Custom Hall Effect Switch Keyboard
Posted: 15 Jun 2012, 12:02
This keyboard was built by my dad and some friends/coworkers sometime around 1980 so it's definitely over 30 years old. 
There was a black one as well but pictures of that will be posted in the workshop subforum. *cough*
 Note the most awesome caps lock key ever, in the far top left corner.
And of course it has an aluminium case which seem to be the latest rage.
This is what's on the inside of this baby:
Note that the hall effect switches are placed in a neat grid which allows simple customizing. If I can find some more keycaps for this might even do that.
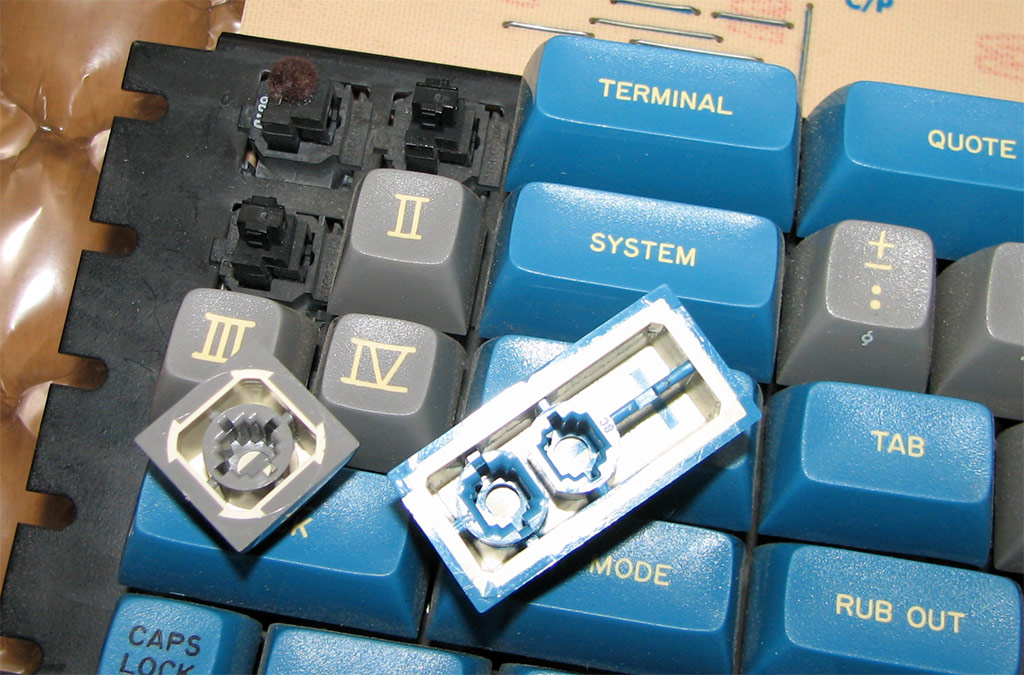
Now here is the interesting part. A picture of the hall effect switches, I assume most people haven't seen them before like me.
So on the left is a switch the way it is assembled. The outer casing, basically just a plastic box with some "rails" (more on the top right) then the slider, with the two magnets (several more colorful examples on the right) and at the bottom the chip with the soldering pins to attach it to the board. Top middle shows two assembled switches, the chip is stuck in the case and the slider is able to move between them.
Now how does this all fit together?
The mounting plate is placed on top of the PCB and the chip is soldered to the PCB through the plate. The rest of the switch is then placed on top of it and held in place with metal clips. The spring is stuck between the slider and the mounting plate. Maybe this picture will clear it up a bit.
I like how this all fits together because it allows you to replace all parts of the switch except the chip with relative ease. Even though hall effect switches are according to wikipedia very robust this seems handy. I already had to take one out and grease it a bit, more on that later.
Okay, on to the keycaps!
I actually like those A LOT.
I don't know what they're made of but they're double shots, spherical and all-in-all look like keycaps people would still dig today.
One thing you could complain about is shining.
But these were shiny on purpose and so they don't look worn at all. I suppose some people don't like shiny keycaps because of the fingerprints on them but I think they look awesome and they definitely age very well.
Sadly international layouts were even less popular back then, so these guys took to making there own. O_o
Apparently spraypainting the caps, rub-on letters and drawing ink and enamling in the end seemed like a good idea at the time. I just mourn those beautiful red doubleshots.
I have to admit that the rub-on letters actually turned out pretty well, though.
The varnish sadly didn't age as well as the material of the caps and yellowed so the umlauts stand out a lot in the first picture.
Alright, enough with the history lesson for today.
Let me know if I misused any of the technical terms; like "varnish" O_o.
If you have any caps for this please get in touch, same goes for switches, I have some spares but more would be nice.
It's some sort of parallel port but I hope that a Teensy will, as always, do the trick and I will be able to actually use this.
There was a black one as well but pictures of that will be posted in the workshop subforum. *cough*
- keyboard
- DSC01703keyboardsmall.jpg (155.07 KiB) Viewed 14356 times
And of course it has an aluminium case which seem to be the latest rage.
This is what's on the inside of this baby:
- inside
- DSC01710insidesmall.JPG (549.89 KiB) Viewed 14356 times
Now here is the interesting part. A picture of the hall effect switches, I assume most people haven't seen them before like me.
- hall effect switches
- DSC01716switches.JPG (498.27 KiB) Viewed 14356 times
Now how does this all fit together?
The mounting plate is placed on top of the PCB and the chip is soldered to the PCB through the plate. The rest of the switch is then placed on top of it and held in place with metal clips. The spring is stuck between the slider and the mounting plate. Maybe this picture will clear it up a bit.
- fancy switchmounting
- DSC01717switchesmounting.JPG (724.38 KiB) Viewed 14356 times
Okay, on to the keycaps!
I actually like those A LOT.
I don't know what they're made of but they're double shots, spherical and all-in-all look like keycaps people would still dig today.
- keycaps
- DSC01720keycaps.JPG (339.12 KiB) Viewed 14356 times
- shiny
- DSC01706shiny.JPG (309.98 KiB) Viewed 14356 times
Sadly international layouts were even less popular back then, so these guys took to making there own. O_o
- painted caps
- DSC01721paintedkeycaps.JPG (393.16 KiB) Viewed 14356 times
I have to admit that the rub-on letters actually turned out pretty well, though.
The varnish sadly didn't age as well as the material of the caps and yellowed so the umlauts stand out a lot in the first picture.
Alright, enough with the history lesson for today.
Let me know if I misused any of the technical terms; like "varnish" O_o.
If you have any caps for this please get in touch, same goes for switches, I have some spares but more would be nice.
It's some sort of parallel port but I hope that a Teensy will, as always, do the trick and I will be able to actually use this.