@kiltannen:
I do not have much experience with PLA. I printed only 0.2 kg of it. It is a bit more stiff and a bit more brittle. It has lower glass transition temperature (just above 60°C) compared to ABS (just above 100°C). So do not leave your PLA case in a car in summer.
Acetone (and ABS-glue) does not work for it. So disregard any instructions involving acetone. People use super glue instead of ABS-glue to glue PLA parts together. The only problem I see here is that super glue is too thin and dries too quickly. ABS-glue dries in about a minute or two after the parts are pressed together. This is true if there is not a thick layer of the ABS-glue (i.e. when the parts actually touch each other). It will not dry completely in that time but it will dry enough so that you do not need to hold it any more. The super glue will dry in few tens of seconds. So you have less time to attach palmPart and keyPart together precisely. It probably will not be a big problem since the gluing template screws will position the part properly. Select screws of just the right length when screwing the gluing template. That way you do not waste time tightening them. Add super glue, tighten the gluing template and press the parts together. In a thick layer super glue will not dry quickly too. So the quick dry time of super glue after the parts are pressed together may be even an advantage. Train at least once without the glue. You will also check whether the parts fit well.
Ask your RepRap chap about how to surface treat PLA. I do not know this.
You can use a thick (i.e. highly viscous) ABS-glue to add even a few mm of material to an ABS part on a place where it is missing because something went horribly wrong. I do not know about such possibility with PLA.
On the other side, PLA tends to curve less when printing. So there is a bigger chance it will print properly. But this should not be a problem since the adhesion pads are quite big.
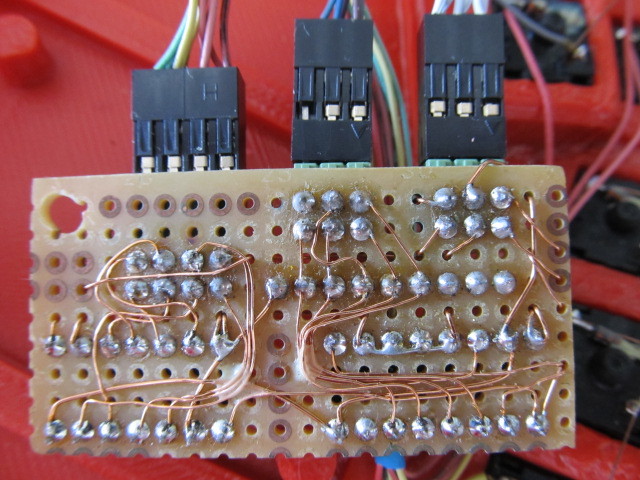
Ach right. You are considering using an universal PCB and a magnet wire to connect the pads. I actually did this for the left side of Katy v0.6.

- universalPcb.jpg (107.76 KiB) Viewed 16428 times
Even in this case I would recommend to draw the PCB (probably with a lot of layers so that you can cross wires) in Kicad. This way it will show you which pads to connect together. Kicad will check your PCB so that it corresponds to the schematic. You do not want to connect wrong pads. It would be hard to find the error.
@kiltannen, CrimsonFlame:
As for as the bootloader. My plan is modify the standard ATxmega DFU bootloader so that it does not check for pin PC3 pin and use that. The standard DFU bootloader is activated when external reset happens (i.e. the reset button is pressed) and PC3 is pulled to ground. The bootloader intended for Katy will ignore the PC3 condition and activate itself when one rests it with the button. I did not compile the bootloader yet (if you want I can try to do it this week). But even the standard bootloader binary is acceptable. PC3 is assigned to oLoad. You wold make a special RJ45 plug which has connected oLoad (RJ45-pin6) and GND (RJ45-pin7) through a 1-10 kΩ resistor. Connect the special plug; reset keyboard with the button; upload firmware; disconnect the keyboard; disconnect the plug and connect the left and right sides normally; and connect the keyboard.
ATxmega128a4u I bought did not come with bootloader preloaded. I'm guessing ATxmega64a4u would come with the standard bootloader preloaded. My guess is based on the "Atmel AVR1916: USB DFU Boot Loader for XMEGA [APPLICATION NOTE]" which mentiones ATxmega64a4u but not ATxmega128a4u. I plan to buy an ATxmega64a4u to verify this. If ATxmega64a4u comes with a bootlader then it may be a better option since its FLASH should be big enough for foreseeable future and one does not need some gadget to burn the bootloader first. One of the cheapest options to get a new bootloader to ATxmega seems to be this:
https://ketturi.kapsi.fi/2013/05/progra ... p-avrdude/
I use AvrDragon since I need a debugger too.
@CrimsonFlame:
It should not be a problem to add right hand side shift register support to EasyAVR to keep the right/left hand side connection within the 8 wires of an ethernet cable.
The LCD is FDCC0802C-FLYYBW-51LK.
As for as BOM. I can do only ATxmega version of BOM. Not sure whether you will go ATmega or ATxmega way now. I'm not in a hurry with BOM since it seems you and kiltannen will actually need a somewhat different BOM than I.
Shipping rates of some companies are crazy. E.g. 7bit can deliver from Berlin to Slovakia for 2€ (no tracking). There are businesses in Germany who are asking 70 € for shipping (probably with tracking). Shipping with tracking should be about 10 € or even less. E.g. Farnell wants 5€ for shipping with tracking from UK.
