Page 1 of 1
Variable weighting cherry.
Posted: 20 Sep 2012, 12:23
by fossala
Soon I will have a selection of cherry switches and springs and I'm looking at making a variable weight keyboard.
The springs I have are
cherry red/brown/blue - 45g
62g korean - 47g
cherry clear - 55g
cherry black - 60g
Would these weightings be correct?
I also have to pick between stem, I will be either using black/red or clear.
Anyone have any thoughts on this/done it before? I have done it on a 4 switches on my numpad with black/black/62g/red It seems to feel natural, would I get any benefit from swapping out the second black with clear spring (won't have until middle of October). Are clears less stiff than blacks? I always found it impossible to bottom out on clears.
EDIT: just swapped out a black for a clear, it is more stiff. Or feels it anyway.
EDIT2: Won't be using clear springs, too heavy. Need to decide either
black/black/62g/red
black/62g/62g/red
black/62g/red/red
Posted: 20 Sep 2012, 12:47
by HzFaq
I did a variable mod on my Poker; I had clears on the index fingers, blacks on the next 2, reds on the pinkes/mods and a clear on the spacebar, all with linear stems. I liked it, but I mostly use my home computer for gaming so the different force in the WASD cluster threw me and I changed it back. Might consider doing it to my work Filco though if I can ever be bothered to desolder it...
edit - I used linear stems mainly because I had loads lying around, but also because I'm not sure how the difference in feel of the bump in an ergo clear vs a vanilla clear would be. I can see it being kind of nice having more tactility on the pinkies, but at the same time I can also see it being distracting.
Posted: 20 Sep 2012, 12:54
by fossala
I think I will do it with linear stems. It will be being done on a g80-5000.
Posted: 20 Sep 2012, 15:38
by Jim66
fossala wrote:I think I will do it with linear stems. It will be being done on a g80-5000.
I thought about doing this to mine but I bottled it.
I don't like changing stems/springs without desoldering switches and I didn't want to start completely desoldering a 5000.
Posted: 20 Sep 2012, 15:57
by fossala
I find it very simple. All you need are 2 small screwdrivers. Never broken a switch yet and if I did all I would have to do is re-solder the single one.
Posted: 20 Sep 2012, 16:16
by Jim66
Yeah, I didn't try it as a couple of the switches (the ones right in the middle next to where the halves separate) are turned on their side so that they fit. The case makes it impossible to get a screw driver in there; you'll have to desolder those ones.
Posted: 20 Sep 2012, 16:21
by fossala
I just did it on the h,f,n keys. Where they the ones you where talking about?
Posted: 20 Sep 2012, 16:24
by Jim66
fossala wrote:I just did it on the h,f,n keys. Where they the ones you where talking about?
Yes.
I'll be quiet now.
Posted: 20 Sep 2012, 16:25
by fossala
Not trying to be horrible, just asking

Posted: 20 Sep 2012, 16:29
by Jim66
Lol, no offence taken, I was joking.
When I thought about doing it, those keys looked more hassle than it was worth. It's good to know that it can be done on those keys.
Posted: 20 Sep 2012, 16:34
by fossala
I'm waiting on the sticker groupbuy from GH and switches from 7bit until I can finish it.
I'm going to use different stems for different weightings.
Black=black stem
red=red stem
62g=grey stem
Posted: 20 Sep 2012, 17:08
by fossala

- ergokeyboard.png (13.68 KiB) Viewed 4124 times
How about this? Should work.
Posted: 20 Sep 2012, 17:11
by Jim66
Do the grey steps have a tactile bump like clear? If so, I would just stick to red and black linear.
I think it could work really well.
Posted: 20 Sep 2012, 17:12
by fossala
No it will be the non-tactile grey switches. Exactly the same as red/grey. Just thought it would help me to remember what is under each switch.
Also put a "super black" under the caps lock, that should help accidental miss-presses.
Posted: 20 Sep 2012, 17:16
by HzFaq
Why not mod it to CTRL/backspace or something?
http://deskthority.net/workshop-f7/rema ... tml#p14552
edit - Layout looks good though, I'd look at another row of "greys" personally but see how it goes I guess.
Posted: 20 Sep 2012, 17:17
by fossala
I want to map the left space to backspace but I'm not good enough at soldering to do work on a board that costs this much.
Posted: 20 Sep 2012, 17:32
by Jim66
fossala wrote:I want to map the left space to backspace but I'm not good enough at soldering to do work on a board that costs this much.
My soldering skills are worse than useless and I managed to do it; I'd say it isn't as difficult as you would think.
I would also as that having the left space as a backspace isn't as nice as you would think. It feels nothing like the kinesis (I actually loved this) as it is very "clacky" and spacebar like... It just don't think it works for fast, repeated backspacing, the key just isn't as solid as the kinesis.
Posted: 22 Sep 2012, 17:16
by fossala
Still waiting on my stems. Does anyone know how to take the g80-5000 apart? I can get most of the case off by uncliping the clips then pulling but it seems to not come apart. I obviously don't want to break it.
Posted: 23 Sep 2012, 09:21
by fossala
Changed the springs that are going to be in the keyboard.
Going to exclude blacks, and use 55g korean springs instead. Hope it isn't too light.
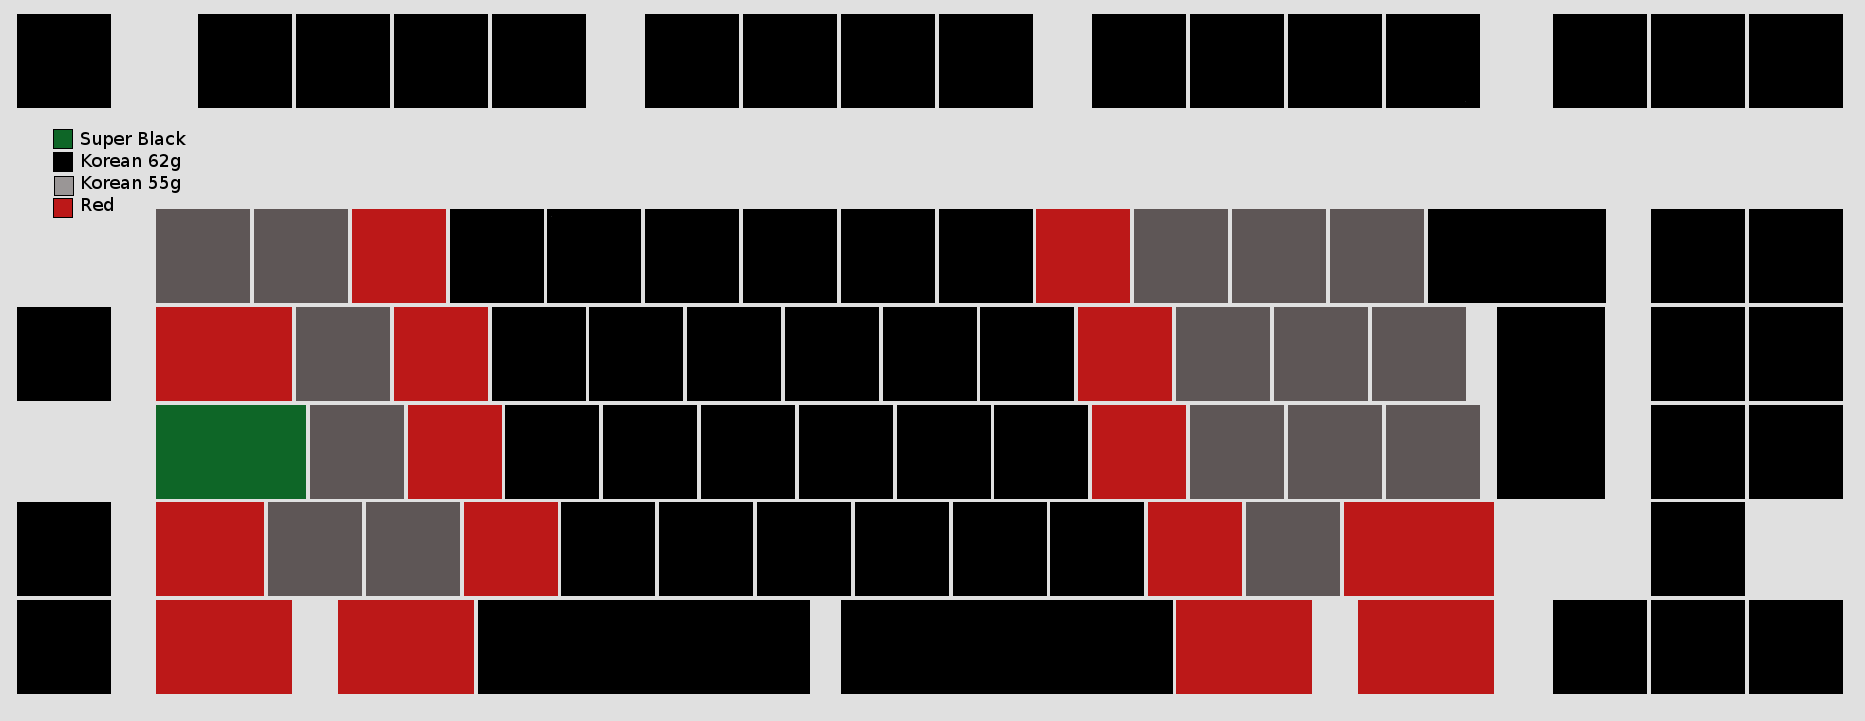
- ergokeyboard2.png (14.52 KiB) Viewed 3970 times
Posted: 23 Sep 2012, 13:41
by Jim66
fossala wrote:Still waiting on my stems. Does anyone know how to take the g80-5000 apart? I can get most of the case off by uncliping the clips then pulling but it seems to not come apart. I obviously don't want to break it.
You need to unscrew the two screws (red circles) then you need to release the two clips (green circles). It isn't immediately obvious how you get these two clips off. You need to put something into the whole and push on the piece of plastic; this means that you'll need to push towards the inside of the keyboard. Everything will then pop apart.
Posted: 23 Sep 2012, 13:56
by fossala
The clips were fine, didn't see the screws. Thanks.