Man vs MicroSwitch: Converting a SD16234
Posted: 27 Aug 2018, 00:56
- openpicflipped.jpg (3.08 MiB) Viewed 53797 times
``Gosh if I could just get those Nike Pumps I know I could dunk.''
I was doomed to eternal suffering it seemed until one day quite by chance I noticed a video recommendation while I was searching for some Slime tutorials. This video had a maniac on the screen with an actual Space Cadet keyboard and he had a voice like Barry White it was one of the most amazing things that I had ever seen. The only problem it seemed was that it hadn't been converted to work with a modern computer, he couldn't use the damn thing. It was a shame that it was nothing but a shelf queen. I had dreamed of typing on the Space Cadet, not staring at it through a display case.
If I could never have a Space Cadet and I had long ago accepted that fact. (Yeah I called Symbollics, yeah I'm on their stupid waiting list.)
If I couldn't have the real deal, then surely I could have the next best thing. I could make a replica. Now I knew I could go the cheap(cheaper) way and just use Cherry or Matias and try to re-purpose some already made kit and maybe order some Caps from Signature Plastics. But I thought if I was going to do it, I might as well do it as perfectly as I could. I decided that would at least be a keyboard made with the same switches and preferably on the same type of PCB with an identical housing made from identical materials. Keycaps could be made, but preferably I could find enough donor boards and mix and match.
I knew this would be expensive and require a good amount of work on my part but I'm a hacker and I could smell the beginning of a project brewing. As any good hacker would, I dove in head first at full speed.
That said once I began my research into MicroSwitch the Wiki was my primary source of information so I have to give a huge thank you to the people that are responsible for writing the articles and posting the links. The SD16 documentation was priceless. I also need to thank MMcm(Mike McMahon), who I don't know and have never had any contact with. His code gave me a good jumping off point and made my conversion possible. I really also need to thank DorkVader, XMIT, and all the others on the boards who had already broken this ground a bit before I trod on it. Of course another thanks to the admins of this site for keeping it all going in the first place.
Enough chit chat...
The four pin has an output and an input, the input is an enable pin. Here is the relevant quote
`` The modules output signal is valid when the input interrogation signal(clock pulse) is low and the key is depressed.''
When I read this paragraph I instantly knew I could have full n-key rollover with these switches, they were designed for it.
This is for all four pin SD-16 switches as far as I know, the switches output is variable though I believe some switches hold open while others emit a pulse. There might be other types but the documentation we have doesn't mention them so I can't say one way or the other. But all of the four pin switches have an enable that when high inhibits output.
----------------------------
| Four Pin | Three Pin |
|____________|_____________|
| ground pin | Ground Pin* |
| output pin | Output Pin |
| enable pin | Power Pin |
| power pin | |
----------------------------
The three pin SD type is I believe an early example of some of the more modern low power Hall Effect transducers that are currently on the market.
The three pin has two modes of operation. It can operate in a normal level sourcing mode with a power, ground, and an output (pin). When used in this manner the switch works just like any four pin sans enable. To operate in what is termed 'Scanned Mode' the ground pin becomes the negative supply and is used as an enable. Applying current to the negative (ground) pin starves the switch putting it into an off state. When the current is removed the switch can draw power and function normally. Of course if the plunger is not depressed the output remains low.
I had wanted to find a MicroSwitch board with the same type of switches that were found on the Space Cadet. But there were none to be found on ebay. So after a good two or three months I finally settled on a board that had the right qualities. Which honestly were cheapness and switch numbers that weren't of the pulse variety.
At the time I tried to get switches that were of the logic scan signal type on the Wiki switch listing but I really think that all the four pin SD16 switches are logic scan signal output. We only need to differentiate between pulse and hold. (Note: This is my personal conjecture and I can't verify this I only have a few switch types.)
I felt like a hacker again, I dove in as any good hacker would headfirst and with full abandon. My wife thought I was crazy. I had spent over a hundred dollars getting the keyboard and a Teensy with headers. Luckily, I already had breadboards and a Fluke Multimeter but no O-scope or any other high tech diagnostics. I honestly didn't know enough to even know if I needed all of that stuff.
I made a power supply out of a cell phone charger that output 5v and began printing out all the documentation that I could dig up about the SD series and Honeywell in general, which is very sparse. There is no home of MicroSwitch keyboards like you have with IBM or SGI and the Wiki has just about everything that has been gathered about these interesting switches.
After a few days of waiting it arrived and I had planned on using some of my vacation from work to devote all my time to working on the project. I wanted to give something back to the community that had helped me so many times when I needed to identify a board or when I was trying to determine if a switch was authentic or a clone.
I wanted people everywhere to be able to use these old MicroSwitch boards. The feel of those keycaps and the dream of having something that sexy on my desk was also a big factor.
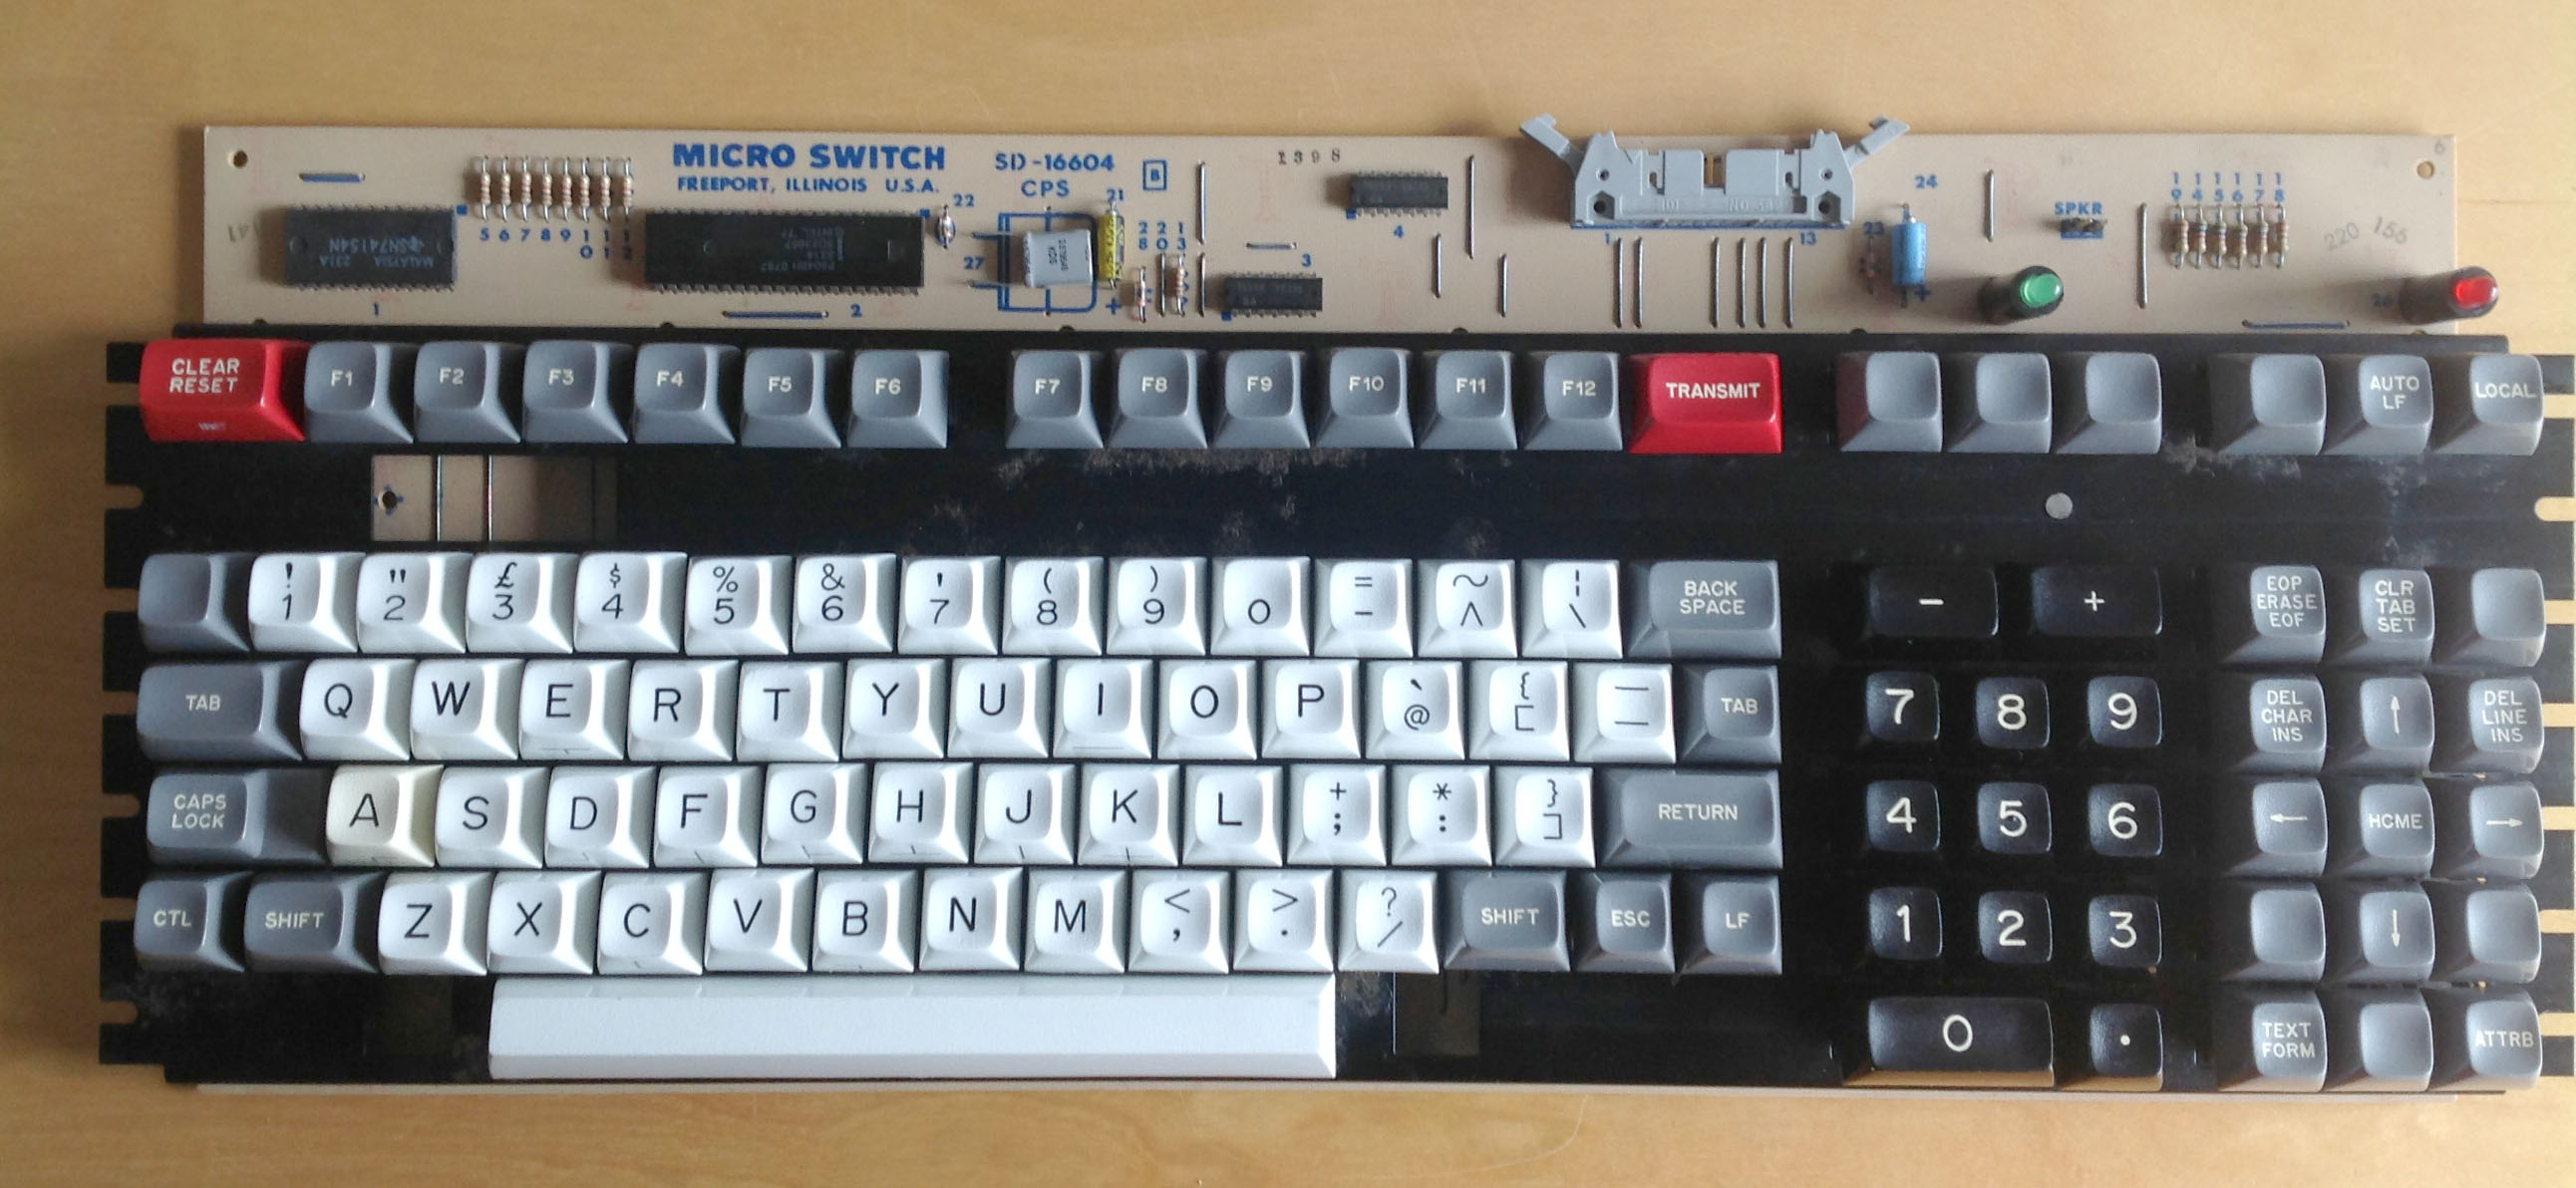
When I opened the box this is what I saw,
- establishingkeycaps1.jpg (3.74 MiB) Viewed 53797 times
This is what she looks like naked, I love the modular mounting system that would allow for awesome customization as far as I can tell there is no reason why you couldn't turn this into a Space Cadet type. I would just need to get more switches and have a keycap set made or just accept having a motley assortment of keys.
- naked1.jpg (4.22 MiB) Viewed 53797 times
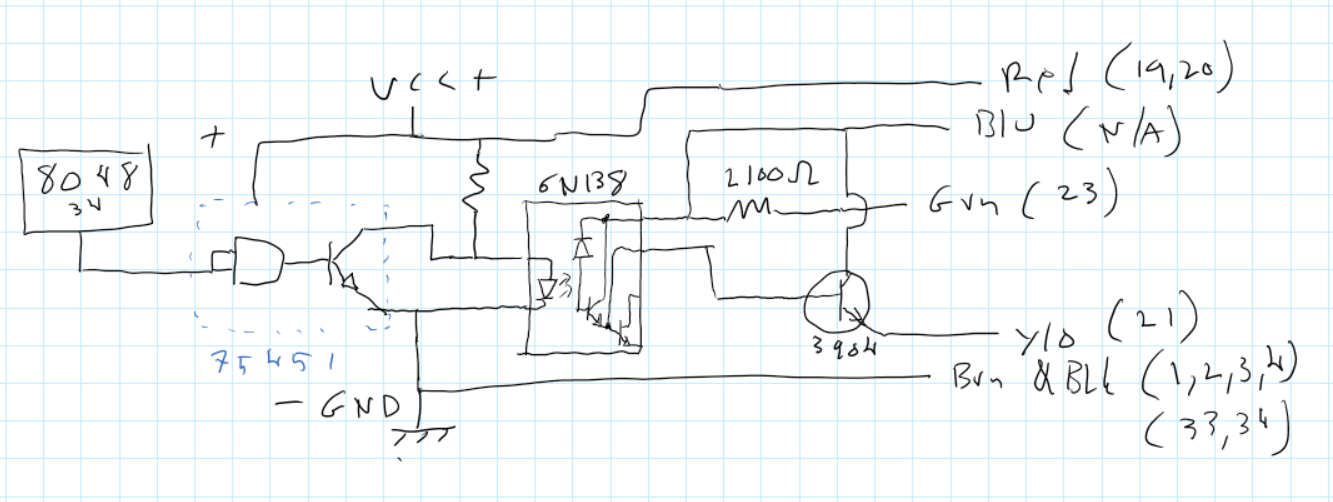
After carefully going over the board, I began to write down the part numbers for the different chips that had been placed on the upper edge of the PCB. A few of the chips didn't have anything to do with the actual operation of the keyboard, such as an optical driver for a light pen.
I used the datasheet of the TI 74154, which is a four to sixteen line demultiplexer to determine where the power and ground lines were, double checking myself against the big caps just below the original cable connector to be sure. I had soldered some female connectors onto a cell phone charger and I used this as my test power supply feeding the board with five volts dc.
I had already used the Multimeter's continuity tester and I really can't stress enough how much trouble and time it saved me. I think you can get away without having an O-scope but you can't get away without having a good Multimeter with a continuity tester(The louder the beep the better). Such a tester lets you with no power supplied to the board, place a probe tip on say a leg of an IC while placing the other on the connector pins to see how the connector is laid out.
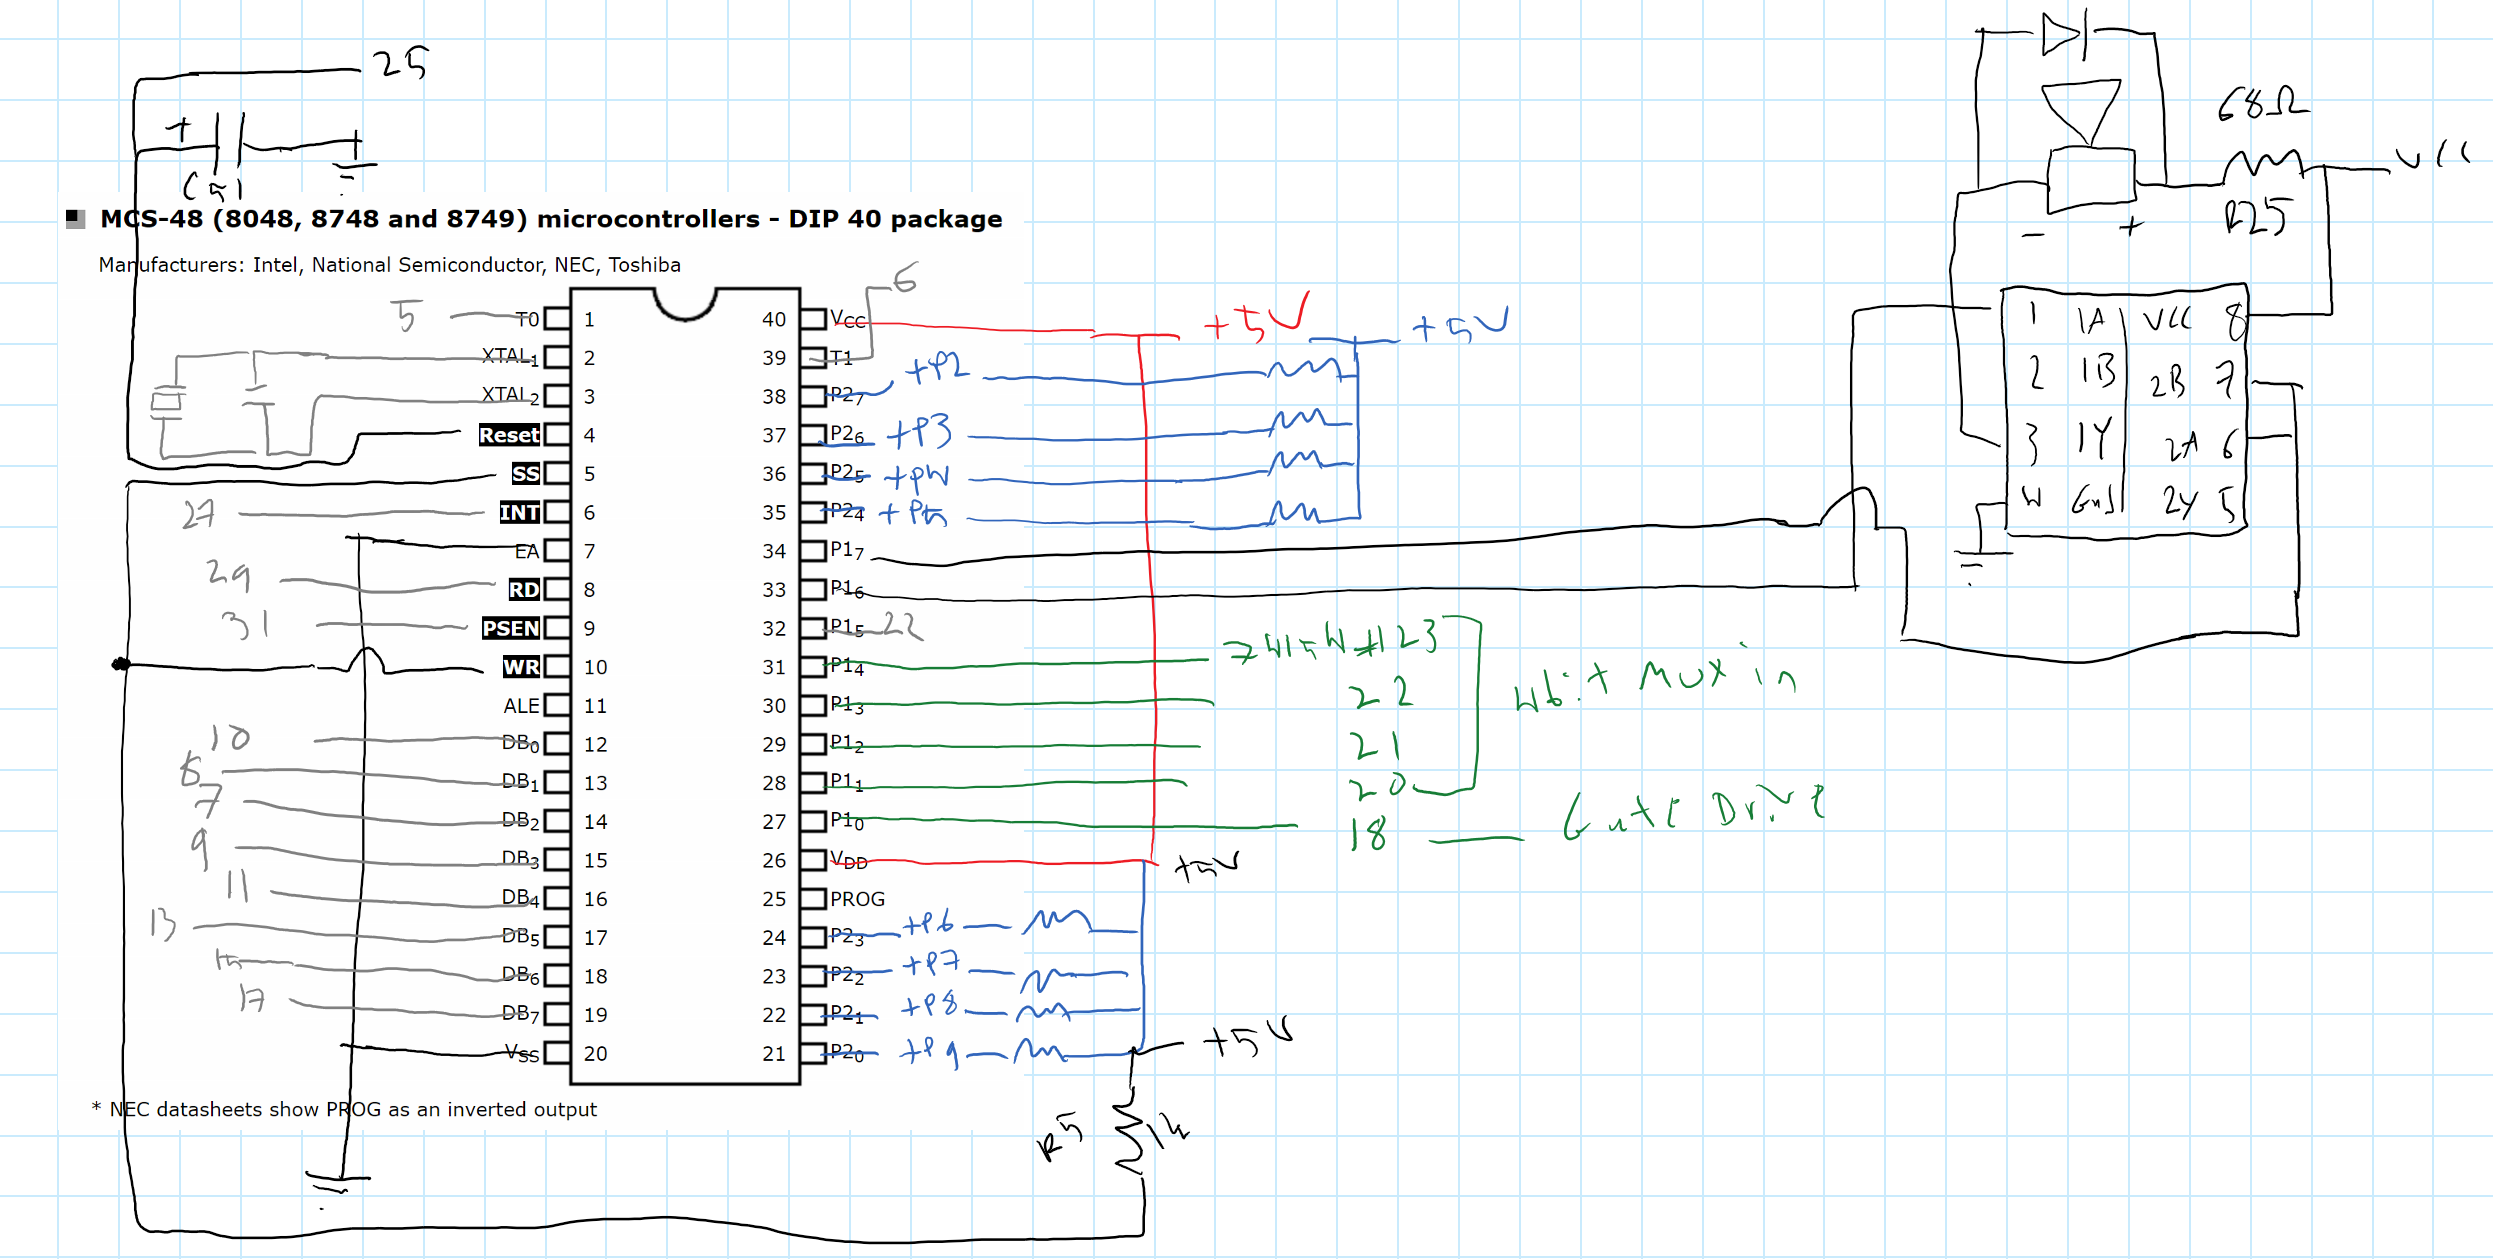
Then using my Multimeter, I checked the eight test points that I had deduced were tied to one of the eight rows which I realized each corresponded to one pin on the cradle that had held an Intel 8748. I felt at this point I was making progress.
But my probes showed that there was zero volts on the test points with FIve volts supplied to the board. I checked various points on the board and found that they all had power. I asked my wife to press down keys so I could hold the probes steady on each of the test points in turn which I hoped would produce a voltage when depressed, still nothing.
Feeling defeated I went back to the SD Keyswitch document and found that someone had scribbled a diagram of a four pin hall effect, they had even labelled the pins correctly and I could clearly see that one of the pins was an input.
In a flash of insight I reached for a jumper and applied a voltage to one of the inputs on the de-multiplexor and once again probed the testpoints but was disappointed yet again.
So I rechecked the 74154's datasheet, combing through the short document. I laughed aloud when I realized my error. There were two enable pins on this chip, one had already been tied low but the other had a trace to a pin on the 8748. So running another jumper from it to ground, I tried again.
Powering up the board I used a jumper and applied a voltage to a single input on the 74154. My probe quickly found voltage on one of the rows and when I depressed a key the current disappeared. I released the switch and the current returned, if I were an athletic man I would have done a back-flip.
Now I just needed to program some kind of driver but I really didn't know anything about creating a USB device much less an entire driver library.
So starting small I wrote a simple binary counter that worked by bit shifting a one. Then set up a while loop to strobe the enable lines one column at a time. While I scanned the other port for any lines that went from high to low.
I quickly began to view the sixteen outputs of the de-multiplexor as the columns in a standard keyboard.
So my debug program was watching for any changes as it ran through a for loop enabling an input and then checked the 8 bits I gathered from reading the D port on my Teensy. I then set up a simple if statement inside two for loops, to keep up with where I was in the array so that I could print out a number to provide my location in the keymap.
This worked off the PRJC Debug Print function and it simply said KeyHit and then spit out the hex number of where the key was in hex.
It took me a little while to get the timing worked out right. I was suprised at how quickly I could poll the switches. Now this was progress. I now had a working MicroSwitch board with inherent nkey rollover I just needed a driver.
In the end I decided on the LUFA driver and as I said earlier I used the LMkbd project as a jumping off point.
I hooked up everything with jumpers to my breadboard.
| 8748 pin | Teensy 2 pin | Signal |
|-------------|---------------|--------------|
| 20 | GND | GND |
| 40 | 5V | +5V |
| 27 | PB0 | Demux Strobe |
| 28-31 | PB4-7 | Demux Address|
| 21-24 | PD0-3 | Input |
| 35-38 | PD4-7 | Input |
Once I had the driver up and running I began the laborious process of setting up my KeyMap.
After finishing this up, I connected everything more permanently with male to female connectors. I hooked the female end to the header pins I had soldered on earlier. I then drove the male ends directly into the cradle that had already been attached to the board making sure everything was well connected. This finally brought us up to this point.
- My teensy hooked into the old Micros cradle
- cradlepic2.jpg (2.51 MiB) Viewed 53797 times
- keypic2.jpg (3.84 MiB) Viewed 53797 times
- holdingteensy.jpg (3.5 MiB) Viewed 53797 times
My main problem is that several keys on my board have unique shifts and I couldn't get the proper HID KeyCode for them.
This is something I've noticed on several MicroSwitch boards the open parenthesis is placed over the eight and the close parenthesis over the nine. There is no shift over the zero so this moves all the alpha-shifts one row over to the left.
There are in fact more than a few keys that are non standard and so you have to just assign them to something that's close or just use what that position would be on a standard board.
- loosekeycaps.jpg (67.61 KiB) Viewed 53797 times
Using the board is a little tiring. The non-standard layout drove me nuts so I messed around with the Keymap until I had the modifiers I needed for my day to day computing. With the keymap arranged properly, I started to use the board as a daily driver.
The switches are nice but heavy and tiring. They have a long travel and being linear I always bottom them out. I love the sound they make, but after fifteen minutes of typing I feel like I've been running a marathon. It's almost a piece of exercise equipment for typing strength.
The construction of the board is top notch. The PCB is thick as hell and most of the boards basic components were all military grade. It has a modular top plate that allows you to move switches around in a grid based arrangement.
Sadly I worry that we will never have a one size fits all ``Soarer'' type converter for these MicroSwitch boards. Or even a single tutorial to convert multiple board types.
HoneyWell (MicroSwitch) made mostly unique solutions to their customers specific problems. Most of the boards that I see were taken from old combined monitor, tower, and keyboard designs. These keyboards weren't designed for some protocol, they were made to work with that specific computer system which was designed in its own unique way. This creates a problem for anyone wanting to convert such a board.
Are there any XT/AT Honeywell Hall Effect boards?
I could probably come up with a way to convert most SD boards to USB or PS2 but I would have to physically work on the board and decipher it like a puzzle. Then formulate a method that would be unique for that specific board type. I'm not sure there can be one single solution.
So I have to admit that it seems the best way to go about having a modern MicroSwitch Keyboard will be designing a PCB that works with the SD type switch. It would then be trivial to use my McMM modified driver. A Kiibohd scanner module could also easily be written to work with such a PCB.
But in this idea of creating a new PCB and removing the switches from the old boards, are we not destroying something that is beautiful to create something that in all honesty will probably be less beautiful. A part of me cringes at the thought of seeing the post.
"My new old school genuine Hall Effect MicroSwitch Poker brauh."
But these switches were designed to be used and if things aren't used they have a habit of disappearing. Maybe we just need to use some discretion guys. Lets work on all the Silent 700's first. I can even draw up a KiCad project for it if no one else wants to do it.
If we come across something truly unique and truly special we should try to do a proper on board conversion to bring it back in its original state. This will be more involved, more expensive, and it might not even be possible to do in every case. But I honestly don't think destroying a work of art is worth having the coolest board on the block. That's just my humble opinion though.
Thanks
LessThanZero <0
Sidenote: I can also upload the hex and source of my code if anyone is interested because the Lmkbd source won't work out of the box, at least it didn't for me. I had to invert the logic and rewrite a few other functions. I have been working on another version based off of my Scanning function that I wrote and has a built in method for creating your Keymap.