[WIP] Cherry G80-3000 60% Mod

snypR

24 Oct 2013, 00:50

Hello there,

I was lurking the Forums and the Wiki for quite some time now and finally got myself to show you guys the project I'm currently working on. Since I always wanted a 60% and had a somewhat broken G80-3000 left over, I decided to just mod it!

Anyway, Here are some Pics:

Image

Image

I'll replace those two pictures with higher quality ones soon, took them in a hurry ;)

Anyway: Things I learned:
- Don't be impatient with the cutting, and especially don't try to do a "Slice and Break" with a boardcutter, this will only mess up your PCB (2 open contacts)
- Document everything REALLY REALLY well. I can't stress how important it is to write down where your leads go to if you wanna solder them correctly.

ToDo:
- Get Alt, Menu Key and 0 to work (Trace+Solder)
- Rework Case
- Paint Keys
- Assemble everything ;)
User avatar
Muirium
µ

24 Oct 2013, 00:55

There's nothing like learning the hard way. Welcome to the 60% club! But what are you doing for a function layer? 60's really need them to navigate.

User avatar
HzFaq

24 Oct 2013, 09:24

My first G80 TKL mod boiled down to "fuck it, hacksaw the PCB and sort out any problems after that". Luckily I just had to rewire 2/3 keys but I remember noticing if I'd moved my cut a little to the left I wouldn't have had to do any...It's all about the planning with these things...

Are you re-using the Cherry controller? I can't quite make out what everything is wired to up there. Good work though, I love these kind of mods, its always interesting to see the different ways people deal with the issues that always seem to come up.

snypR

24 Oct 2013, 12:04

@Muirium: Yeah, I just love soldering and love figuring out how stuff like this works :P. Just one (probably stupid) question: What do you mean by function layer? Like the F-Keys?

@HzFaq: Yeah, If I had done some more planning I probably wouldn't have had to solder so much. I cut right in between the J12 and J13 Bridges, figured why solder some bridges if they are already there :P. Yes I'm reusing the Cherry Controller, gonna get a better picture of it soon, where you probably can see how it is all wired up, otherwise I could write down which key is the one I soldered to the connections on the controller, if you want.

User avatar
Muirium
µ

24 Oct 2013, 12:14

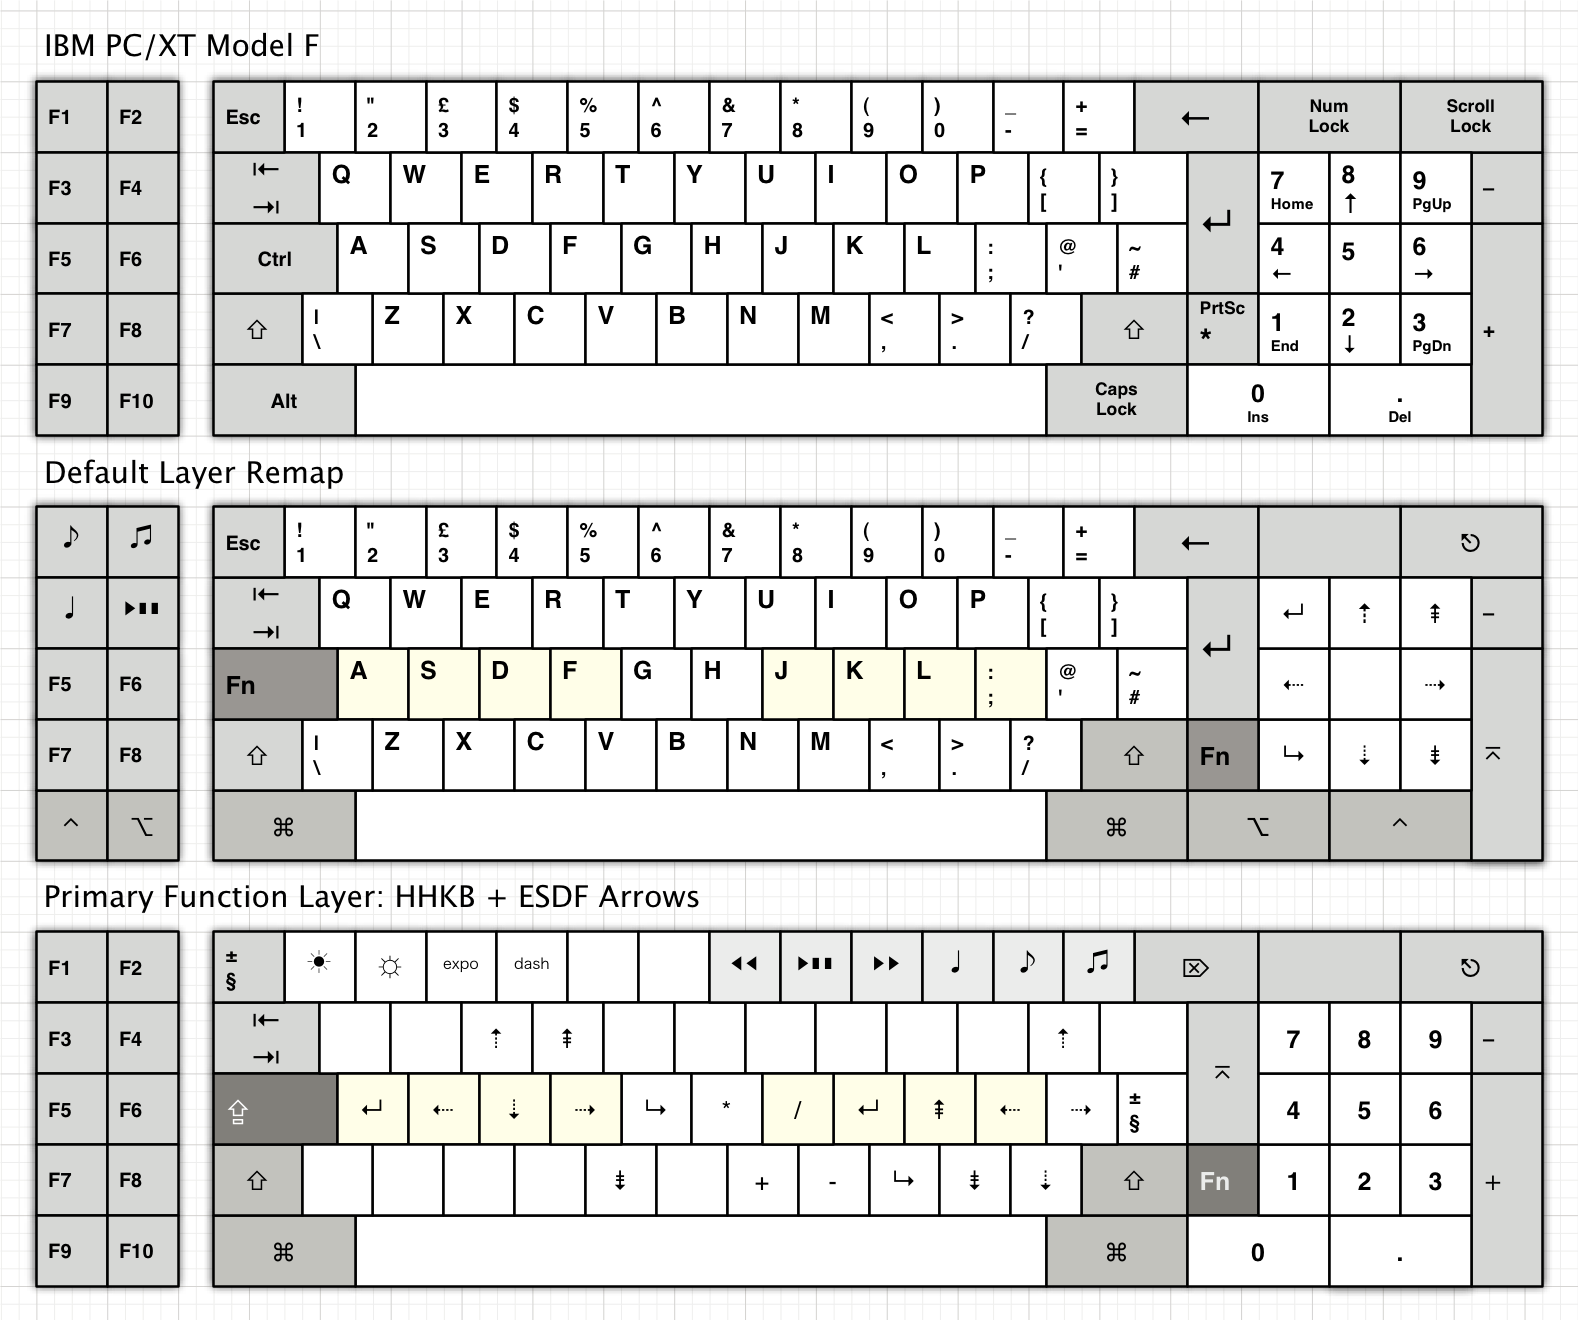
Layers are where you put the missing keys like arrows, home/end etc., that you just chopped off! Here's a diagram of how I map my IBM (with a programmable converter). The third picture is the function layer:
Image
When I press either of the function keys I've set aside, everything else I press is from that layer.

snypR

24 Oct 2013, 14:10

Ah! I see! Well, I thought of using AHK to Map some Keys I really need:
- I never was a big fan of media keys so I don't need them.
- F-Keys would be ALT (As FN)+1 to =
- Arrow keys can be mapped to right ALT (As FN)+WASD.
- Got a external numpad (Rubber dome but whatevs)

User avatar
Muirium
µ

24 Oct 2013, 14:59

Good stuff. The art is in picking keys you never need (caps lock for me) and putting the targets where you'll remember them. Then practice.

I use too many beastly old keyboards, on too many computers, to try a software fix and I often forget all about them. But that's just my use case.

snypR

24 Oct 2013, 23:04

Well, so far everything is working quite nicely, fixed the Menu key, but the Alt Keys are still messing it up quite a bit. Does anyone of you guys know in which circuit(s) the Alt keys are integrated? (Both, the left and the Alt+Gr on the right). Right now pressing the Alt+Gr is giving me a Down-Arrow. I'm gonna check on why and how once I get the time to do so. Thanks in advance :)

Post Reply

Return to “Workshop”