Talk:HHKB Professional JP Type-S
The following Talk page discusses Happy Hacking Keyboard Professional JP Type-S. Whilst retaining the subject on the said keyboard the information contained hereonin may/may not be suitable for usage within the actual page or maybe added to other areas as needed. Feel free to add suitable subjects that may otherwise be considered as unsuitable for use within the actual page for various reasons.
Tuxsavvy's notes
Cleaning
WARNING Cleaning your Happy Hacking Keyboard Professional JP Type-S like this will void any warranties as it requires disassembly and there will be scuff marks on the sliders during the process. I take no responsibility for any losses during the process. You are therefore forewarned.
Thanks to cookie and OO2 for input on HHKB disassmbly. cookie's rough guide can be found here: http://deskthority.net/photos-videos-f8/whoops-i-did-it-again-hhkb-pro-1-t6955.html
What you will need:
* Small Philips screwdriver.
* Small flathead screwdriver, ideally from precision screwdriver set.
* Cleaning/Denture tabs x3.
* An empty jar big enough to hold all the key caps.
* A clean and dry rag. Microfibre cloth is optional but not a necessity.
* A toothbrush.
Optionally:
* A camera. To take photos of before disassembly and can be used to guide one back to placing the keycaps, etc back into their respective places.
* Anti-static wriststrap. Unless you know how to handle bare electronics without discharging static electricity from yourself.
* Gloves and/or shower cap. If you want to prevent hair/grease getting caught.
* Keycap puller tool.
* Stabiliser lube such as Mechlube 2, Ro-59 or a mixture of other lube that is safe for use on keyboards.
Cleaning and/or disassembly requires patience. The lack of patience may break the tabs that holds the two keyboard cases together. [1]
- Remove all the keycaps (ideally) using keycap puller tool or bare hands.
- With small Philips screwdriver, turn the keyboard upside down and unscrew the three screws on the undersides of the keyboard.
- Carefully open the keyboard case from the rear, starting from where the screws were used to hold the keyboard cases together. Do not completely separate the upper and lower pieces of the keyboard. At this point once getting a small opening from the rear of the keyboard, flip the keyboard upside down and again holding the upper part of the keyboard case, unscrew a screw that holds the controller. The controller is a small PCB. Optionally, you can detach the cable from the controller however you will need a small flathead screwdriver. Carefully wedge the connector from the sides where there is a gap with a flathead screwdriver.
- Once the screw that holds the controller in place has been removed or once the connector between the controller and the main PCB has been disconnected. Either remove the controller PCB from its own position whilst holding the top half of the keyboard case.
- Carefully nudge the halves of the keyboard case. There are three latches that holds the two halves of the keyboard together. They are at the opposite ends of where the three screws that were responsible for holding the rear end of the keyboard together. Start with a side, wiggling either the top or the bottom half of the keyboard until the latches eventually will let go of. No tools are required in this process as the latches does not hold the two halves tightly.
- Once the two halves has been completely separated, turn the top half of the keyboard onto the side where the PCB are seen. Start unscrewing 14 or so screws that holds the PCB to the top half of the keyboard case with a small Philips screwdriver.
- The PCB can now be safely removed from the top half of the keyboard. At this point in time you will notice the PCB on the obverse side reveals the gray rubber cups. The springs are inside. If you have not removed the controller PCB from the bottom half of the keyboard case, do so. The controller PCB only has one screw that holds it in place apart from a small plastic tab. Once the screw has been removed the controller PCB would be able to move a little more freely and allow it to be removed from its former position.
- Once the PCB has been removed, it is time to work on the sliders. With a small flathead screwdriver, wedge the head in between the slider and the top half of keyboard case. With one hand,, push the slider firmly inwards whilst the other hand wedge against the slider. At this time the slider should be able to pop right out. Initially it is easy to exert too much force and have the sliders bouncing around the place. However with enough practise, popping the sliders out may not be the same as how you initially started it. Beware that the Type-S has foam that sits on the bottom of the sliders, the notch on the top of the slider not only holds the slider in place on the keyboard case but to also hold the foam. Once the slider has been removed, the notch will become noticeably damaged which may allow the foam to slip out.
- There are three stabilisers on the Happy Hacking Keyboard Professional JP Type-S. They are under the left shift, spacebar and the enter key respectively. These sliders do not have retainers on top but are fixed in by the small metal rod. To remove these, use a small flathead screwdriver to wedge in between the metal rod and the keyboard case. With a slight twist on the flathead screwdriver is enough to remove the stabiliser. Careful when removing the slider as the foam can easily fall out as well as the small metal rod. The sliders with stabilisers for record can only fit in one way. There is no way to mistakenly put the slider on the wrong way round.
- Once all the sliders has been removed from the top half of the keyboard case. The two halves of the keyboard case along with the keycaps are safe for washing. The PCB, rubber cups, etc on the other hand are not.
- Put all the keycaps into a spare empty jar along with three cleaning/denture tabs. I used Steradent Extra Stength. For the cleaning, follow the guide as mentioned on the cleaning/denture tabs. In my case it was warm (not boiling) water and let the keycaps sit in the solution for 10 minutes before thoroughly rinse as well as scrubbing for each keycaps.
- Once the key caps are cleaned (or are cleaning), you can work on cleaning the keyboard case. Household detergents might be enough alone to clean any scruff marks on the keyboard case. For both key caps as well as the keyboard case it is best to wipe them dry with a clean and dry rag. Again optionally a microfibre cloth if you desire cleaner results.
- For the rest of the drying process, you will require a good weather with sun doing the work. In my case I did it on a midday/afternoon sun during autumn. The keyboard cases should not be sitting in the sun for too long (as they are made of ABS and may yellow), in my case 5-10 minutes is enough for both sides once they were dried with a rag. The key caps may take roughly an hour each side (total of approximately two hours but are ok to sit in the sun longer because they are made from PBT). More time maybe needed pending on seasons and climates in different areas.
- . Reassmbly is essentially the reverse process of disassembly.
- Disassmbly/Cleaning photos
Xmodmap and virtual keyboard layout
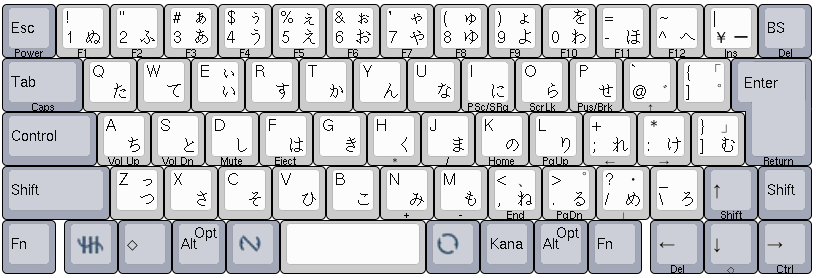
Although Xmodmap is old and has been deprecated amongst some *nix the following idea may give people some insights on the keycodes found on HHKB Pro JP. To best visually represent how both the keyboard would look like thus the default keycodes to be presented.
Above shows slight variation to what the keyboard actually looks like. The tool used to create the virtual keyboard can be found on this website:
Keyboard layout editor - http://www.keyboard-layout-editor.com/
- TIP: You might want to save the raw data of your keyboard layout into some text editor on your computer when using the site as it will not permanently save your layout. To share your layout with others, click the Save button and a new text below all the keyboard editing preferences shows a green dialog box saying that the keyboard can be accessed at a link.
Information on the raw data to be used on keyboard layout editor website to closely mimick the above image (with the exception of a few things). Thanks to adhoc_ for inputs.
Raw data for use on Keyboard layout editor website (copy and paste the following data into the raw code part of the keyboard layout editor website):
{backcolor:"#ffffff"},
[{y:1.5,c:"#a2a8b8",f:4},"\n\n\n\nPower\n\nEsc",{c:"#cccccc",f:5},"!\n1\n\nぬ\nF1","\"\n2\n\nふ\nF2","#\n3\nぁ\nあ\nF3","$\n4\nぅ\nう\nF4","%\n5\nぇ\nえ\nF5","&\n6\nぉ\nお\nF6","'\n7\nゃ\nや\nF7","(\n8\nゅ\nゆ\nF8",")\n9\nょ\nよ\nF9","\n0\nを\nわ\nF10","=\n−\n\nほ\nF11","~\n^\n\nへ\nF12","|\n¥\n\nー\nIns",{c:"#a2a8b8",f:4},"\n\n\n\nDel\n\nBS"],
[{w:1.5},"\n\n\n\nCaps\n\nTab",{c:"#cccccc",f:5},"Q\n\n\nた","W\n\n\nて","E\n\nぃ\nい","R\n\n\nす","T\n\n\nか","Y\n\n\nん","U\n\n\nな",{a:0},"I\n\n\nに\nPSc/\nSRq",{a:4},"O\n\n\nら\nScrLk","P\n\n\nせ\nPus/Brk","`\n@\n\n゛\n↑","{\n]\n「\n゜",{x:0.25,c:"#a2a8b8",f:4,w:1.25,h:2,w2:1.5,h2:1,x2:-0.25},"Enter"],
[{w:1.75},"\n\n\n\n\n\nControl",{c:"#cccccc",f:5},"A\n\n\nち\nVol_Up","S\n\n\nと\nVol_Dn","D\n\n\nし\nMute","F\n\n\nは\nEject","G\n\n\nき","H\n\n\nく\n*","J\n\n\nま\n/","K\n\n\nの\nHome","L\n\n\nり\nPgUp","+\n;\n\nれ\n←","*\n:\n\nけ\n→","}\n]\n」\nむ"],
[{c:"#a2a8b8",f:4,w:2},"\n\n\n\n\n\nShift",{c:"#cccccc",f:5},"Z\n\nっ\nつ","X\n\n\nさ","C\n\n\nそ","V\n\n\nひ","B\n\n\nこ","N\n\n\nみ\n+","M\n\n\nも\n-","<\n,\n、\nね\nEnd",">\n.\n。\nる\nPgDn","?\n/\n・\nめ\n↓","_\n\\\n\nろ",{c:"#a2a8b8"},"\n\n\n\nShift\n\n↑",{f:4},"\n\n\n\n\n\nShift"],
["\n\n\n\n\n\nFn",{x:0.1499999999999999,f:5},"",{f:4},"\n\n\n\n\n\n◇","\n\nOpt\n\n\n\nAlt",{f:5},"",{c:"#cccccc",w:2.7},"",{x:-8.881784197001252e-16,c:"#a2a8b8"},"",{a:5,f:4},"\n\n\n\n\n\nKana",{a:4},"\n\nOpt\n\n\n\nAlt","\n\n\n\n\n\nFn",{x:0.15000000000000036,f:5},"\n\n\n\nDel\n\n←","\n\n\n\n◇\n\n↓","\n\n\n\nCtrl\n\n→"]
- Japanese fonts may be needed
- Some custom legends are missing such as muhenkan, henkan, etc.
- Website's specific quirks are visible when the information is copied into the website. For instance PSc/Brk key appears to be slightly jumbled.
- The colours on the the modifier keycaps (all the ones in darker colour) are slightly different.
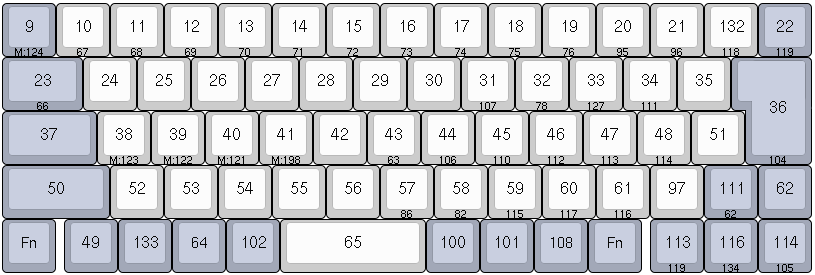
Raw data for use on Keyboard layout editor website (copy and paste the following data into the raw code part of the keyboard layout editor website):
{backcolor:"#ffffff"},
[{y:1.5,c:"#a2a8b8",a:5,f:5},"\n\n\n\n124\n\n9",{c:"#cccccc"},"\n\n\n\n67\n\n10","\n\n\n\n68\n\n11","\n\n\n\n69\n\n12","\n\n\n\n70\n\n13","\n\n\n\n71\n\n14","\n\n\n\n72\n\n15","\n\n\n\n73\n\n16","\n\n\n\n74\n\n17","\n\n\n\n75\n\n18","\n\n\n\n76\n\n19","\n\n\n\n95\n\n20","\n\n\n\n96\n\n21","\n\n\n\n118\n\n132",{c:"#a2a8b8"},"\n\n\n\n119\n\n22"],
[{w:1.5},"\n\n\n\n66\n\n23",{c:"#cccccc"},"\n\n\n\n\n\n24","\n\n\n\n\n\n25","\n\n\n\n\n\n26","\n\n\n\n\n\n27","\n\n\n\n\n\n28","\n\n\n\n\n\n29","\n\n\n\n\n\n30","\n\n\n\n107\n\n31","\n\n\n\n78\n\n32","\n\n\n\n127\n\n33","\n\n\n\n111\n\n34","\n\n\n\n\n\n35",{x:0.25,c:"#a2a8b8",w:1.25,h:2,w2:1.5,h2:1,x2:-0.25},"\n\n\n\n\n\n36"],
[{w:1.75},"\n\n\n\n\n\n37",{c:"#cccccc"},"\n\n\n\n123\n\n38","\n\n\n\n122\n\n39","\n\n\n\n121\n\n40","\n\n\n\n198\n\n41","\n\n\n\n\n\n42","\n\n\n\n63\n\n43","\n\n\n\n106\n\n44","\n\n\n\n110\n\n45","\n\n\n\n112\n\n46","\n\n\n\n113\n\n47","\n\n\n\n114\n\n48","\n\n\n\n\n\n51"],
[{c:"#a2a8b8",w:2},"\n\n\n\n\n\n50",{c:"#cccccc"},"\n\n\n\n\n\n52","\n\n\n\n\n\n53","\n\n\n\n\n\n54","\n\n\n\n\n\n55","\n\n\n\n\n\n56","\n\n\n\n86\n\n57","\n\n\n\n82\n\n58","\n\n\n\n115\n\n59","\n\n\n\n117\n\n60","\n\n\n\n116\n\n61","\n\n\n\n\n\n97",{c:"#a2a8b8"},"\n\n\n\n62\n\n111","\n\n\n\n\n\n62"],
[{f:9},"\n\n\n\n\n\nX",{x:0.1499999999999999,f:5},"\n\n\n\n\n\n49","\n\n\n\n\n\n133",{f:4},"\n\n\n\n\n\n64",{f:5},"\n\n\n\n\n\n102",{c:"#cccccc",w:2.7},"\n\n\n\n\n\n65",{x:-8.881784197001252e-16,c:"#a2a8b8"},"\n\n\n\n\n\n100","\n\n\n\n\n\n101",{f:4},"\n\n\n\n\n\n108",{f:9},"\n\n\n\n\n\nX",{x:0.15000000000000036,f:5},"\n\n\n\n119\n\n113","\n\n\n\n134\n\n116","\n\n\n\n105\n\n114"]
Above shows the keyboard's keycodes when set in Mac mode. If the keyboard was not set in Mac mode, the extra media keys for instance are not accessible and therefore cannot be mapped to a specific function.
Fn key does not and will not emit any keycode when pressed alone. The key actuation is being caught internally by the controller and informs the controller to send a different keycode based on specific keys. All the keycodes printed on the side print of the virtual keyboard above can only be accessed when either of the Fn keys are held down with the exception of five keys which specifically requires Mac mode.
An old version (as of writing) for HHKB Pro JP with Xmodmap setup can be found here:
Geekhack forums - http://geekhack.org/index.php?topic=52123.msg1152290
A virtual Dvorak layout (partly inspired by PFU Systems of America at one stage releasing Dvorak keycaps for HHKB Lite 2) along with a setup specifically for HHKB Pro JP as it is using JIS layout:
Raw data for use on Keyboard layout editor website (copy and paste the following data into the raw code part of the keyboard layout editor website):
{backcolor:"#ffffff"},
[{y:1.5,c:"#a2a8b8",f:4},"\n\n\n\nPower\n\nEsc",{c:"#cccccc",f:5},"!\n1\n\nぬ\nF1","\"\n2\n\nふ\nF2","#\n3\nぁ\nあ\nF3","$\n4\nぅ\nう\nF4","%\n5\nぇ\nえ\nF5","&\n6\nぉ\nお\nF6","'\n7\nゃ\nや\nF7","(\n8\nゅ\nゆ\nF8",")\n9\nょ\nよ\nF9","\n0\nを\nわ\nF10","`\n@\n\n゛\nF11","~\n^\n\nへ\nF12","|\n¥\n\nー\nIns",{c:"#a2a8b8",f:4},"\n\n\n\nDel\n\nBS"],
[{w:1.5},"\n\n\n\nCaps\n\nTab",{c:"#cccccc",f:5},"*\n:\n\nけ","<\n、\n、\nね",">\n.\n゜\nる","P\n\n\nせ","Y\n\n\nん","F\n\n\nは","G\n\n\nき",{a:0},"C\n\n\nそ\nPSc/\nSRq",{a:4},"R\n\n\nす\nScrLk","L\n\n\nり\nPus/Brk","?\n/\n・\nめ\n↑","{\n[\n「\n゜",{x:0.25,c:"#a2a8b8",f:4,w:1.25,h:2,w2:1.5,h2:1,x2:-0.25},"Enter"],
[{w:1.75},"\n\n\n\n\n\nControl",{c:"#cccccc",f:5},"A\n\n\nち\nVol_Up","O\n\n\nら\nVol_Dn","E\n\nぃ\nい\nMute","U\n\n\nな\nEject","I\n\n\nに","D\n\n\nし\n*","H\n\n\nく\n/","T\n\n\nか\nHome","N\n\n\nみ\nPgUp","S\n;\n\nと\n←","=\n−\n\nほ\n→","}\n]\n」\nむ"],
[{c:"#a2a8b8",f:4,w:2},"\n\n\n\n\n\nShift",{c:"#cccccc",f:5},"+\n;\n\nれ","Q\n\n\nた","J\n\n\nま","K\n\n\nの","X\n\n\nさ","B\n\n\nこ\n+","M\n\n\nも\n-","W\n\n\nて\nEnd","V\n\n\nひ\nPgDn","Z\n\nっ\nつ\n↓","_\n\\\n\nろ",{c:"#a2a8b8"},"\n\n\n\nShift\n\n↑",{f:4},"\n\n\n\n\n\nShift"],
["\n\n\n\n\n\nFn",{x:0.1499999999999999,f:5},"",{f:4},"\n\n\n\n\n\n◇","\n\nOpt\n\n\n\nAlt",{f:5},"",{c:"#cccccc",w:2.7},"",{x:-8.881784197001252e-16,c:"#a2a8b8"},"",{a:5,f:4},"\n\n\n\n\n\nKana",{a:4},"\n\nOpt\n\n\n\nAlt","\n\n\n\n\n\nFn",{x:0.15000000000000036,f:5},"\n\n\n\nDel\n\n←","\n\n\n\n◇\n\n↓","\n\n\n\nCtrl\n\n→"]
- JIS layout idea copied from: http://www.vultaire.net/software/dvorak_jp106/dv106jp_white.png
- No Xmodmap layout is available for this setup.
References
- ↑ Geekhack Forums - Re: What can I put inside my HHKB to make it heavier?


