[COMPLETED] Laser Cut Prototyping mini-GB

User avatar
matt3o
-[°_°]-

16 Jul 2013, 14:58

Since the Whitefox has to wait until I find a Focus FK-2001, I decided to make a new experiment.

This is Foxy or HHFox :)
foxy-plate.png
foxy-plate.png (3.44 KiB) Viewed 5354 times
Layout is HHKB-like, the difference with the BrownFox is that there are no visible screws! (in the perimeter). They are all concealed under the keycaps in the middle of case.

This is how the sides look.
foxy-sides.png
foxy-sides.png (3.21 KiB) Viewed 5354 times
The keyboard measures 291x101mm. I actually could make it 2mm smaller per side but I decided to add some metal for the sake of stability.

That being said. I'm going to request the quote please prepare your wallet because you'll need to make a very quick payment!

User avatar
matt3o
-[°_°]-

16 Jul 2013, 16:02

This might be Monkey's board BUT I never worked with 7u and ISO return. It's a bit of a hazard...
monkey.png
monkey.png (3.45 KiB) Viewed 5342 times

mintberryminuscrunch

16 Jul 2013, 21:55

matt3o wrote:This might be Monkey's board BUT I never worked with 7u and ISO return. It's a bit of a hazard...
monkey.png
The left shift should be 1.25

User avatar
Broadmonkey
Fancy Rank

16 Jul 2013, 23:01

Nope, it's as it should be. Only "fault" is that it is missing a regular backspace, but if it's too late to change then it's something I can live with :-) ISO return and space bar looks correct to me, but I will check when I get home.
Thanks matt3o!

User avatar
matt3o
-[°_°]-

16 Jul 2013, 23:42

no, it's not too late. I already requested the quote but we can make small changes.

User avatar
Jmneuv

17 Jul 2013, 00:04

Broadmonkey wrote:Sorry, I have been in two minds of what I should get, but I have settled on this:
What have you done!?

User avatar
photekq
Cherry Picker

17 Jul 2013, 00:34

My wallet is ready!

User avatar
Broadmonkey
Fancy Rank

17 Jul 2013, 00:45

Jmneuv wrote:
Broadmonkey wrote:Sorry, I have been in two minds of what I should get, but I have settled on this:
What have you done!?
You don't like it? :lol:

User avatar
oneproduct

17 Jul 2013, 02:15

Hello again Matt3o! I've been in the hospital since the day after you were kind enough to make a DWG for my design! My right lung collapsed and they had me attached to some tubes to reinflate it and keep it that way. It was quite hard to breathe and there were times that I thought I was literally going to pass out in the middle of nowhere before I got to the hospital! :lol: I just got out late yesterday and I'm feeling good now.

After seeing your HHFoxy with the hidden screws, I'm also somewhat interested in something like that. Not so much to hide the screws but to reduce the size of the bezel as I'd like this 40% keyboard to be as small as possible as that's the primary goal. :)

If you'd be willing to take a shot and something similar to this I'd be very grateful. I hope it's not too late! I'm also ready to pay anytime! 8-)

Something like this, with smaller bezel:
Image

Compared to original version:
Image

mtl

17 Jul 2013, 03:51

matt3o wrote:This is how the sides look.
foxy-sides.png
Looks great! I think he'll need to be careful about routing the matrix around the screw holes, especially the two at the top of the case, and maybe the space bar. :)

mtl

17 Jul 2013, 04:10

matt3o wrote:You definitely need a longer stick (don't really know how not to pun). I don't think you can fit that in the current case design. Cables almost touch the bottom of the case, it won't be easy to fit a daughter board like that under the switches. Probably you need 1 more 3mm side layer and a looong stick.
Lol! Thanks for the tip. I'll add another side layer, but also do some measurements to make sure that'll be enough.

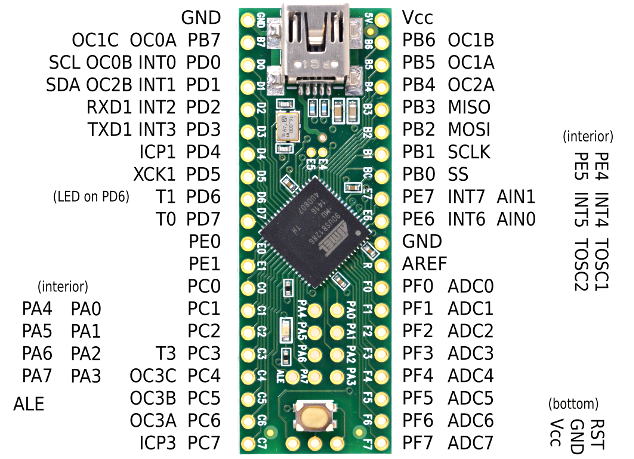
For the display, I ordered this part (will drive it w/ a Teensy 3), which is definitely overkill but I want to future-proof this keyboard. So far I'm thinking of using the display to implement a configuration menu (do DIP switch -like things in software), show layers status, and also configure the trackpoint.

Here's how the left side looks now:
left-edge.png
left-edge.png (3.56 KiB) Viewed 5270 times
The display took up all the space and forced the indicator LEDs to be vertical, but I think it worked out ok. :)

User avatar
matt3o
-[°_°]-

17 Jul 2013, 09:22

Guys, I already sent the quote request, they will let me know today probably. The problem is that we have many different materials and thicknesses, it is likely that they couldn't make it by the end of July. I'll keep you posted.
oneproduct wrote:My right lung collapsed and they had me attached to some tubes to reinflate it and keep it that way. It was quite hard to breathe and there were times that I thought I was literally going to pass out in the middle of nowhere before I got to the hospital! :lol: I just got out late yesterday and I'm feeling good now.
Oh my! This is terrible! Fortunately you "look" fine now.
oneproduct wrote:After seeing your HHFoxy with the hidden screws, I'm also somewhat interested in something like that. Not so much to hide the screws but to reduce the size of the bezel as I'd like this 40% keyboard to be as small as possible as that's the primary goal. :)
I'm not sure that would be possible with your design, I have to make some tests with the sides.

mtl wrote:Looks great! I think he'll need to be careful about routing the matrix around the screw holes, especially the two at the top of the case, and maybe the space bar. :)
yeah, routing the matrix won't be easy but should be feasible.
mtl wrote:Lol! Thanks for the tip. I'll add another side layer, but also do some measurements to make sure that'll be enough.
yes, you need accurate measurements. Consider that with a 9mm case you can't fit anything under the switches.

Apart from that it looks a really nice custom project, congrats! Looking forward to seeing it in action.

User avatar
matt3o
-[°_°]-

17 Jul 2013, 18:18

Just got the reply from the laser cutter. Unfortunately they can't make it by the end of July and we have to wait until September.

The good news it that we have more time to refine our layouts and possibly others will join.

User avatar
Muirium
µ

17 Jul 2013, 18:20

Did they give you any price estimates?

User avatar
matt3o
-[°_°]-

17 Jul 2013, 18:28

Muirium wrote:Did they give you any price estimates?
they have to design the final composition to make the quote, since we have so many different designs and materials they just got scared and said that there's no way to have it by the end of July :) (anyway I may try to call them and ask for a ballpark estimate)

User avatar
photekq
Cherry Picker

17 Jul 2013, 18:41

Is there any way I can just have mine cut (obviously without price reductions) before the end of July? If not then I'll need to find another place to have them cut.

User avatar
matt3o
-[°_°]-

17 Jul 2013, 19:03

photekq wrote:Is there any way I can just have mine cut (obviously without price reductions) before the end of July? If not then I'll need to find another place to have them cut.
gonna ask. hold on.

User avatar
photekq
Cherry Picker

17 Jul 2013, 19:13

matt3o wrote:
photekq wrote:Is there any way I can just have mine cut (obviously without price reductions) before the end of July? If not then I'll need to find another place to have them cut.
gonna ask. hold on.
Thank you very much :)

User avatar
Muirium
µ

17 Jul 2013, 19:40

Indeed, thanks for organising this.

And especially for putting up with picky buggers (me) who want to sit on the fence until you've tried your new design. Apologies and gratitude!

User avatar
Broadmonkey
Fancy Rank

17 Jul 2013, 23:44

Bummer, but on the bright side I can review my plate design some more. Thanks for all you have done so far Matt3o!

mtl

21 Jul 2013, 01:22

Sorry to hear they wouldn't take the order until September. :( I guess that gives time for more people to jump on board though, and maybe bring prices down. :-D

A lot of progress has been made on my design:
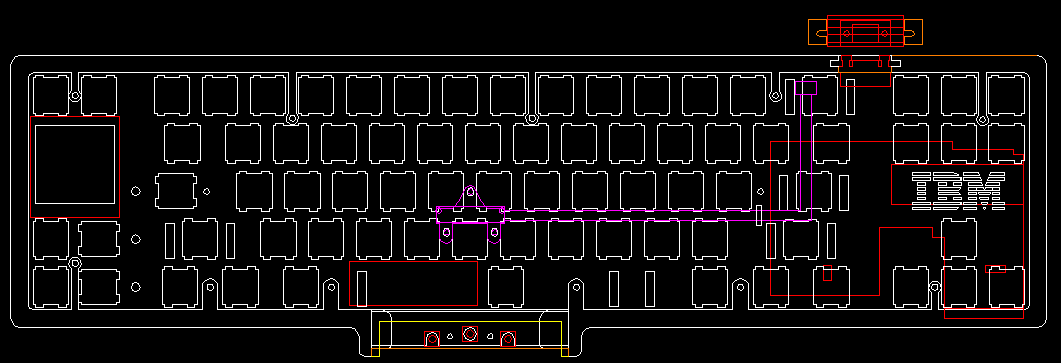
all.png
all.png (11.6 KiB) Viewed 5152 times
It is 5 layers. I borrowed matt3o's nice idea to move the screws to the interior of the case. :-) The USB connector is this one. It will need a Teensy 2.0++ due to the extra lines required by the TrackPoint and OLED display. The IBM logo would be a nice touch but I could live without it if it's impossible to cut. :-) Most of the key switches will be mounted sideways, because I will have to hack away at some of them to get things to fit, and sideways worked out better.

After receiving the SpaceSaver II, I have been able to nail down many of the dimensions. It came with a very nice TrackPoint stick:
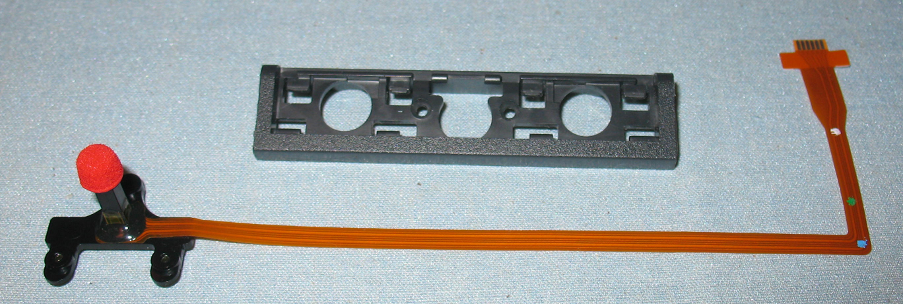
trackpoint-and-buttons.png
trackpoint-and-buttons.png (523 KiB) Viewed 5152 times
The buttons mount in that picture had to be Dremel'd out of the case since it comes permanently attached. :-/ Also the Spacesaver II's TP buttons are rubber dome and feel horrible. I'll replace them with micro switches.

The problem with the TP is the controller is integrated with the keyboard controller, which is a large module:
Spoiler:
ssii-controller.png
ssii-controller.png (640.18 KiB) Viewed 5152 times
This is the large red outline in the first pic, between the home/end and arrow key clusters. It wasn't clear how to integrate the stick with the smaller laptop TP module I intended to use, so I just threw in the huge controller. I will have to trim part of the PCB and remove some components to make it thin enough to fit!

So what's left to be done is get detailed measurements of the OLED when it arrives and figure out how to mount it. Also I'm not sure what to do for feet. Anyone have any ideas?
Attachments
space-invader.dwg.gz
(86.72 KiB) Downloaded 174 times

User avatar
matt3o
-[°_°]-

21 Jul 2013, 09:01

wow, what a project!

What do you need the whole SS controller for? Can't you use the teensy++?

For the feet, depends on what angle you are aiming for.

User avatar
Muirium
µ

21 Jul 2013, 13:46

Love the IBM logo cut right into the plate! Though with an exposed area as large as that, I'd do it in mirror steel… (and even without)

What is the trackpoint's pinout? If yo can integrate its logic into the Teensy++, like Matteo says, you're really going places. Teensies have several analogue inputs available too, I think. In all, you have a lot to play with:
Image
Custom pointer controller = flexible acceleration curves just the way you decide.

mtl

21 Jul 2013, 14:29

Thanks! Of course I could not even attempt it had matt3o not shown the way. :-D

The TP stick is basically a fancy resistor. There is some information here about it. IBM has a lot of proprietary logic (e.g., negative inertia, etc.) that goes into converting those inputs to a PS/2 mouse device. So without having to reinvent that wheel, I would prefer to just embed a TP controller. The smaller laptop modules suka is using (and his firmware supports) directly expose a PS/2 interface that can be hooked up to a Teensy.

Long story short, I hope to use the SSII's logic board to convert the TP stick's resistor outputs to a PS/2 mouse, and then hook that up to the Teensy to convert it to a USB mouse.

I now have a better idea of what's going on with the SSII logic board. The TP and keyboard controllers are pretty well separated, and it could be possible to cut out the keyboard controller. But that can make for harder soldering targets and carries some risk of destroying the unit.

User avatar
matt3o
-[°_°]-

21 Jul 2013, 14:38

I see what you mean. well, better stay grounded and proceed on a safe way (ie: reuse the whole original controller).

As per the IBM logo, it's a bit risky imho (especially on aluminum). You could use a not-striped version instead. Maybe a little smaller.

Image

User avatar
Muirium
µ

21 Jul 2013, 14:40

Fair enough. The downside to using IBM's original TP controller is its physical size, especially in the Z dimension. Matt's design relies on using most of the internal space in that axis to house the switches and their pins. You'll have to go deeper, into thicker keyboard territory.

Here's an idea: how about making a stepped rectangle shape? If you can slim the IBM controller's footprint down a bit, you could move it to the back where it can enjoy its own deeper section of the case, which will also elevate the overall angle a bit. We've been making strictly cuboid cases until now, but a stepped shape (the union of two cuboids) should be doable. That way you can have a slim case where it matters: at the front, but also keep your needed extra room.

mtl

21 Jul 2013, 14:44

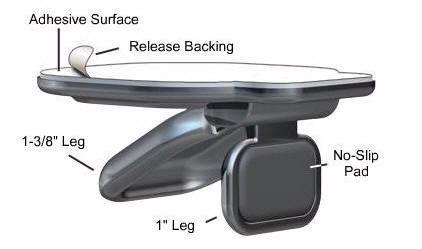
For feet, it may be enough to just have the keyboard flat, since I have a sliding keyboard tray that tilts and such. Unfortunately a lot of the really cool looking aluminum feet seem to be 12 mm or more taller, which is thicker than the keyboard sandwich itself! But once key switches and caps are installed, they may not look so out of place.
Spoiler:
Image
I was also looking at these, to get a lower profile.
Spoiler:
Image
But if tilting is your think, these look great, but seem a bit expensive for a keyboard:
Spoiler:
Image
Also, these looked interesting:
Image

mtl

21 Jul 2013, 15:05

matt3o wrote:As per the IBM logo, it's a bit risky imho (especially on aluminum). You could use a not-striped version instead. Maybe a little smaller.
Great idea!
Muirium wrote:Fair enough. The downside to using IBM's original TP controller is its physical size, especially in the Z dimension. Matt's design relies on using most of the internal space in that axis to house the switches and their pins. You'll have to go deeper, into thicker keyboard territory.
Yeah, already I've gone to 9 mm of internal space, and it is a bit cramped at that. The key switches can be made slimmer (down to about 4 mm protrusion) by cutting off the round nub at the bottom and bending the pins, which will help a lot in areas where I plan to sqeeze internal components, but it will probably get very difficult to work in such tight spaces.
Muirium wrote:Here's an idea: how about making a stepped rectangle shape? If you can slim the IBM controller's footprint down a bit, you could move it to the back where it can enjoy its own deeper section of the case, which will also elevate the overall angle a bit. We've been making strictly cuboid cases until now, but a stepped shape (the union of two cuboids) should be doable. That way you can have a slim case where it matters: at the front, but also keep your needed extra room.
That's an excellent idea! Thank you! I'll play around with some layouts to see how it works. :-D

User avatar
Muirium
µ

21 Jul 2013, 15:25

mtl wrote:
matt3o wrote:As per the IBM logo, it's a bit risky imho (especially on aluminum). You could use a not-striped version instead. Maybe a little smaller.
Great idea!
The one problem with that is the letter B. It just doesn't look right without the two holes. But you could take the same approach as KMAC:
Image
I'd go for the full stripey logo, this being IBM. Maybe a conservative route would be to leave a rectangular hole in the plate and try the logo on steel which can be fixed beneath?
mtl wrote:
Muirium wrote:Here's an idea: how about making a stepped rectangle shape? If you can slim the IBM controller's footprint down a bit, you could move it to the back where it can enjoy its own deeper section of the case, which will also elevate the overall angle a bit. We've been making strictly cuboid cases until now, but a stepped shape (the union of two cuboids) should be doable. That way you can have a slim case where it matters: at the front, but also keep your needed extra room.
That's an excellent idea! Thank you! I'll play around with some layouts to see how it works. :-D
Well, it's untested of course. I'd ask Matteo about supports for the plate. I'd go for a full keyboard width "box" along the back, with risers, like HHFox's, set at the obvious tension points. Another play-it-safe option could be to make this extra space a truly separate physical compartment, with a few holes for cabling up to the top. But it would be nice to make this more of a trough than a separate cellar under the house!

Oh, one more thing: with all this extra space at the back, you could get away with a nice big USB-B socket instead of mini for a change; and even a USB hub, if you like. Very handy. I might try the same for my Bluetooth project down the road!

User avatar
matt3o
-[°_°]-

21 Jul 2013, 19:16

you could also cut a hole for the controller in the base a build a kind of a box for it.

Code: Select all

=====+                     +====
     |                     |
     +=====================+

Post Reply

Return to “Group buys”