Group Build prototyping phase
- Vierax
- Location: France (Lille)
- Main keyboard: Tipro MID KM128 Bépo layout
- Main mouse: Kensington Orbit Trackball
- Favorite switch: MX Clear / MX Grey (under thumbs)
- DT Pro Member: -
- Contact:
Yeah people can be very unthankful sometimes but don't discourage yourself, a lot of people appreciate how strong you work for the community, the other are the kind who ever have to complain about something.
BTW This case sound promising This will be a nice piece of artwork.
Knobs may require another HID for the device or the use of analog pins and that's a huge challenge.
BTW This case sound promising This will be a nice piece of artwork.
Knobs may require another HID for the device or the use of analog pins and that's a huge challenge.
-
- Location: Stockholm, Sweden
- DT Pro Member: 0011
Immature idiots are immature.
Linear knobs are usually done as rotary encoders. You would need two pins for the simplest encoder. The ATmega32u4 does not have any special hardware for reading them so it would have to be done in a fast interrupt and it would skip if you would turn the knob too fast.
I have two other suggestions for building a case, but they would include borders so they would not show the plate (if there is one).
I started on a (schm)ErgoDox case out of interlocking pieces of wood (like the laser-cut boxes a couple pages back) but I printed them and cut the pieces by hand. I think it works if the shape is not too complex and the wood is perfectly flat - unfortunately, my wood was too thin, not really as flat as I thought and the ErgoDox's shape is quite complex, so I made a mess.
This project however has a much simpler shape. This keyboard's case could therefore be built more like a Poker case with the keyboard assembly inserted into the box from above.
My other suggestion is to build the case of wood as a picture-frame. You could thread the plate inside grooves and glue it together. Alternatively, the sides would be routed into L-shapes and you would install bars of wood inside to secure the plate from the bottom. Once the plate is installed in its frame, you would install the switches and PCB.
-
- Location: USA
- Main keyboard: CM QF Stealth
- Main mouse: Apple trackpad
- Favorite switch: MX Brown
- DT Pro Member: -
Re: the case, the design I've sorta settled on for my project is very much like a picture frame. My dad used to do cabinetry and other woodworking and suggested the design:
This would be cut on a table saw as a single, long piece which is then cut into four pieces on a miter saw to frame the plate. The plate gets screwed from the bottom every 6-8 inches, and then a piece of backing material can also be screwed into the wider grooves in the bottom. This way the edge of the plate is somewhat hidden, and the plate can be easily removed for repairs / customization, and also you avoid showing any end grain of the wood. That's the theory, anyway... we're going to give it a try in a few weeks.
- matt3o
- -[°_°]-
- Location: Italy
- Main keyboard: WhiteFox
- Main mouse: Anywhere MX
- Favorite switch: Anything, really
- DT Pro Member: 0030
- Contact:
the picture frame solution is indeed something I thought about. I came out with a design that would also work with laser cut wood.
Ultimately I need to do prototypes and see which one is the best solution aesthetically and cost-wise. It just takes time, and money.
-
- Location: Italy
- DT Pro Member: -
Plain horrible sketch (black=wood, red=plate, blue=screws)Findecanor wrote:I don't quite understand. Could you draw a sketch?pasph wrote:Isn't this more simple?
...
For the upper part
Then alu goes down in side wood grooves like those
..
Then with another bend goes to back
And the back part is wood
So the alu piece has a U shape
The various wood pieces can be assambled in Ikea style.
On the top wood part you can engrave something like "Molti Nemici Molto Onore"
- Attachments
-
- Senza titolo-1.png (50.05 KiB) Viewed 9260 times
-
- Location: Cape Cod, MA, USA
- Main keyboard: IBM Model M
- Main mouse: Razer Mamba
- Favorite switch: Buckling Spring
- DT Pro Member: -
If we were to have wooden panels on the side would it be possible to have designs CnC'd into them like this picture which was previously posted http://milwaukeemakerspace.org/wp-conte ... ng-036.jpg
- matt3o
- -[°_°]-
- Location: Italy
- Main keyboard: WhiteFox
- Main mouse: Anywhere MX
- Favorite switch: Anything, really
- DT Pro Member: 0030
- Contact:
technically it would be possible but it's more machine time, hence higher cost.
-
- Location: Sweden
- Main keyboard: Crappy logitech rubber dome
- Main mouse: wow cataclysm
- Favorite switch: Don't know yet
- DT Pro Member: -
Hi all!
I absolutely love this thread. It's in fact this thread that made me register.
I don't have my own mechanical keyboard yet and thought it would be fun to have a customized one.
I don't think I will come up with my own layout but just copy someone else (as long as it's ISO ).
I think I'm on the same page as pyrelink with only ordering the PCB and the cover plate, the rest I can hopefully do myself to try and keep the cost down.
I will however be needing help when ordering keycaps.
What level of soldering would you guys say is required to be able to put the keyboard together?
Will it be possible to order a numpad if the keyboard is a tkl?
Will this perhaps be a too big of a challenge for me when I'm not that great with soldering? But then again, it's fun to be challenged once in a while .
Looking forward to see what will happen with this.
Cheers from Sweden.
- Muirium
- µ
- Location: Edinburgh, Scotland
- Main keyboard: HHKB Type-S with Bluetooth by Hasu
- Main mouse: Apple Magic Mouse
- Favorite switch: Gotta Try 'Em All
- DT Pro Member: µ
Switches are pretty easy to solder into a PCB. Maybe the USB socket will be a challenge, and the Teensy. But you should be fine.
Now just set aside twice the budget you expect and you're good to go. You'll find out why. It always happens!
- matt3o
- -[°_°]-
- Location: Italy
- Main keyboard: WhiteFox
- Main mouse: Anywhere MX
- Favorite switch: Anything, really
- DT Pro Member: 0030
- Contact:
welcome! what great post to startPerrko wrote:Hi all!
I absolutely love this thread. It's in fact this thread that made me register.
don't worry about soldering, you get used to it pretty quickly!Perrko wrote:What level of soldering would you guys say is required to be able to put the keyboard together?
Will it be possible to order a numpad if the keyboard is a tkl?
Will this perhaps be a too big of a challenge for me when I'm not that great with soldering? But then again, it's fun to be challenged once in a while .
theoretically you can order whatever you want in whatever layout you want but we are still prototyping
-
- Location: Sweden
- Main keyboard: Crappy logitech rubber dome
- Main mouse: wow cataclysm
- Favorite switch: Don't know yet
- DT Pro Member: -
Maybe I will need more than twice the budget if I get hooked on this and start stacking keyboards .Muirium wrote:Switches are pretty easy to solder into a PCB. Maybe the USB socket will be a challenge, and the Teensy. But you should be fine.
Now just set aside twice the budget you expect and you're good to go. You'll find out why. It always happens!
-
- Location: Sweden
- Main keyboard: Crappy logitech rubber dome
- Main mouse: wow cataclysm
- Favorite switch: Don't know yet
- DT Pro Member: -
I will be checking this thread and try to come to a conclusion on what I want and how to get it .matt3o wrote:welcome! what great post to startPerrko wrote:Hi all!
I absolutely love this thread. It's in fact this thread that made me register.
don't worry about soldering, you get used to it pretty quickly!Perrko wrote:What level of soldering would you guys say is required to be able to put the keyboard together?
Will it be possible to order a numpad if the keyboard is a tkl?
Will this perhaps be a too big of a challenge for me when I'm not that great with soldering? But then again, it's fun to be challenged once in a while .
theoretically you can order whatever you want in whatever layout you want but we are still prototyping
-
- DT Pro Member: -
What about symmetric stagger?
Here's a prototype I sketched:
http://www.keyboard-layout-editor.com/# ... 695b685cac
(I didn't really think the labels through, but if the keyboard is programmable it'll be easy to swap some keys around )
Here's a prototype I sketched:
http://www.keyboard-layout-editor.com/# ... 695b685cac
(I didn't really think the labels through, but if the keyboard is programmable it'll be easy to swap some keys around )
- Muirium
- µ
- Location: Edinburgh, Scotland
- Main keyboard: HHKB Type-S with Bluetooth by Hasu
- Main mouse: Apple Magic Mouse
- Favorite switch: Gotta Try 'Em All
- DT Pro Member: µ
Looking good! You're quite right about programmability freeing you from too many hard commitments: the only thing you have to decide at the outset is the size and position of keys; not their content. You've got a nice one in the works there.EugeneMsc wrote:What about symmetric stagger?
Here's a prototype I sketched:
(I didn't really think the labels through, but if the keyboard is programmable it'll be easy to swap some keys around )
Symmetric stagger is always at the back of my mind, too. I'd probably go for a whole sequence of 1.5u keys on the bottom row. That's because I love thumb keys. And I'll have plenty of 1.5u spares in particular! They don't need stabilisers, either, which is a plus compared to the 2.0 and 2.25u caps in your plan. But then I'm nutty enough to delete the whole right most column and go for a symmetric 60% for SUPER SYMMETRY!
What caps do you have in mind? And have you any cunning plans for where to put the Teensy? You've probably heard of mine already…
Spoiler:
-
- DT Pro Member: -
I like your idea about the 1.5 keys on the bottom maybe it will be better.Muirium wrote: Looking good! You're quite right about programmability freeing you from too many hard commitments: the only thing you have to decide at the outset is the size and position of keys; not their content. You've got a nice one in the works there.
Symmetric stagger is always at the back of my mind, too. I'd probably go for a whole sequence of 1.5u keys on the bottom row. That's because I love thumb keys. And I'll have plenty of 1.5u spares in particular! They don't need stabilisers, either, which is a plus compared to the 2.0 and 2.25u caps in your plan. But then I'm nutty enough to delete the whole right most column and go for a symmetric 60% for SUPER SYMMETRY!
What caps do you have in mind? And have you any cunning plans for where to put the Teensy? You've probably heard of mine already…
Spoiler:
Actually I don't even own a mechanical keyboard yet, much less ever made one .
So I don't have any plans for teensy placement. Yours seems ok but I dont really like the steep slope that it leads to, I dont even use the legs on my current keyboard, so it would lie flat. I'd rather have it stick out forward or something, so it makes the whole keyboard bigger but does not make it thicker.
- Muirium
- µ
- Location: Edinburgh, Scotland
- Main keyboard: HHKB Type-S with Bluetooth by Hasu
- Main mouse: Apple Magic Mouse
- Favorite switch: Gotta Try 'Em All
- DT Pro Member: µ
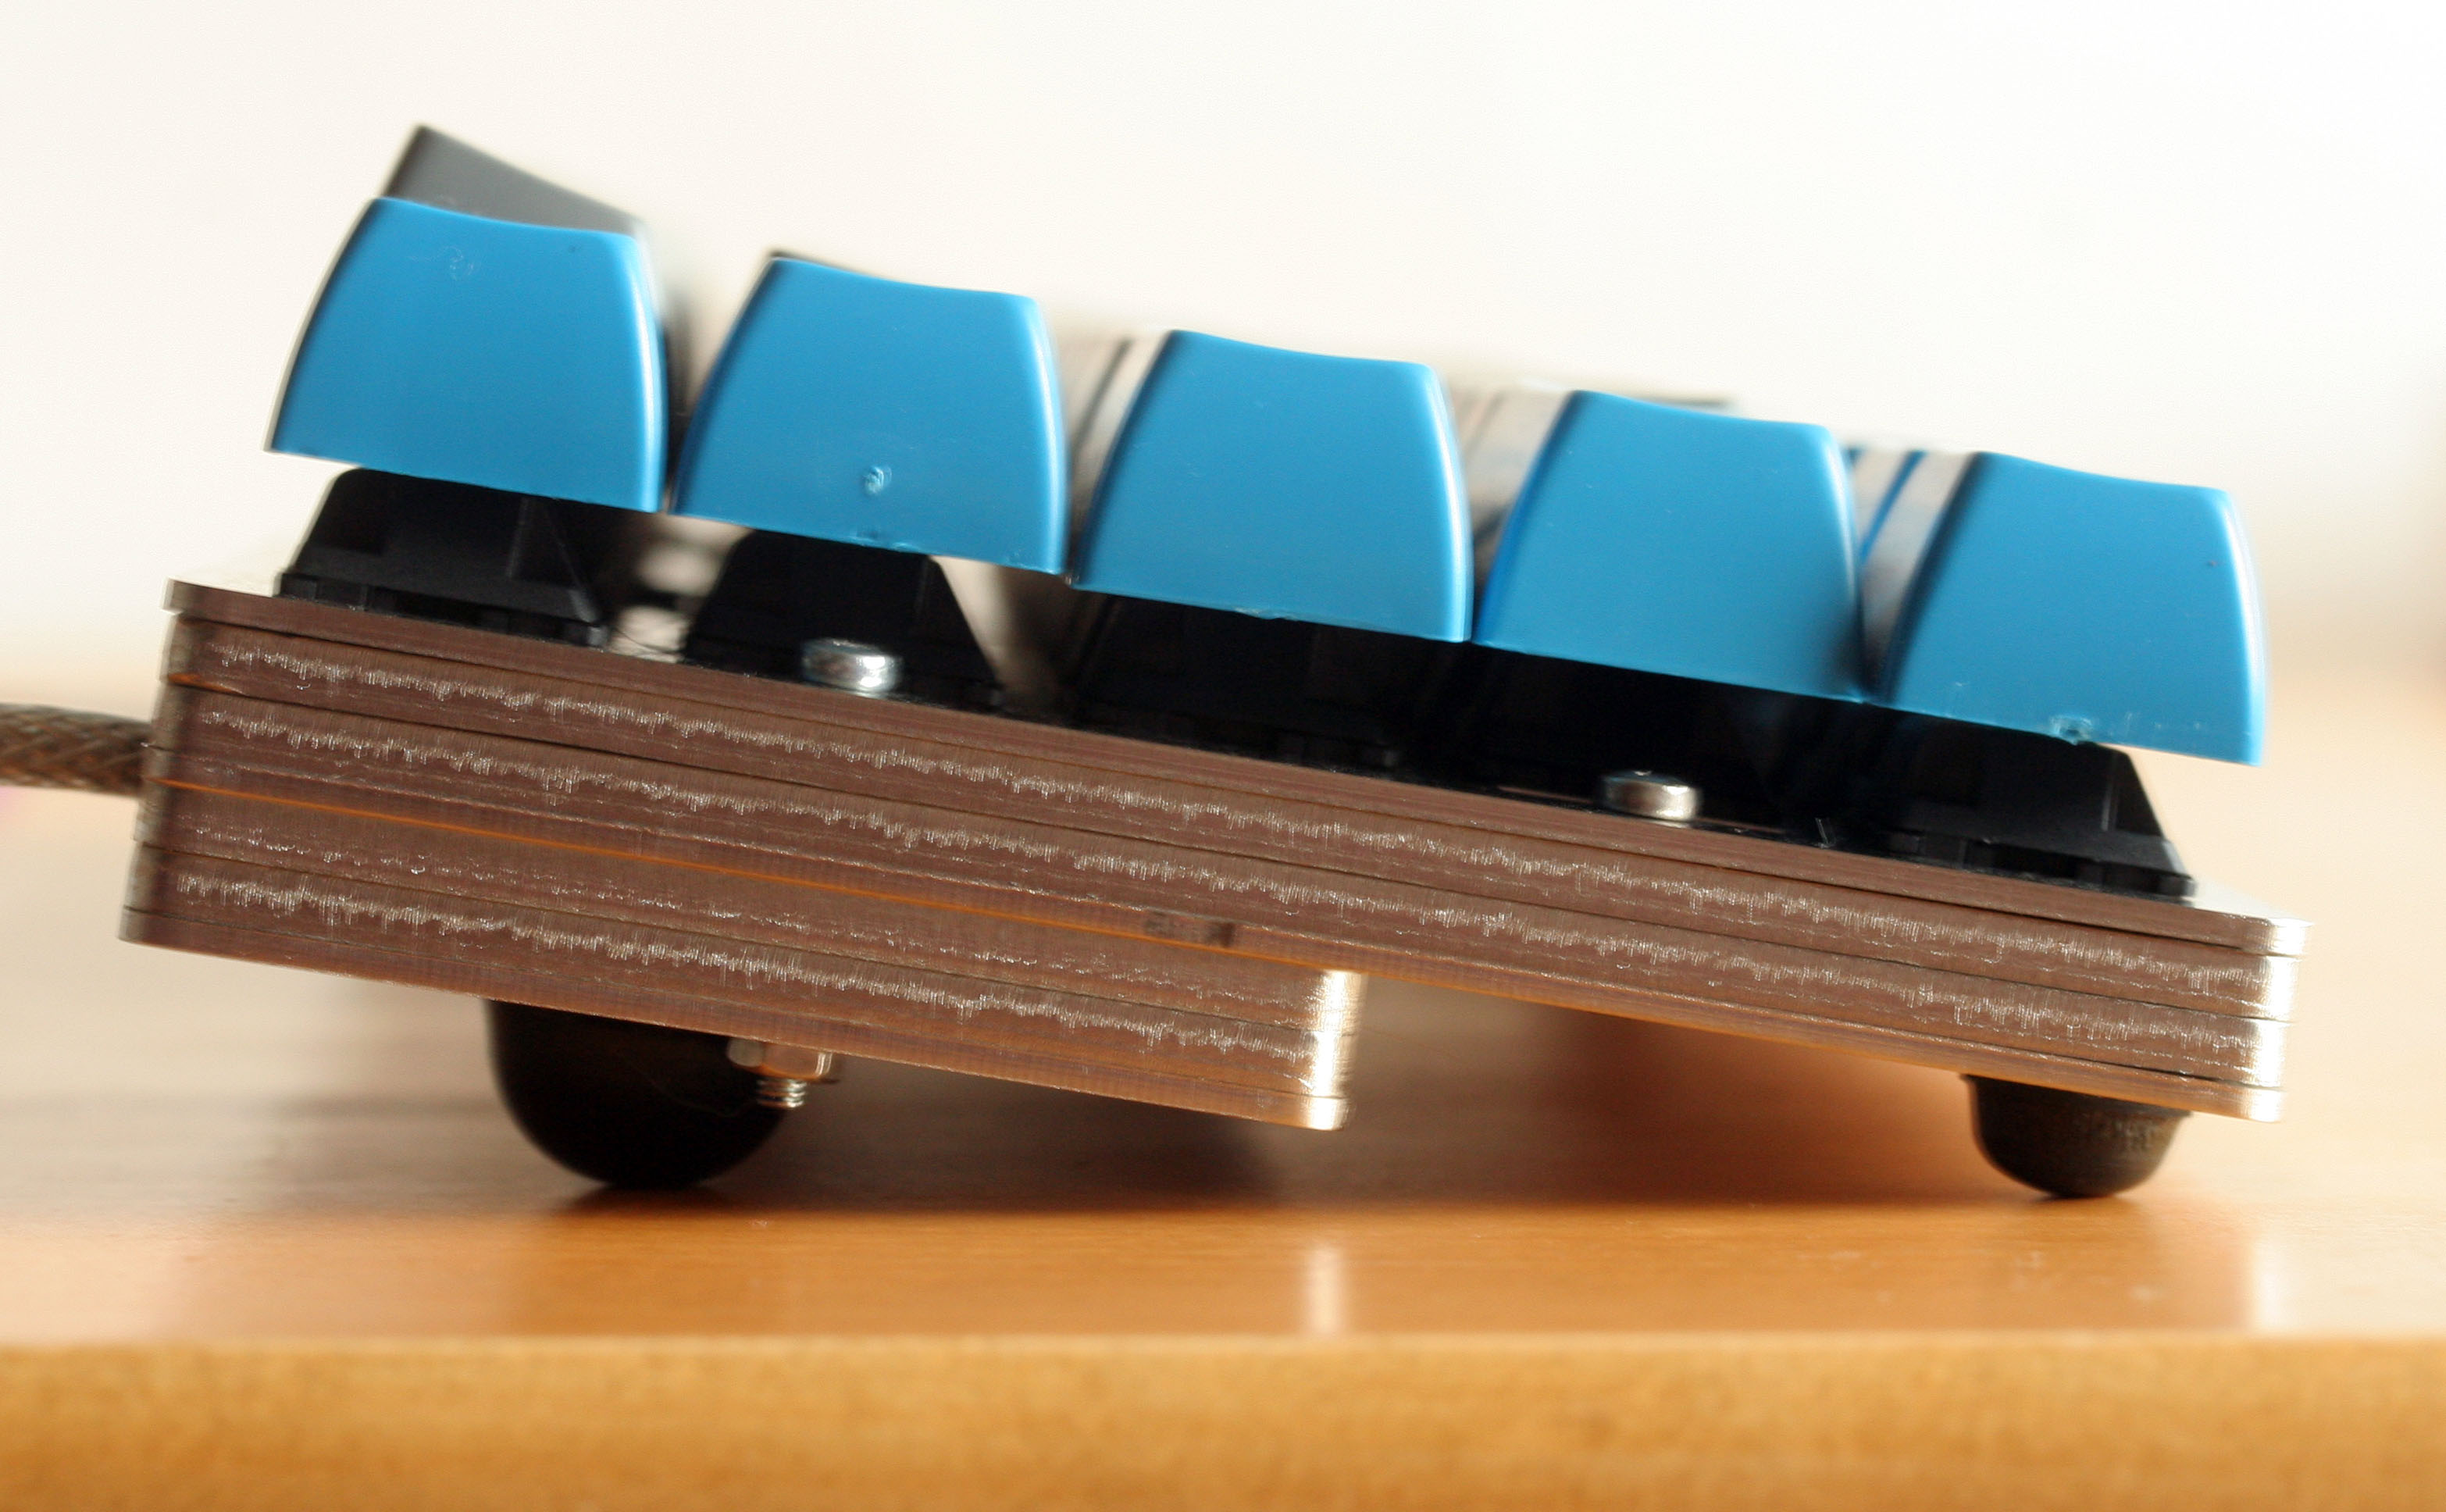
Yeah, my little 60% came out steeper than I planned. The tricky part was raising the front edge of the step, which meant I had to go for big feet:
It's okay for me, as I find it pretty comfortable at my standing desk anyway. But my next plan for a stepped layer case is to use several, smaller, steps. So it's more like a staircase than leaping straight upstairs!
I like where you're coming from, by the way. I started my 60% project before I had any Cherry MX boards of my own, too. IBM buckling springs were my gateway into all this…
A lot of the ideas people have talked about on this thread, the last few days, are completely different to the classic layered case. This could be the year we all build something else! Anything with a good bit of room inside for mounting a Teensy will really open up layout choices. Big space bars begone!
-
- Location: PARIS, FRANCE
- Main keyboard: Pok3r × 2 | Infinity 60%
- Main mouse: Trackball
- Favorite switch: MX Brown
- DT Pro Member: -
If we want straight keyboard, we might split the pcb in 2 pieces to let people adjusting the width of their cases ?
- Muirium
- µ
- Location: Edinburgh, Scotland
- Main keyboard: HHKB Type-S with Bluetooth by Hasu
- Main mouse: Apple Magic Mouse
- Favorite switch: Gotta Try 'Em All
- DT Pro Member: µ
3.25 space bars, eh? Round 5 has 3.0, but that's the closest I've heard of. Make one of your 1.25 mods a 1.5 on the left side, and beef up Menu to 1.25u on the right and then you're compatible.
Split keyboards are a whole other story, well worth thinking about. The best ergos are split body, so you can move them individually for whatever suits you best, wherever you are. And the ErgoDox looks way too big to me…
- matt3o
- -[°_°]-
- Location: Italy
- Main keyboard: WhiteFox
- Main mouse: Anywhere MX
- Favorite switch: Anything, really
- DT Pro Member: 0030
- Contact:
yes, splitting the PCB would workmr_peck wrote: If we want straight keyboard, we might split the pcb in 2 pieces to let people adjusting the width of their cases ?
-
- Location: PARIS, FRANCE
- Main keyboard: Pok3r × 2 | Infinity 60%
- Main mouse: Trackball
- Favorite switch: MX Brown
- DT Pro Member: -
Updated with 3x space bar : http://www.keyboard-layout-editor.com/# ... 0c45dd3450
- Broadmonkey
- Fancy Rank
- Location: Denmark
- Main keyboard: Whitefox
- Main mouse: Zowie FK2
- Favorite switch: MX Black
- DT Pro Member: -
- Contact:
I am all for splitting the keyboard, actually I would prefer it.
A normal 65% simply split with a 5 degree angle would be great, but something in a matrix would even better. only problem is the spacebar(s)... again! I haven't given the bottom row too much thought (and I don't want two win keys).
Again, the bottom row hasn't got too much attention. The two halves should just be split enought to make room for the teensy.
- Req
- Main keyboard: Das Keyboard
- Main mouse: Mionix Avior 7000
- Favorite switch: Clear
- DT Pro Member: -
Here is my contribution to the split design ideas. I rather like this idea. The Teensy could be put under either of the relocated home cluster keys locations in the image. Obviously you would lose those keys, however with a split or angled design where it is in one case you could install the teensy in between the plates/pcb's inside whatever case you made.
Edit: I also threw together a design that incorporates the knobs we were speaking of earlier in the thread.
Last edited by Req on 06 May 2014, 18:12, edited 1 time in total.
-
- Location: PARIS, FRANCE
- Main keyboard: Pok3r × 2 | Infinity 60%
- Main mouse: Trackball
- Favorite switch: MX Brown
- DT Pro Member: -
I like your design.Req wrote:Here is my contribution to the split design ideas. I rather like this idea. The Teensy could be put under either of the relocated home cluster keys locations in the image. Obviously you would lose those keys, however with a split or angled design where it is in one case you could install the teensy in between the plates/pcb's inside whatever case you made.
-
- Location: Stockholm, Sweden
- DT Pro Member: 0011
I think that matrix layout is uninteresting from a DIY perspective. If you want a keyboard with matrix layout, you get one of the readily available POS keyboards with matrix layout that already has NKRO and full programmability, multiple layers etc. and you program it to the ergonomic layout you want.
What I would like out of this group project is a small, sexy keyboard, like the GH60 but with arrow and nav keys.
Too bad that matt3o's custom 60% design with a nav column did not work with a Poker/GH60 case, or I would have been in on that. I see this project as being the substitute for that. I think this project keyboard should also work with a bog-standard ISO or ANSI key set with 1.25 mods and 6.25 space bar.
The next group project after this could be an ergo board.
- Muirium
- µ
- Location: Edinburgh, Scotland
- Main keyboard: HHKB Type-S with Bluetooth by Hasu
- Main mouse: Apple Magic Mouse
- Favorite switch: Gotta Try 'Em All
- DT Pro Member: µ
Tight constraints! Which are arguably better than no constraints at all, but typically less fun…
One option is to remake my 60% layout from last year with a PCB and the appropriate fittings for a Poker case.
- Req
- Main keyboard: Das Keyboard
- Main mouse: Mionix Avior 7000
- Favorite switch: Clear
- DT Pro Member: -
This would fit in a 60% case and fits your bill I think.Findecanor wrote:What I would like out of this group project is a small, sexy keyboard, like the GH60 but with arrow and nav keys.
Too bad that matt3o's custom 60% design with a nav column did not work with a Poker/GH60 case, or I would have been in on that. I see this project as being the substitute for that. I think this project keyboard should also work with a bog-standard ISO or ANSI key set with 1.25 mods and 6.25 space bar.
The next group project after this could be an ergo board.
- Attachments
-
- 60%nav.JPG (106.54 KiB) Viewed 8976 times
- matt3o
- -[°_°]-
- Location: Italy
- Main keyboard: WhiteFox
- Main mouse: Anywhere MX
- Favorite switch: Anything, really
- DT Pro Member: 0030
- Contact:
I don't think so. Don't forget the screw holes.Req wrote:This would fit in a 60% case and fits your bill I think.Findecanor wrote:What I would like out of this group project is a small, sexy keyboard, like the GH60 but with arrow and nav keys.
Too bad that matt3o's custom 60% design with a nav column did not work with a Poker/GH60 case, or I would have been in on that. I see this project as being the substitute for that. I think this project keyboard should also work with a bog-standard ISO or ANSI key set with 1.25 mods and 6.25 space bar.
The next group project after this could be an ergo board.