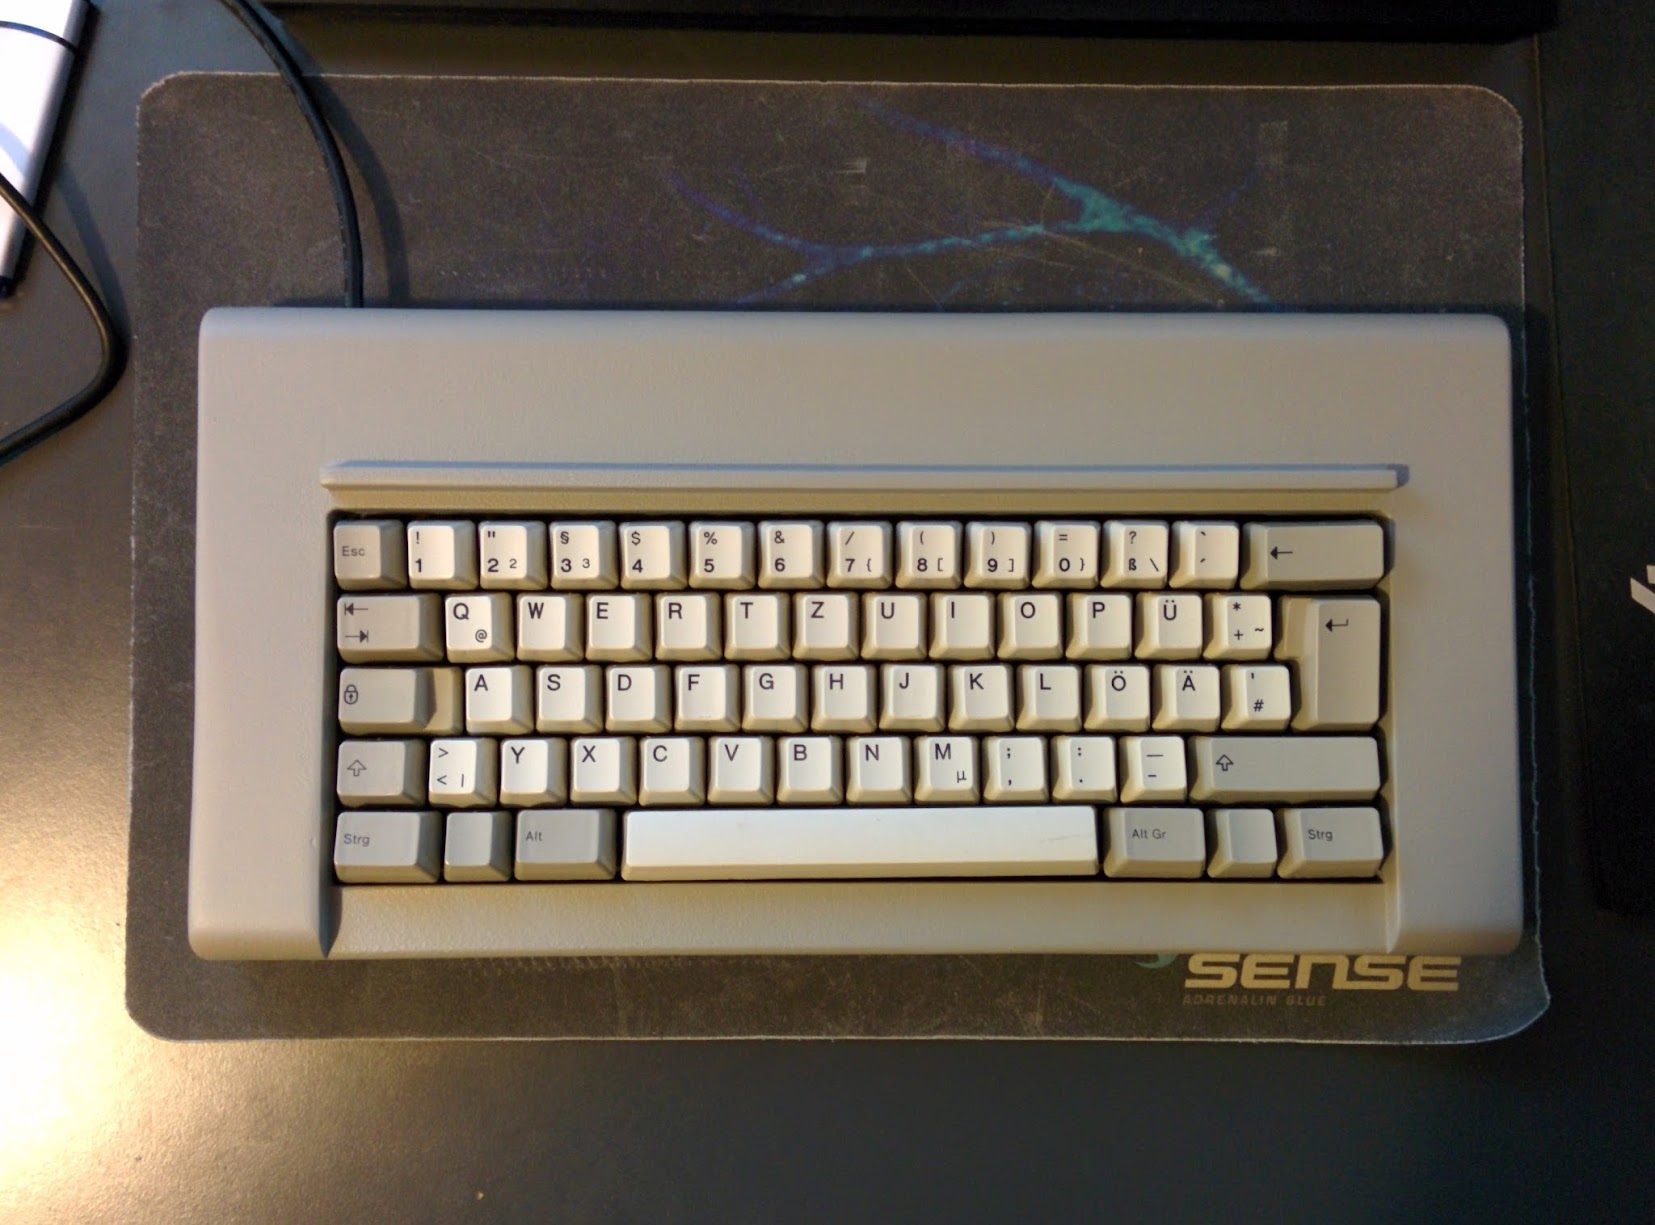
IBM 107 Key Model F 4704 Restoration Thread
- pyrelink
- Location: USA
- Main keyboard: HHKB 2
- Main mouse: CST L-Trac
- Favorite switch: Capacitive Buckling Spring
- DT Pro Member: -
Hello Deskthority. Earlier this week I received from Cindy a neat 107 key IBM 4704 Model F. While no where near as elegant as the lovely Kishsaver or 77 key models, this is still quite an awesome keyboard. I immediately broke it open after tearing it out of the box, and began to bring it back to life. My end results are to get it looking pretty and running one of Xwhatsit's lovely converters. I figured I would make this post as something of a worklog, if anyone else was interested, and to get some answers to a few questions. I will post all the images I take in full resolution to this Flickr album, and I will post the more pertinent images here on DT. As always, you can use my pictures for any purpose you see fit. Let's get started!
Out of the box, it was pretty damn dirty. Partially sticky, pen drawings on the case, peeling, chipping, and eroding paint, and grimy. Just what I expected from a bank teller's keyboard. On the back the label was still intact. It was manufactured in the Armonk, NY factory, January 1985. There is also a stamp on the inside of the top case that says January 25, 1984, as well as a stamp on the bottom half of the case that says December 8, 1984. First impressions of typing on the keyboard were good. All of the keys felt and sounded like they were buckling smoothly, with all of the stabilized keys working properly.
Soaked the keycaps in a bowl with warm water and laundry detergent for a few hours. Separated the windowed keycaps, and removed the labels. Everything looks great now, except for the tops of the windowed caps are a good deal yellowed, with some cracks in the casing.
While this is the first time I have ever cracked the case of a Model F, with the amount of reading I have been doing here on these types of boards, I felt pretty confident I could do it. And sure enough, it wasn't bad at all. The barrel plate was clearly a mess. It had corrosion and a bit of rusting, as well as crap sticking to it like crazy. The PCB is in excellent condition. Besides a minor possible issue (which I will get into later) it looks great. All of the flippers (flippies?), barrels were also looking great.
The foam however, was not okay. It was attached fine, but it was disintegrating. Its hard to describe, but some of the sections had no foam left at all. I tried to be as careful as I possibly could when removing the foam from the barrel plate, but in the end it had turned the sheets I had been working on (weird place to work I know, but that room had some good lighting for taking pictures) black with dust and bits of foam. While its not going to be easy, I am gonna have to replace the foam.
The next steps were to find a tub large enough to submerge the entire 12 pound case to soak it in detergent for a few hours. While it was soaking, I went and sanded down the barrel plate with some 600 grit sand paper. I got it as smooth and corrosion and rust free as I could. In order to keep it rust free, I taped up all of the stabilizers, and sprayed it with a few coats of Rust-Oleum, Stops Rust paint. I sanded in between each coat with 1500 grit, and gave it plenty of drying time. I am aware that it is blue, but it was the only adequate paint I could find at the time
Finally, this is how everything looks after being washed, and sanded/painted. As you can see the paint does not look great. Some how it looks like I might have scratched a bit of paint off of the left hand side, and there is discoloring around the top. It looks a hell of a lot better then before, but still not perfect.
I mentioned that there was a tiny, possibly non existent problem on my PCB. It looks like a bit of the solder mask chipped away on this part of the pad. I understand the basics of how these capacitive switches work, but I can't really tell if this small chip is really going to effect anything.
That is all the work I have done so far. I am still recuperating from all the spending I did last month, so it might be another month before I am able to continue work on this. I plan to buy some of Xwhatsits controller PCBs seperately through OSHpark, and all of the components, and assemble everything myself. I need to figure out what is the best type of foam to use, and then I need to figure out what I want to do about the case.
There are already a few threads here about the best kind of replacement foam to use in these Model F's. For example:
This excellent thread
There are a lot of options to choose from. Any feedback on the foam mat, the PCB, or what to do about the case... Actually, any feedback at all would be greatly appreciated. Also let me know if the amount of pictures here was overkill, or if I should add the images into spoilers or whatever to make things load faster. I will continue to update this, when ever I make any more progress.
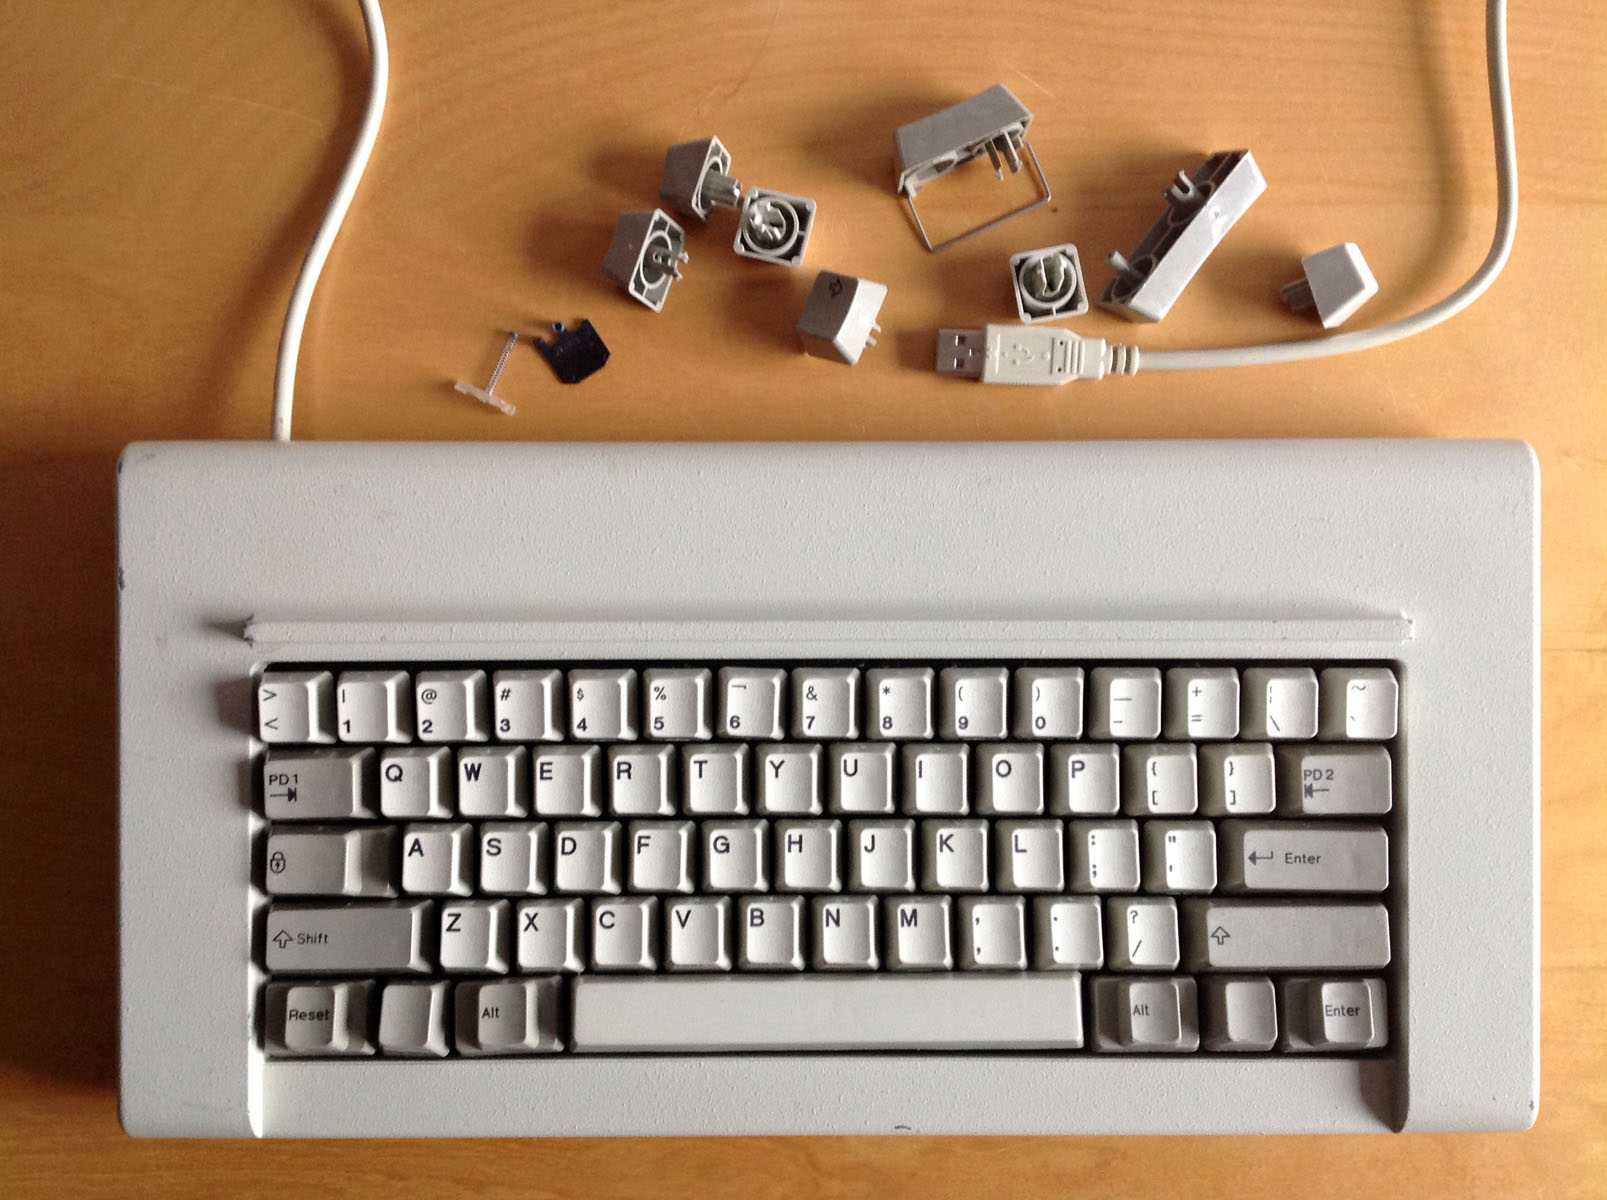
Last edited by pyrelink on 06 Nov 2014, 04:55, edited 5 times in total.
- Hypersphere
- Location: USA
- Main keyboard: Silenced & Lubed HHKB (Black)
- Main mouse: Logitech G403
- Favorite switch: Topre 45/55g Silenced; Various Alps; IBM Model F
- DT Pro Member: 0038
Thanks for starting this thread. Although one might consult previous threads on other model F keyboards, such as the AT or XT, there will be things specific to the 107 that certainly warrant having its own restoration guide.
Naive question: For the 107, is it necessary to use an Xwhatsit controller, or would it be possible to use a Teensy and the Soarer converter?
- pyrelink
- Location: USA
- Main keyboard: HHKB 2
- Main mouse: CST L-Trac
- Favorite switch: Capacitive Buckling Spring
- DT Pro Member: -
I seem to have forgotten to take any photos of the controller for some reason. The controller visually looks pretty much the same as the Kishsaver controller, with a few minor differences. I will take some photos of it soon, and post them. It shares the same DE-9 connector (using only 4 pins) as the Kishsaver. I would say its a pretty good chance it will need an Xwhatsit controller.
-
- Location: UK
- Main keyboard: Filco ZERO green alps, Model F 122 Terminal
- Main mouse: Ducky Secret / Roller Mouse Pro 1
- Favorite switch: MX Mount Topre / Model F Buckling
- DT Pro Member: 0167
Amazing board and good thread !
the lettering on them caps looks nice , much better than more fuzzy model m BS caps, looks closer to XT and i have XT caps on every model f i use .
i would not worry too much about the solder mask as long as its not on the switch area it will be fine , i removed the mask on mine ( when i say mine i mean my 122) in one place on each row and each col to test continuity and had no problems so don't worry about that if the whole trace was bare and it could corrode then yeh possibly worry about it but i would not think twice on what is shown in your photo. (EDIT: fi anyone knows a good way to clean a PCB i would love to know as my backup XT PCB is very dirty i tried mild soap and water but its still very dirty)
Is the case on the 107 metal ? IF so it lends itself very well to new paint jobs get the correct colour code and take it to your local paint shop they will do that a treat. ( if anyone knows a way to get the texture back i would love to know as a few repairs on mine have left a few parts of the case smooth).
Overall a good restoration will look forwards to seeing it finished. Remember however get them 1 part XT caps for the main section they are "teh shitz"
- pyrelink
- Location: USA
- Main keyboard: HHKB 2
- Main mouse: CST L-Trac
- Favorite switch: Capacitive Buckling Spring
- DT Pro Member: -
Thanks! Good to know about the soldermask. It didn't really look serious, but good to know its probably fine. The case is all metal, its what most contributes to its 4.5kg weight! Like you said, getting it repainted sounds like the best option. I have seen some really great looking powder coated and painted Kishy's here, so I imagine I can do something similar.
43/107 keycaps are windowed on this board. I haven't thought too much about my intended layout, but I imagine I will want to have a nav block as well as a numpad, but that still leaves a bunch of unused keys... Will take some figuring out
-
- Location: UK
- Main keyboard: Filco ZERO green alps, Model F 122 Terminal
- Main mouse: Ducky Secret / Roller Mouse Pro 1
- Favorite switch: MX Mount Topre / Model F Buckling
- DT Pro Member: 0167
go for industrial grey ! Ral 7030 if i am correct, was going to do it on my 122 but with a beamspring on the way think i will do it on that.
I cannot see from the photo does it use XT or AT style barrels ? XT has a pin at the front whist AT ( and all other Fs i have had ) has a nub on the barrel that fit into a cut out in the hole.
- pyrelink
- Location: USA
- Main keyboard: HHKB 2
- Main mouse: CST L-Trac
- Favorite switch: Capacitive Buckling Spring
- DT Pro Member: -
Just a quick update here. I posted this thread over on Geekhack, which I got some good responses. Including some advice from fohat.digs about removing the stabilizers. Seeing as I plan to update the layout of the board, there are quite a few extra stabs on the plate, and there is super heavy corrosion and rusting near each stab, I decided to pop them all out.
As you can see, it turned out nicely. I was super careful with everything, and in the end I only slightly "lost" 1/14 stabs. The one that lost its bottom flange plastic, still fits snugly into the plate though. I imagine a small dab of hot glue, and the stab will work just fine.
Because I am updating the layout, and there are a bunch of extras already on the board, I would be up to giving some away if anyone needs a couple. Sadly I need the space bar stabs though, as I only have 2, and according to fohat.digs, wire stabs haven't been used since 1989...
I have decided that I will eventually be getting the case painted locally in (roughly) IBM Industrial: RAL 7030, as Andrewjoy suggested.
-
- Location: UK
- Main keyboard: Filco ZERO green alps, Model F 122 Terminal
- Main mouse: Ducky Secret / Roller Mouse Pro 1
- Favorite switch: MX Mount Topre / Model F Buckling
- DT Pro Member: 0167
i am still undecided if i am going to go for 7030 on my beamspring or go insane and do something crazy that SGI would be proud of
-
- Location: Wisconsin, USA
- Main keyboard: Model F Unsaver
- Main mouse: A turd logitech wireless mouse
- Favorite switch: Buckling Spring/Blue Alps/Beam spring
Hey, Im restoring mine aswell! Thought id share a few quick snaps but my camera is to crappy and no good light source was near. Ill try in the morning! Besides opening it to check for corrosion Ive only switched the yellowed and rusted connector for a brand new one from on of these: http://www.ebay.com/itm/380994154944
Contrary to what I read on gh, mine opens up with a torx 15 bit, Oddly enough It looks as if some one started to sand it.
- pyrelink
- Location: USA
- Main keyboard: HHKB 2
- Main mouse: CST L-Trac
- Favorite switch: Capacitive Buckling Spring
- DT Pro Member: -
Very cool. Can't wait to see your pictures. Might I ask though, why replace the original connector? Are you not intending to use one of xwhatsit's wonderful controllers?
My case also opened with a torx bit. I don't remember what size though. And what part does it look like someone started sanding? The barrel plate or the case?
- Muirium
- µ
- Location: Edinburgh, Scotland
- Main keyboard: HHKB Type-S with Bluetooth by Hasu
- Main mouse: Apple Magic Mouse
- Favorite switch: Gotta Try 'Em All
- DT Pro Member: µ
Oooh, I hadn't seen this thread yet. Nice Dachshund Loooooooooongkish Unsaver you've got there, Pyrelink. Use it wisely!
Xwhatsit's controller is definitely the ticket for this board. My 62 key version has several blank columns that I bet map right to your extras! Typical IBM. Hasu made a valiant effort to reverse engineer the original controller's protocol (including jamming it into a diagnostic mode to read the mods which ware normally hidden on the original banking terminals) but I tried his solution and, as he said, it's not up to daily use. Grab an Xwhatsit!
Speaking of which:
He's got fresh stock. We told him about Cindy…
- pyrelink
- Location: USA
- Main keyboard: HHKB 2
- Main mouse: CST L-Trac
- Favorite switch: Capacitive Buckling Spring
- DT Pro Member: -
Why thank you! I am really loving this board. The 107 is actually my *first time working on an IBM, as well as my first real "restoration" effort on an old keyboard. I had honestly thought, that I would buy the board and be working on it for at least a few months, either stuck on an issue or waiting for an obscure part to arrive. As I will post later today, I have replaced my foam, and I am basically wrapping up the last steps, before its time to install an Xwhatsit board.
All I have left is to locate and buy keys to update my layout + numpad and Fkeys to replace the all the windowed keycaps. Buy and install an xwhatsit board, and eventually get the case powder coated locally - without breaking the bank.
Do you happen to know how many boards Xwhatsit ordered/how soon I need to make the choice between my Round5b order and an new controller? I was originally planning on ordering PCBs separately and trying to assemble it all myself, but when I think about it, with the cost of the solder paste, and high probability of screwing up my first attempt at SMT soldering... It might just prove cheaper to buy one fully assembled - even with that crazy NZ shipping.
*Not including simple Teensy mods of course...
- Hypersphere
- Location: USA
- Main keyboard: Silenced & Lubed HHKB (Black)
- Main mouse: Logitech G403
- Favorite switch: Topre 45/55g Silenced; Various Alps; IBM Model F
- DT Pro Member: 0038
Regarding painting the metal case of an F-107, what are some thoughts on the relative merits of DIY spray painting vs commercial powder coating?
-
- Location: UK
- Main keyboard: Filco ZERO green alps, Model F 122 Terminal
- Main mouse: Ducky Secret / Roller Mouse Pro 1
- Favorite switch: MX Mount Topre / Model F Buckling
- DT Pro Member: 0167
DIY is cheap and quick to do , professional paint jobs are just that professional they look way better
- pyrelink
- Location: USA
- Main keyboard: HHKB 2
- Main mouse: CST L-Trac
- Favorite switch: Capacitive Buckling Spring
- DT Pro Member: -
I don't know. I have done quite a lot of painting of things, even keyboards for that matter. If you are patient and follow some basic steps, you can get a really great looking result. My biggest concern with attempting to paint it myself, is the prepwork. The case is going to be a total bitch to manually sand (even with a power sander), and I don't have or really know anything about sand blasting. Prep work is everything when painting, and I doubt I have the ability to do a great job with that.
The second main reason is that I sorta look at this case, like my car. I love painting, but there is no way I am coming close to my car with a sheet of sand paper, let alone a $5 can of Rust-Oleum spray paint. A professional painter, could do powder coating, which itself looks and feels way better then anything I could do, and they can also match the exact color I am looking for, do a good sandblasting, and (if they are a decent paint shop) give you a guarantee if your paint starts messing up.
I imagine it will not be cheap, and I wouldn't do this for all of my keyboards, but eventually if I can manage to save up a bit of money, I will get it professionally powder coated.
- pyrelink
- Location: USA
- Main keyboard: HHKB 2
- Main mouse: CST L-Trac
- Favorite switch: Capacitive Buckling Spring
- DT Pro Member: -
I realize that this thread has a ton of photos in it already, but I will show no mercy. I will continue to fill this thread with pictures, mobile users and capped bandwidth users be damned
I made great progress the past couple days. I managed to quite easily tackle the replacement foam issue. Based on reading a bunch of threads, I chose what was not only recommended, but would be the cheapest and easiest to obtain. That would be .49 cent sheets of craft foam from the local craft store. I picked up $7 worth, and only used 2 sheets. Overkill at its finest.
I want to start by saying that I did everything manually, with scissors. I have the proper tools somewhere buried in the mess of my workshop, but due to impatience, I did just about this entire process using scissors and a razor blade.
Cutting the foam horizontally was the first step. Getting it to fit into the edges of the barrel plate, was easy. The first thing that I noticed was that being such a huge ass keyboard, the foam that I bought would not reach the last (technically first if looking at it right side up) column of 10 barrels. So I had to cut out a separate block. I taped the felt down to the plate with what I thought would be safe, blue tape. Then I did a coat or 2 of paint onto the plate, leaving wonderful outlines on the foam.
I proceeded to cut out each individual circle. At this point, I was planning on using my drill press to cut out each individual circle. I tried on the first hole, and it tore up the edges of the foam pretty bad, and it also meant I would need to cut out the small notch manually, anyway. The only x-acto knife I had was super dull, so that meant, and like I mentioned, my leather punches were buried, and I had no desire to go dig for them. In the end it took me about an hour exactly to cut out all of those holes. While they don't look pretty, they hold the barrels perfectly, and I didn't manage to screw any of them up.
This part was the most tricky to figure out. I still don't know whether I did this appropriately, but I do know that it works. After installing all the stabilizers in backwards (minus the spacebar) and popping in all of the flippies (including some in the wrong barrels), I needed to find a way to get the PCB onto the plate. The same thread that was fohat mentioned using craft foam, there was also discussion about using clamps for something. To be honest I did not read that entire thread, as carefully as I should. When I got to this step, I knew exactly what they were talking about with the clamps. These are the steps I used to very easily get the plates back together. I don't have any more pictures of this process sadly:
I was impatient with assembly because I was already pretty sure I wanted to repaint the plate with a more drab color, and I wanted to test to see if that foam worked at all, or if I needed to get to work on something totally different.
After assembling all of the keycaps, I noticed that the top and bottom row keys felt insanely sturdy and were surprisingly not all that pingy. The center 3 rows on the other hand felt very "light", they pinged like a piano, and if you wiggled around the "F" key, R, D, G, C, V, R, and T all moved around with it. I also found out that I put a few flippers in the wrong spots for the stabilized keys, and some how I have managed to lose a single barrel+flipper, with no freaking idea where it went!
Opening everything back up, I found exactly what I suspected. There was not enough foam on the middle rows. You can see by the marks left in the top and bottom row, with hardly anything on the middle 3 rows! I have remedied this by cutting out a second piece of foam for the middle 3 rows.
I have also decided to repaint the plate with a nice Walnut color. I am also clear coating the plate, and it is currently drying in a nice spot, and will be curing for 3 days. I will not be reassembling everything until Monday.
I will close this project update with a question. I want to update my key layout on this board. Specifically I would like to lengthen the left shift, possibly do a HHKB style right shift, and extend the enter key. I would also like to replace all of the windowed keys. I want nav keys in the first block of 15, and then turn the block of 20 into a numpad, with something like F1-10 in the block to the far left.
What would be the best way to do that? I was originally thinking about just buying a Unicomp keyset for $30, but there is that whole quality issue there. Would it make sense to just buy and strip a Model M, or does Unicomp have decent enough quality? And what about the special size keys. To do the layout changes I am considering, are there any specific keys, not included in a stock layout that I would have to separately source?
I made great progress the past couple days. I managed to quite easily tackle the replacement foam issue. Based on reading a bunch of threads, I chose what was not only recommended, but would be the cheapest and easiest to obtain. That would be .49 cent sheets of craft foam from the local craft store. I picked up $7 worth, and only used 2 sheets. Overkill at its finest.
I want to start by saying that I did everything manually, with scissors. I have the proper tools somewhere buried in the mess of my workshop, but due to impatience, I did just about this entire process using scissors and a razor blade.
Cutting the foam horizontally was the first step. Getting it to fit into the edges of the barrel plate, was easy. The first thing that I noticed was that being such a huge ass keyboard, the foam that I bought would not reach the last (technically first if looking at it right side up) column of 10 barrels. So I had to cut out a separate block. I taped the felt down to the plate with what I thought would be safe, blue tape. Then I did a coat or 2 of paint onto the plate, leaving wonderful outlines on the foam.
I proceeded to cut out each individual circle. At this point, I was planning on using my drill press to cut out each individual circle. I tried on the first hole, and it tore up the edges of the foam pretty bad, and it also meant I would need to cut out the small notch manually, anyway. The only x-acto knife I had was super dull, so that meant, and like I mentioned, my leather punches were buried, and I had no desire to go dig for them. In the end it took me about an hour exactly to cut out all of those holes. While they don't look pretty, they hold the barrels perfectly, and I didn't manage to screw any of them up.
This part was the most tricky to figure out. I still don't know whether I did this appropriately, but I do know that it works. After installing all the stabilizers in backwards (minus the spacebar) and popping in all of the flippies (including some in the wrong barrels), I needed to find a way to get the PCB onto the plate. The same thread that was fohat mentioned using craft foam, there was also discussion about using clamps for something. To be honest I did not read that entire thread, as carefully as I should. When I got to this step, I knew exactly what they were talking about with the clamps. These are the steps I used to very easily get the plates back together. I don't have any more pictures of this process sadly:
- 1. Lined up the PCB and the barrel plate, and hooked in the side of the barrel plate/PCB with the longer fatter metal tabs.
2. On the side with the smaller thinner metal tabs, I took a pair of needle nose pliers and bent them back from the plate.
3. Using clamps I tightened the PCB and plate together, until the PCB passed the edge of the tab.
4. Then I bend the tab back into place over the PCB using pliers, and do that for all the tabs.
I was impatient with assembly because I was already pretty sure I wanted to repaint the plate with a more drab color, and I wanted to test to see if that foam worked at all, or if I needed to get to work on something totally different.
After assembling all of the keycaps, I noticed that the top and bottom row keys felt insanely sturdy and were surprisingly not all that pingy. The center 3 rows on the other hand felt very "light", they pinged like a piano, and if you wiggled around the "F" key, R, D, G, C, V, R, and T all moved around with it. I also found out that I put a few flippers in the wrong spots for the stabilized keys, and some how I have managed to lose a single barrel+flipper, with no freaking idea where it went!
Opening everything back up, I found exactly what I suspected. There was not enough foam on the middle rows. You can see by the marks left in the top and bottom row, with hardly anything on the middle 3 rows! I have remedied this by cutting out a second piece of foam for the middle 3 rows.
I have also decided to repaint the plate with a nice Walnut color. I am also clear coating the plate, and it is currently drying in a nice spot, and will be curing for 3 days. I will not be reassembling everything until Monday.
I will close this project update with a question. I want to update my key layout on this board. Specifically I would like to lengthen the left shift, possibly do a HHKB style right shift, and extend the enter key. I would also like to replace all of the windowed keys. I want nav keys in the first block of 15, and then turn the block of 20 into a numpad, with something like F1-10 in the block to the far left.
What would be the best way to do that? I was originally thinking about just buying a Unicomp keyset for $30, but there is that whole quality issue there. Would it make sense to just buy and strip a Model M, or does Unicomp have decent enough quality? And what about the special size keys. To do the layout changes I am considering, are there any specific keys, not included in a stock layout that I would have to separately source?
-
- Location: UK
- Main keyboard: Filco ZERO green alps, Model F 122 Terminal
- Main mouse: Ducky Secret / Roller Mouse Pro 1
- Favorite switch: MX Mount Topre / Model F Buckling
- DT Pro Member: 0167
Ahh yeh getting an f back together can be a pain in the arse, the worst by far is the XT as the controller is part of the pcb and you have to put the tab through a hole in the PCB i must have killed 2 3 hammers doing mine , lucky i had over 80 spare! AT and 122 are not as hard as you can put them in place quite easy, i am a bit heavy handed so i usually just line them all up hold it together and then knock 10 types of s**t out of it with a hammer to get it into place and then bend the end tabs over you get the hang of it after a while, but i never EVER want to do an XT again that was horrible.
I like the second paint job looks nice and sturdy.
EDIT, i would get the mods and barrel inserts from unicomp or from a older m if you can, keep your model f letters or....
try to get a bigfoot or XT for the caps as they are very nice i think there are some(bigfoots) available from the seller of awesome !
That will give you number row number pad F1 - F10 and letters. My 122 is basicly that
Model M modifiers where needed XT numberpad, numbers, letters and function keys for the left block PF keys are still from the 122 and a few unicomp bits mainly Print Scroll lock ESC and so on
- 7bit
- Location: Berlin, DE
- Main keyboard: Tipro / IBM 3270 emulator
- Main mouse: Logitech granite for SGI
- Favorite switch: MX Lock
- DT Pro Member: 0001
I plan to use blanks for everything but the alnum keys. Unless they print me a special set.
About mixing keys: I've noticed that the color slightly differs between my Model M 122 key and the blanks I got from unicomp. So it might be better to change them all or use old key caps.
For splitting the right Shift, you need a 1.75 units stepped caps Lock key. Unicomp does not have the tools for the full-touch version.
About the foam cutting:
Can't that be water or lasercut?
I'm serious!
This is an insane work that should be automatised.
- Muirium
- µ
- Location: Edinburgh, Scotland
- Main keyboard: HHKB Type-S with Bluetooth by Hasu
- Main mouse: Apple Magic Mouse
- Favorite switch: Gotta Try 'Em All
- DT Pro Member: µ
Excellent pictures. I'm pleased you've found a good solution with that foam. The crumbly stuff is the bane of Model Fs everywhere! My Kish could use a new lot sometime, once I pluck up the courage to really sort out its dodgy spacebar stab.
I wouldn't mix Unicomp caps with IBM originals. Someone sent me a nice regular ANSI set from them (very nice surprise!) and while they're fine by themselves, the two styles are different enough to clash. I stole caps from my 122 key Model M instead, to get the layout I'm forever showing off:
The HHKB style backspace PD 2 key was already standard on the Kishsaver. I extended left Shift, popped on an ANSI Return, and split Backspace as you can see, all from my Model M. I've even put on Model M style mods since then, which feel great on the Kish. Although the High Hat F style ones look better. Unless you go all out Snoopy:
Those blank Unicomps really are sublime! I'd be really tempted to go perfectly blank, but that might not be so smart on the Dachshund as it is on the 60% Kish.
Andy's right about XTs and Bigfoots being a good source for the other caps you want. Cindy has indeed just got a boatload of Bigfeets, right on cue!
Note that Model Fs and Ms both share one annoying limitation: you can't get an ideal HHKB style right Shift. Those 2.75 units are split the wrong damn way around, alas. The barrels only permit a 1u key on the left and a 1.75u on the right.
-
- Location: UK
- Main keyboard: Filco ZERO green alps, Model F 122 Terminal
- Main mouse: Ducky Secret / Roller Mouse Pro 1
- Favorite switch: MX Mount Topre / Model F Buckling
- DT Pro Member: 0167
All that 62 key needs is a spacebar the length of an XT one and we have the dream layout.
I would not mix caps next to each-other but if they are in a different block say your function block i think its ok,
i would say get an older m before you go to unicomp for the mods.
And i say its again as its so worth it
XT letters on EVERYTHING!
I would not mix caps next to each-other but if they are in a different block say your function block i think its ok,
i would say get an older m before you go to unicomp for the mods.
And i say its again as its so worth it
XT letters on EVERYTHING!
- pyrelink
- Location: USA
- Main keyboard: HHKB 2
- Main mouse: CST L-Trac
- Favorite switch: Capacitive Buckling Spring
- DT Pro Member: -
After cutting both of those mats out, I can't agree more! However I am cheap, impatient, and lazy7bit wrote: ↑This is an insane work that should be automatised.
There are a lot of different materials out there to use. If I were doing this in the future, I would make sure I got a material that was cut to the correct length of this huge board, and I would get it laser cut. I know Wcass has pdf files of the proper barrel placement and all of that for a couple of the Model F boards. Not sure how he made those, but I imagine you could do something like that and get it laser cut nice and clean.
Thanks! The Bigfoot would probably be a good idea to pick up just based on how cheap Cindy is selling them, and for their keys on a future project, but for this 107, the only keys I would really use are the 0-9 numpad keys. All of the current keys on this board (minus all the windowed) are the single piece awesome caps (I assume the same as the XT caps?). I think for the time being, I will look for an older Model M. That should have most of the keys that I need.Muirium wrote: ↑Excellent pictures. I'm pleased you've found a good solution with that foam. The crumbly stuff is the bane of Model Fs everywhere! My Kish could use a new lot sometime, once I pluck up the courage to really sort out its dodgy spacebar stab.
I wouldn't mix Unicomp caps with IBM originals. Someone sent me a nice regular ANSI set from them (very nice surprise!) and while they're fine by themselves, the two styles are different enough to clash. I stole caps from my 122 key Model M instead, to get the layout I'm forever showing off:
The HHKB style backspace PD 2 key was already standard on the Kishsaver. I extended left Shift, popped on an ANSI Return, and split Backspace as you can see, all from my Model M. I've even put on Model M style mods since then, which feel great on the Kish. Although the High Hat F style ones look better. Unless you go all out Snoopy:
Andy's right about XTs and Bigfoots being a good source for the other caps you want. Cindy has indeed just got a boatload of Bigfeets, right on cue!
Note that Model Fs and Ms both share one annoying limitation: you can't get an ideal HHKB style right Shift. Those 2.75 units are split the wrong damn way around, alas. The barrels only permit a 1u key on the left and a 1.75u on the right.
I am not too worried about not getting a HHKB style shift+FN on this board though. While I still like to see the right shift WAY shorter, there are just so many damn keys on this board that it isn't as important as on the Kish. The backspace on the 107 is different then the Kishsaver though. It is one row higher, and has that extra key where the oversized backslash key is, on a modern keyboard. I might just leave backspace alone, and find some sort of interesting use for that key instead... In fact. Would it be possible to use the ISO return key from a 122 key Model M in that spot? I don't generally use ISO, but that might be cool, if it would work!
EDIT:
I agree! The blue just didn't look right on this board at all. And are the Bigfoot/XT caps actually different from the Model F caps? I thought the main difference was the change from the nice single piece caps, to the 2 part (I assume cost saving) caps of the later Model Ms? Or is there another difference in there, that I am missing? I think a big foot might still be a really good idea, for spare parts alone.andrewjoy wrote: ↑I like the second paint job looks nice and sturdy.
i would get the mods and barrel inserts from unicomp or from a older m if you can, keep your model f letters or....
try to get a bigfoot or XT for the caps as they are very nice i think there are some(bigfoots) available from the seller of awesome !
That will give you number row number pad F1 - F10 and letters. My 122 is basicly that
Model M modifiers where needed XT numberpad, numbers, letters and function keys for the left block PF keys are still from the 122 and a few unicomp bits mainly Print Scroll lock ESC and so on
Last edited by pyrelink on 04 Oct 2014, 00:19, edited 1 time in total.
- Muirium
- µ
- Location: Edinburgh, Scotland
- Main keyboard: HHKB Type-S with Bluetooth by Hasu
- Main mouse: Apple Magic Mouse
- Favorite switch: Gotta Try 'Em All
- DT Pro Member: µ
The 60% block of your board is identical to a 62 key Kishsaver. If you mean an ISO Return instead of ANSI, sure, Rindorbrot did that:
But I much prefer ANSI, myself. Those IBM ISO Return caps aren't my kind of style either.
- pyrelink
- Location: USA
- Main keyboard: HHKB 2
- Main mouse: CST L-Trac
- Favorite switch: Capacitive Buckling Spring
- DT Pro Member: -
Yeah, now that I think about it, the main reason I want to change the short return key in the first place, is that I am used to hitting the very left end of the ANSI return. Probably wouldn't make much sense to switch to ISO, now!
- Muirium
- µ
- Location: Edinburgh, Scotland
- Main keyboard: HHKB Type-S with Bluetooth by Hasu
- Main mouse: Apple Magic Mouse
- Favorite switch: Gotta Try 'Em All
- DT Pro Member: µ
I get that when I switch between boards sometimes. ISO Return just ain't for me. Fortunately, little 1.25u ISO left Shift isn't such a problem, Though I do prefer the symmetric look of ANSI's 2.25u there even at the cost of a key.
- Muirium
- µ
- Location: Edinburgh, Scotland
- Main keyboard: HHKB Type-S with Bluetooth by Hasu
- Main mouse: Apple Magic Mouse
- Favorite switch: Gotta Try 'Em All
- DT Pro Member: µ
Looks, in this case. I do like a balanced ANSI keyboard with two near-equal Shifts. I split 2u Backspace for much the same reason! It should really be 1.5u on row 2 anyway, and once split there's symmetry on row 1.
-
- Location: geekhack ergonomics subforum
- Favorite switch: Alps plate spring; clicky SMK
- DT Pro Member: -
Well, the layout is pretty much awful no matter what you do... but that’s what you get when you design something for a specific machine in the 1860s–70s and then never bother to fix it in 150 years.7bit wrote: ↑Can't understand why people unsplit keys, instead of splitting up the 2 remaining splittable keys (Shift and Back Space)!
More specifically, short shift keys are not very useful as shift keys (the ISO left shift and the ANSI right shift are both a substantial reach).
Since the keys on one of these Model Fs can be arbitrarily remapped in firmware, it makes sense to split every key possible and then make a new layout to take advantage of all the keys in the best way possible.. but it’s easier to just match existing standard designs and not think too hard about it.
-
- Location: UK
- Main keyboard: Filco ZERO green alps, Model F 122 Terminal
- Main mouse: Ducky Secret / Roller Mouse Pro 1
- Favorite switch: MX Mount Topre / Model F Buckling
- DT Pro Member: 0167
put a model m cap on a barrel right next to it ( with its top on) if they are a tiny tiny bit shorter they are XT caps but i think all 1 part caps are the same, and awesome ( at least the IBM ones )pyrelink wrote: ↑ (I assume the same as the XT caps?)
- Hypersphere
- Location: USA
- Main keyboard: Silenced & Lubed HHKB (Black)
- Main mouse: Logitech G403
- Favorite switch: Topre 45/55g Silenced; Various Alps; IBM Model F
- DT Pro Member: 0038
@pyrelink: Really appreciate your detailed posts with pics. This is extremely helpful for all of us who are undertaking work on our F-107 keyboards.
Regarding painting the plate, I learned from my work on my XT that you need to follow the recommendations on the Rustoleum can and allow the allotted time for drying between coats, which I think is something like 48 or 72 hours. I found that the best way was to apply several coats with light sanding between coats and allow the specified time between each coat. I used wet sanding followed by a thorough rinse with water and then a wipe-down with 70% (v/v) isopropyl alcohol to remove all traces of sanded paint before applying the next coat.
For my next project, at least for the 107 with its metal case, I think I will look into commercial powder coating. I had not realized that a commercial outfit could do the surface preparation for me -- this is the most tedious part, and yet it is vitally important.