Custom "75%+1" layout with "Danger Zone" Caps & Dyed Gateron MX Tops

User avatar
richfiles

08 Oct 2015, 02:49

Keyboard_DZ_75+1_Top.jpg
Keyboard_DZ_75+1_Top.jpg (411.13 KiB) Viewed 12004 times
Keyboard_DZ_75+1_Side.jpg
Keyboard_DZ_75+1_Side.jpg (436.78 KiB) Viewed 12004 times
***UPDATE***
The keyboard is complete, and I just have some coding left to do! I've been slogging through the TMK firmware, and figuring it out slowly! :mrgreen:

So, I mentioned this layout before, but I figured I'll give it it's own thread, now that I have a nice render of it The completed pictures! Sadly, I shall have to wait a week or two for the switches, a month or more for the plate, and sometime in or after February for the keycaps... The joys of manufacturing and group buys... :roll:

I just purchased the "Danger Zone" keycap set off Massdrop. It's my very first custom key cap set, very first mechanical keyboard, and first time doing a custom keyboard. While I do plan on having a separate number pad I can set aside, and a Kerbal Space Program controller with actual flight instruments built into my desk, I wanted the primary keyboard to be both fully featured and compact. I discovered the 75% layout, and feel it is one of the best layouts out there, but I really wanted to retain a few more keys than a 75% offers.

I decided to do this layout with an extra column of keys, so it has 2 columns of keys to the right of the return and right shift keys, instead of just one column, as a standard 75% board does. This let me do a couple of things:

A: It let me slide the arrow keys over to the right by 1u, thus allowing both a standard sized right shift key, and the ability to use six 1.25u modifiers with a 6.25u or 6.5u spacebar. Alternately, seven modifiers can be used, if the left modifiers are three 1.25u, a 6.25u spacebar, and four 1u modifiers to the right. This is an exceptional degree of modifier row flexibility! I personally chose to use six modifiers, with a 6.25u spacebar, and made one modifier (the one immediately to the left of the spacebar) into a 1.5u modifier, to enhance it's use as a Mac keyboard layout. That was just my preference.

B: Because of the standard key sizes, this custom layout can be populated by most base TKL keycap sets, without having to dip into extra add-on options!

C: This custom layout provides 88 keys, while most 75% layouts only provide 84 keys. This means that you get 1 key more than a standard 87 key TKL, but have a smaller footprint. If a TKL keycap set has no real options to fill in the last 88th key... Great excuse for an artisan key! :thumb:

I used the renders of the Dangerzone keycap set to create a render of what I expect my keyboard to look like. I'm getting the custom plate made via the LeandreN Prototyper group buy http://leandren.bigcartel.com/prototyper-round-1. Invoicing is today, so orders should go out real soon! Like I said, i'm pretty excited! This is my first mechanical keyboard, and I decided to go **big or go home... :p

**compact :lol:

As for the case, I will use the keyboard to bridge my Kerbal Controller and my PC case, which have drastically different styles. The Computer case is a 1939 Philco radio cabinet, with brass accents, a nixie tube clock, and strong art deco stylings. The plate will be anodized blue, to match the keys, but I'll use brass screws on the keyboard to hold it all together. The plate will screw into four wood strips that I will glue into a rectangular ring bordering the perimeter of the plate, and I'll sand the corners round. I'll stain it to match the computer case, and then seal it. The bottom will be a metal plate with rubber feet. I may use brass for the bottom. I think it'll look very nice. I'll use some keys from the Danger Zone key set on the Kerbal Controller to get some style crossover there as well.
PhilcoNixie.jpg
PhilcoNixie.jpg (443.01 KiB) Viewed 13718 times
Internally, I'll hand wire the matrix using the diode leads to connect from switch to switch. I don't know if it's worth it to mess with a Teensy or not. I run a "Hackintosh", basically Mac OS running on stock PC hardware. I have no PS2 ports. Macs tend to just have 6KRO, not NKRO. I'm half tempted to salvage the PC board from my old mac membrane keyboard and recreate the matrix. It WAS a good keyboard, till it lost a game of chicken with a can of pop. :rolleyes: I guess that's something i'd be happy to get advice on. Longtime DIYer, but VERY new to microcontrollers, completely inexperienced with C, and far more comfortable with a soldering iron than code. If i'm just running Mac OS, are there even any NKRO option for me? Is it worth the bother?

I am interested in both opinions on my custom layout, as well as 6KRO/NKRO options and issues on Macs.
Hope you all find this keyboard layout to be interesting!

**FIRST PICS**
Opted to change a few keys later on, but these are indeed the first pics of the completed keyboard!
Keyboard76_DangerZone.jpg
Keyboard76_DangerZone.jpg (777.85 KiB) Viewed 12808 times
Keyboard76_DangerZoneEnd.jpg
Keyboard76_DangerZoneEnd.jpg (527.96 KiB) Viewed 12808 times
Last edited by richfiles on 21 Jul 2016, 03:39, edited 6 times in total.

User avatar
Plasmodium

08 Oct 2015, 09:04

Hey, I'm in the same boat as you - building my first keyboard in the coming months with a nearly-but-not-quite standard layout!

One thing I don't understand, though - if you're not using a Teensy, what will you use? Virtually any controller will require a certain amount of coding, but it's not too difficult from what I can tell (or at least I hope not, as I plan to follow this guide at some point in the next few weeks: http://deskthority.net/workshop-f7/how- ... t7177.html).

That is a fantastic-looking PC case, by the way. A real head-turned for sure!

User avatar
richfiles

08 Oct 2015, 10:38

I was just debating stealing the controller from an actual Apple keyboard. Sure, it's only 6KRO, but it'd be super simple. I'd just have to wire the matrix to match the matrix in the Apple keyboard.

I still don't have a very strong grasp of C coding... As in, I've barely done more than make an LED display and an analog meter output values of a sine wave from a lookup table. Even that was done by modifying bits and pieces of code from online. I'm learning, but I'm a ways off yet.

None of the keys I'll be using are different than any keys on the Mac keyboard I'd salvage teh controller from. The only fault with the mac keyboard, is coroded traces int he membrane from a spill... also it's a membrane! :lol:

And thanks for the compliments! I put a lot of work into that PC case! :D

It used to be about a foot taller too, as it used to be a floor standing model radio! I didn't want it that tall, so I cut it down, taped it and hand cut all the curved parts to the desired length, and then reglued/fastened the top to the bottom half. I left the "character" I kinda like that it's old and beat up! The radio was LONG gone when I found the case, so I used brass mailbox doors to cover the hole where the radio once was. The windows are perfect for the nixie tube clock, and they kept with the art deco theme.

Inside, it has a pair of 10x10 inch (24.5x24.5 cm) pleated air filters, with 8 intake fans and 4 exhaust fans (the intakes pull through the filters, and the exhausts have unrestricted flow) It has a Noctua NH-D14 cooler (cause I don't want water cooling inside a wood case) with 2 fans, and 2 more circulation fans inside, for a total of 16 fans! I built a unity gain voltage follower to power all the fans, so I don't overburden the motherboard fan header drivers, but still get motherboard controlled fan speed regulation. I'm also (not done yet) building optocoupler isolated neon lamp drivers so the power and sleep lamps will be actual neon lamps. Hard drive activity will shown be a dekatron spinner that spins faster with more pulse activity from the HDD indicator. The computer itself is a quad 3.5 GHz i7 (i've been thinking of overclocking it) with 32 GB RAM, and 33 TB of storage... I may have several hard drives... :shock:

I almost bought Datamancer typewriter style keys to go with it, and I might yet do that someday. Danger Zone caught my fancy though, and I felt it'd go nicely with the Kerbal Space Program controller I'm building. The PC case and the controller are on different levels of a two level desk, so they shouldn't clash...

User avatar
Plasmodium

08 Oct 2015, 13:27

Wow. Those are some serious specs. You've definitely put a lot of time and effort into that case! You wouldn't happen to have a build log anywhere, would you?

Have you seen the oak cases for the Pok3r keyboard that are currently on Massdrop? They wouldn't physically fit your board, but something like that would be perfect for the art deco(/slightly steampunk, if I may say so!) theme. I think Danger Zone will go relatively well with it - it's designed to look like old-fashioned aircraft control labels.
I'm not a huge fan of Datamancer, but I think a set of retro-style sculpted SA keys (like Round 5) would look great!

As for the actual controller, it certainly logically makes sense to me that you could solder a matrix of the same type to the old controller, but I'm no expert, so you'll have to wait for someone more knowledgable to weigh in!
The only thing I can think of is that if the matrix has to be identical, then the wiring might have to get a little bit crazy on the right hand side if the keys aren't in the same physical position.

Anyhow, I'm definitely following this build!

User avatar
richfiles

08 Oct 2015, 21:39

No build log, but a bunch of in progress photos that don't have an actual page associated, sitting loose in a folder online.

http://richfiles.solarbotics.net/eb/

Some gems...
AppleIIcKeyboard.jpg
AppleIIcKeyboard.jpg (502.38 KiB) Viewed 13715 times
http://deskthority.net/wiki/Alps_SKCM_Amber
This is an Apple //c keyboard from the rev 3 Extended memory model. This keyboard is significant, in that it uses Alps SKCM Amber (Taxi Yellow) tactile clicky switches. They feel SOOOOO GOOOOOD when they click! It will be made into a portable bluetooth keyboard... It'll use the push to lock switches on the top for power and to toggle the number row between functions and numbers. [Reset] will become [Esc], [` ~] will move where [Esc] is, and I'll steal some Mac modifiers to replace where the [` ~] key was at the bottom. Keeping the Apple keys though... They are classic!
NixieDetail.jpg
NixieDetail.jpg (473.3 KiB) Viewed 13715 times
NixieClockSeconds.jpg
NixieClockSeconds.jpg (696.31 KiB) Viewed 13715 times
Here is the nixie tube clock in detail, and the brass mailbox doors I used. They do open up, so things like the computer's power and reset buttons are hidden away, along with buttons for setting the clock. The clock doesn't use a microcontroller. It's hardware counter, counting the cycles of the AC power from the wall. AC power frequency can fluctuate by minute amounts, but the power company adjusts it to keep it VERY accurate over time. Yet to be installed, is the dekatron "spinner" I mentioned before, which will show off hard drive activity as a spinning ring of neon dots (about 30 positions, with the glow jumping from position to position) in a glass tube.
PhilcoMacPSU.jpg
PhilcoMacPSU.jpg (783.76 KiB) Viewed 13715 times
PhilcoMacFanController.jpg
PhilcoMacFanController.jpg (319.29 KiB) Viewed 13715 times
PhilcoBChassisTestFit.jpg
PhilcoBChassisTestFit.jpg (399.88 KiB) Viewed 13715 times
Here are some of the internals. The PSU vents downward, and pulls air from directly over the GPU/PCI area, blowing it out the bottom of the case. The 8 intake fans are on either side. The back wall of the "speaker grill" is actually set back, and two gaps on either side feed air into the side chambers. Filters sit in the slots between the side chambers and the pair of fan quads. Hard drives are up top, mounted to the side walls. There is room for eight 3.5" hard drives, with some SSDs intended to be mounted on the motherboard chassis. The motherboard chassis hinges open, like an oven door. The circuit board is my fan controller. It is a unity gain voltage follower that duplicated the voltage of the motherboard controlled fan headers, outputting the exact same voltage, but with more available current, so it can drive many more fans. It can read both the CPU and chassis fan speeds, convert PWM CPU fan to voltage controlled, and lets you select from either source for your fan speed control. Done only with operational amplifiers... Nothing digital. It even feeds back the tach signals so the motherboard doesn't panic, and branches them off for further speed monitoring. The chassis itself is a significantly modified stock tower case. I cut it down, bent the metal where it needed to be bent, and made it narrower. The front panel was flipped, making the intake over the hard drives now an exhaust for CPU heat, and the opening for an optical drive now allows the intake fan quad nearest to it to pump air directly over the GPU. There is a small "hump" in that area, where the wood shell extends out further. This is to accommodate 13 inch GPUs. The motherboard seen in ALL these shots is an old Pentium 4 mobo, that I use as a stand in, so I know I'm not drilling somewhere I shouldn't! :D
PhilcoMacRearFinished.jpg
PhilcoMacRearFinished.jpg (613.85 KiB) Viewed 13715 times
PhilcoMacSingle140Grill.jpg
PhilcoMacSingle140Grill.jpg (337.81 KiB) Viewed 13715 times
PhilcoMacDual120Grills.jpg
PhilcoMacDual120Grills.jpg (316.25 KiB) Viewed 13715 times
You can see the two 10x10 inch pleated filters, the motherboard chassis in the center, in the closed position (the key locks it closed). The areas on the side are for exhaust fans. I'll probably eventually paint the steel black. Just haven't gotten around to it yet. That cutout near the top... I left an old label that says "Built to receive Television Sound: The Wireless Way". Back in 1939, TV was rare. It was common to have a radio that could tune the audio, and a television with no speaker that just tuned the image... And yes, TV really is that old! I love the old chrome wire fan grills I salvaged for this case
KerbalCMAllMeters.jpg
KerbalCMAllMeters.jpg (444.54 KiB) Viewed 13715 times
KerbalCM_FDAIdetail.jpg
KerbalCM_FDAIdetail.jpg (644.27 KiB) Viewed 13715 times
KerbalGreenLEDx8.jpg
KerbalGreenLEDx8.jpg (882.06 KiB) Viewed 13715 times
KerbalCMAbort.jpg
KerbalCMAbort.jpg (218.61 KiB) Viewed 13715 times
Some of the goodies I'm planning on using for the Kerbal Space program controller. I'm still in only the VERY early stages of learning C, so I have a long way to go. Fortunately, the driver and Arduino code to make this work is all more or less already written. You just tweak it to your setup. The only truly original code I need to do is for running the FDAI (the navball). I'm focusing on the hardware to drive it first, as software means nothing without the hardware for it to run... Oddball stuff. 115 VAC at 400 Hz is used for both power AND control signals, meaning I have to design high voltage drivers to make it work!
PhilcoBackCover.jpg
PhilcoBackCover.jpg (562.4 KiB) Viewed 13715 times
PhilcoFanSystem.jpg
PhilcoFanSystem.jpg (436.6 KiB) Viewed 13715 times
This was my old configuration. Front is unchanged, but the mobo was mounted horizontally, and I had only a single blower and single filter back then. The chassis pulled out like a drawer, on slider rails. I didn't have room to fit the Noctua NH-D14 cooler (too tall), so I changed it to hinge open like an oven instead. The blower was rather loud at full RPM, though it was PWM controllable. It put out a LOT of air at full speed. The application is feeding oxygenated air to the burner of a commercial boiler system (for heating commercial buildings). As well as it worked, I wanted redundancy over immense power in a single package! That's why I went from one blower to over a dozen fans! :mrgreen:

https://www.youtube.com/watch?v=kfYPexNIfS8
The fan never needed to run at over 50% PWM... But I wanted to see full speed... hear full speed rather!
Still, even at lower RPMs, it was noticeable, and again, the configuration just simply needed to change.
Last edited by richfiles on 23 Dec 2015, 03:36, edited 1 time in total.

User avatar
richfiles

15 Oct 2015, 03:32

I think I have a temporary solution to the problem of finishing the keyboard LONG before the Danger Zone keycaps arrive...

These MX stem adapters from Shapeways: http://www.shapeways.com/product/UAXHBN ... rchResults
CommodoreShapeways.jpg
CommodoreShapeways.jpg (22.29 KiB) Viewed 13720 times
They adapt Commodore 64 Keycaps to MX compatible stems, and only cost a bit over $12. Where oh where might I find Commodore 64 keycaps... :mrgreen:
CommordoreKeyboards.jpg
CommordoreKeyboards.jpg (509.83 KiB) Viewed 13720 times
I may just simply use the old Commodore keys for a keyboard in the future, but if I do, I'll do a PCB or a plate that is designed to work properly with their sizes. Since I have SO many of them to spare, I'll do a full compliment of function keys, but in 3 columns of 4. Since I have made PCBs myself, in the past, and since a homemade PCB is dirt cheap, and since Gateron Blues are also like, what, $25 for 120-ish... I'm thinking I can actually make such a keyboard for just peanuts! $20 for a teensy, $25 for the switches, and about $24 for a pair of the Shapeways adapter sets. I already have PCB material and etching solution, and can drill it myself. If I mount the PC board in the same plastic chassis the existing boar dis mounted in (maybe on top, instead of the bottom, so I can bypass the existing structure, but still use it as a reinforcing structure, and then set the chassis back on the case with standoffs to adjust for the added height of the MX switches on top of the PC board... That might just work! I'd be able to mount it right inside the original C64 "breadbox" case.

And as I said... In the meantime, 24 dollars buys me two sets of the key stem adapters, which should be enough to cover every key on my Danger Zone keyboard, till I actually get the Danger Zone keycaps sometime next year.
Last edited by richfiles on 23 Dec 2015, 03:04, edited 1 time in total.

User avatar
t8c

15 Oct 2015, 10:52

How do the commodore 64 caps feel?

User avatar
richfiles

15 Oct 2015, 15:20

t8c wrote: How do the commodore 64 caps feel?
The caps... Like my childhood! :D
They are a spherical sculpted profile, quite tall.

The Commodore switch... Like typing on a rubber dome... That's dirty and binds easy... :(
The only key that had a stabilizer was the 9u Space.
Every other large key had two stem mounts, but was only mounted by one side! The other side free hangs! :shock:

User avatar
richfiles

18 Oct 2015, 05:16

Alright! FINALLY found the Cherry MX Stabilizers I need for the long keys! I needed plate mounted stabs, but could only find Costars and PCB mounted Cherry. out's INSANE how much WASD's mislabeled Costars SCREW with Google search! Why the heck have they not fixed that? Anyway, it seems (at least in the USA) that Ortholinear Keyboards his the defacto place to go to if you want plate mounted Cherry MX Stabilizers, and want to know exactly what you're getting.

ortholinearkeyboards.com has the Cherry stabs in BOTH PCB and Plate mount variety, and CLEARLY lets you know exactly what you are selecting. Tried the ancient post recommendations of Mouser... For $0.88 vs $1.00... I'll pay the extra at OL for the certainty that I ordered the right thing. Mouser doesn't even have product photos.

I ordered enough plate mount stabs to do 2 full-size boards (basically, my 75%+1 plate, with a number pad on the side) as well as enough PCB mount stabs to do ALL the long keys in the Danger Zone child packs I ordered. I'll probably be using many of those extra keys on my Kerbal controller, and will likely have all those be PCB mounted stabs and switches. $30 worth of stabilizers, for two 75%+1 keyboards, 2 number pads, and a Kerbal controller! :D

I'm glad I like the Danger Zone keycap set so much, cause added all up, THIS IS EXPENSIVE STUFF. O_o
Thankfully, I really only expect to make only three keyboards... My Danger Zone keyboard, my typewriter style keyboard for my retro computer case, and my //c bluetooth keyboard. Thankfully, that last one will be cheap to make. Maybe, since I'll have those Commodore key stem adapters, I might make one retro keyboard, in an actual Commodore case. I'll only be focusing on the Danger Zone keyboard first. I won't worry about the typewriter keys until I build a second PC (for my workshop)

I am also toying with the idea of having my number pad attach to the keyboard with magnets, with contact being made electrically using pogo pins. If I need it, I just click it into place, and the magnets pull it into place. If I don't need it, I just pull the number pad off and set it aside, no cables required.

User avatar
richfiles

28 Oct 2015, 07:27

GateronBlueSwitches.jpg
GateronBlueSwitches.jpg (643.95 KiB) Viewed 13721 times
Woo-hoo! Got my Gateron Blues in the mail! :mrgreen:
I also ordered my Cherry stabs from Ortholinear, but apparently they had a big Massdrop thing, and all their orders are delayed for 3-8 weeks...

...

Waiting for plates... click... click... click... Waiting for stem adapters... click... click... click... Waiting for stabs... click... click... click... Waiting for keycaps... click... click... click... These are good for 20 million cycles... click... click... click... Cool... click... click... click...

Dang things are like infinite bubble wrap! :lol:
Commodore64KeyWash.jpg
Commodore64KeyWash.jpg (312.67 KiB) Viewed 13721 times
So, the Shapeways order for my Commodore 64 key cap to MX stem adapters is placed, and is currently in production. Maybe I'll do a truly custom Commodore 64 keyboard someday, using these Commodore keys, but for now, It's all temporary. I'm very used to US ANSI layout, and all the Commodore symbols are in the "wrong" places to me. I'll be using the 64C keys for Function keys, since they have the differing color (the legends are also printed... The classic brown keys look to be double shot, which is freaking awesome!). I'll use random 1u keys to fill in the various symbols, even if they don't actually match up.

I might pop off a few more to wash, if I think I need them, but in the mean time, I'd gotten all my Commodore keys popped off. Sent 'em all for a swim. Now they're nice and clean and dry, just waiting for my temporary stem adapters, so I can use my keyboard temporarily, till the actual Danger Zone key cap set arrives next February.
Commodore64KeyDry.jpg
Commodore64KeyDry.jpg (620.63 KiB) Viewed 13721 times
click... click... click... :P
Last edited by richfiles on 23 Dec 2015, 03:02, edited 2 times in total.

User avatar
matt3o
-[°_°]-

28 Oct 2015, 08:54

incredibly fun project! congrats! :D

Samir

03 Nov 2015, 04:06

Some lovely mix of retro, vintage and modern. Can't wait to see more.

It did make my heart cry a bit to see all those c64s like that though. :( that was the first computer that I really used.

Also, there were two variants on the keyboard caps used on the c64 (from what I recall). The ones you have seem like the 'older' style that were doubleshot for sure. I'm not sure about the later ones, but I don't recall them being that spherical.

User avatar
richfiles

03 Nov 2015, 05:13

The browner keys are from the early breadbox style Commodore 64. The lighter ones are from a 64C, which was modeled to Look like the 128. The 128 had cylindrical keycaps, but the 64C retained the spherical keycaps and the overall shape and layout of the breadbox Commodore 64. I am unsure if later revisions of the 64C ever switched to cylindrical caps or not. Given how cheap the C 64's keyboard is... It's almost surprising to see double shots at all, but I could see that being cheaped out on later in the computer's life. The 64C caps are definitely NOT double shots. They are printed keycaps, the cheap kind that you can feel... And see... The double shots on the older keys are only on the top surface legends. The front surface key symbols are still printed... Cheaply, it would seem, as I have some symbols rubbing off... On a part of the key that isn't normally touched! :!: Long fingernails maybe??? :?:

Image

You'll be glad to know I didn't do that to those machines. I have a long standing history of trying to save old machines like these from the trash... It pains me to think of all the stuff that makes it's way to the recycler. Free e-waste recycling programs are my nemesis! :evilgeek: They were saved dead machines. I acquired them off of Craigslist, a bit over half a decade ago. ALMOST got a PET from the guy, but he couldn't find it... I never did hear about that PET. :shock: :cry:

I have working VIC-20, C64, and C128s. My 128 is about 8-10 feet to my right! :mrgreen:
Never owned an Amiga though... :cry:

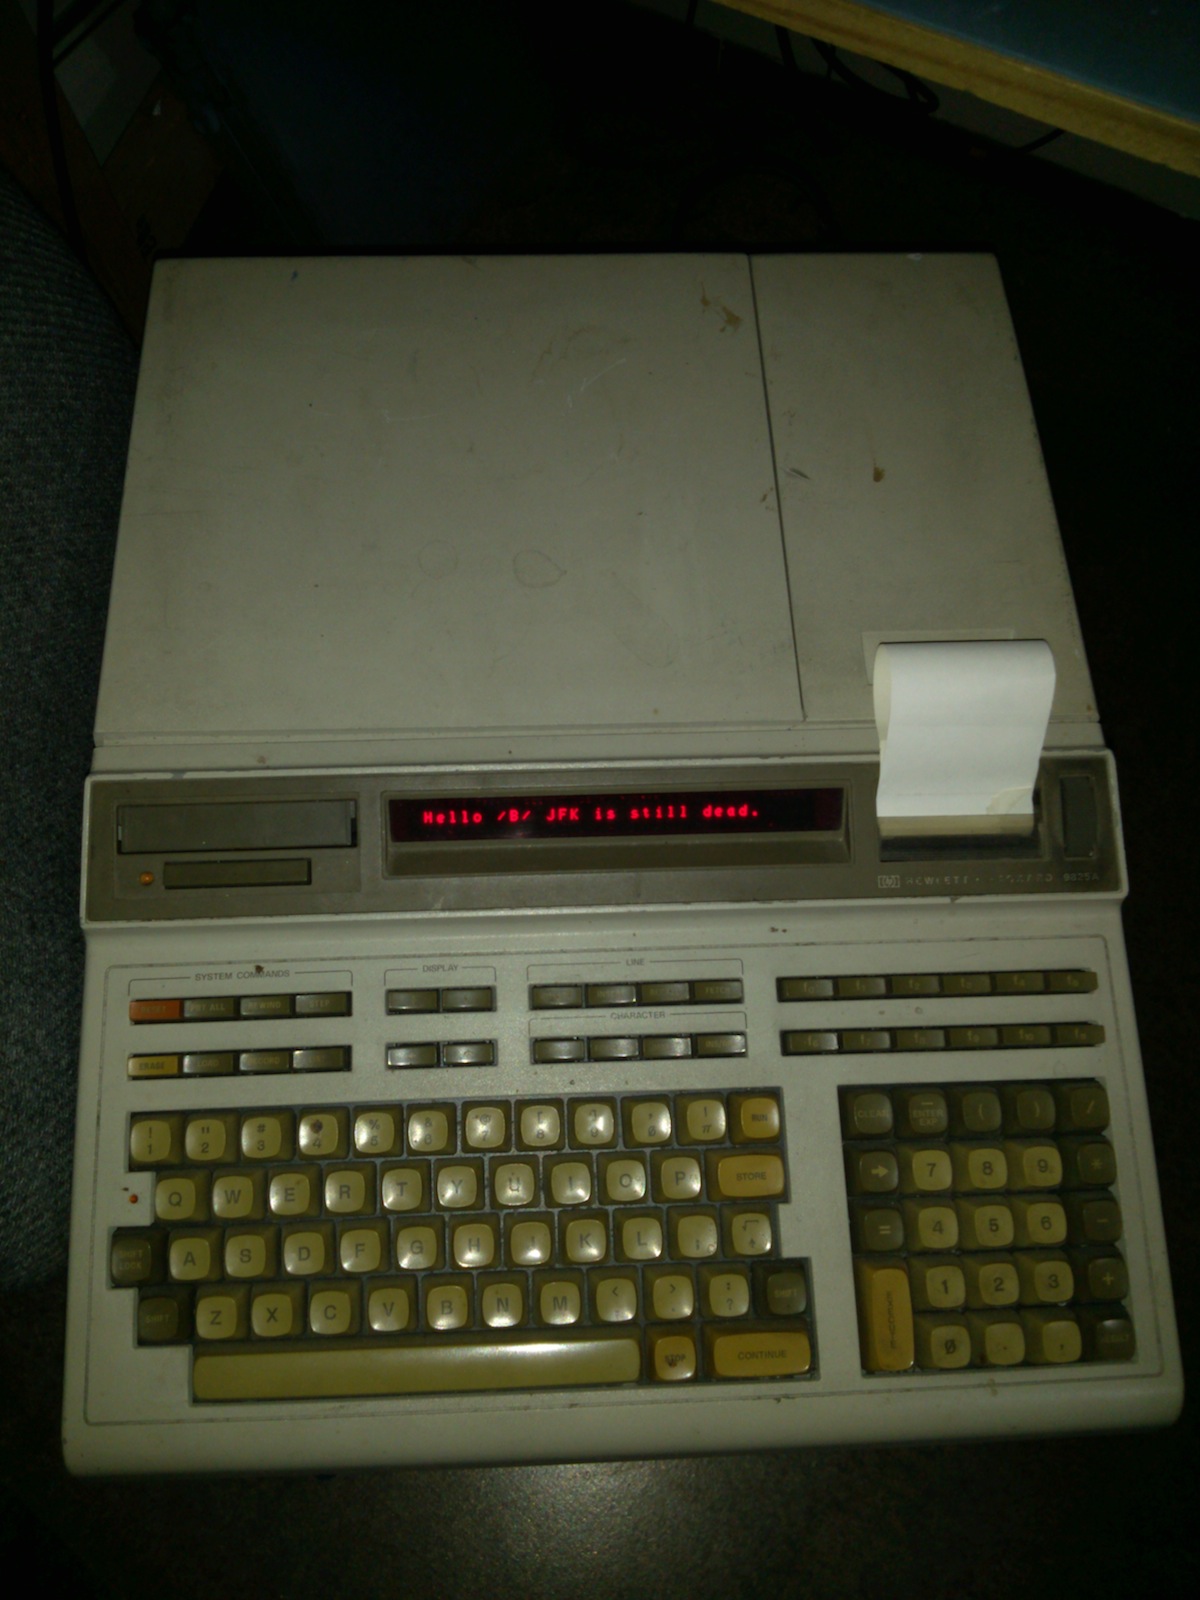
I do own a pair of Apple //e machines, and a plethora of early Macs. I also have a Hewlett Packard HP 9825. NICE old machine. Released in 1976 with a 16-bit custom CPU running at 10 MHz, with 16k, 24k, or 32k of RAM (the first revision in '76 had only 8k and pocket calculator like chicklet keys). :o

Pardon my text... I, uh... I was trolling some conspiracy nuts the day I took that photo... :roll: :lol:
HP9825.jpg
HP9825.jpg (309 KiB) Viewed 13704 times
Spherical double shots. Non-profiled, all keys are on a flat plane, slightly angled. These thing were sold as calculators, because back in those days, computers were still supposed to be hulking beasts... It was easier for an engineer to requisition an expensive "specialty calculator" to aid his job, than it was to requisition a computer. Thus, HP's genius, was to market these as calculators. It LITERALLY cut miles of red tape between getting these past corporate procurement bureaucracy! These cost about $5900 - 10k in the 1970s, depending on configuration! :shock:
Last edited by richfiles on 23 Dec 2015, 02:52, edited 1 time in total.

Samir

03 Nov 2015, 18:50

richfiles wrote: The browner keys are from the early breadbox style Commodore 64. The lighter ones are from a 64C, which was modeled to Look like the 128. The 128 had cylindrical keycaps, but the 64C retained the spherical keycaps and the overall shape and layout of the breadbox Commodore 64. I am unsure if later revisions of the 64C ever switched to cylindrical caps or not. Given how cheap the C 64's keyboard is... It's almost surprising to see double shots at all, but I could see that being cheaped out on later in the computer's life. The 64C caps are definitely NOT double shots. They are printed keycaps, the cheap kind that you can feel... And see... The double shots on the older keys are only on the top surface legends. The front surface key symbols are still printed... Cheaply, it would seem, as I have some symbols rubbing off... On a part of the key that isn't normally touched! :!: Long fingernails maybe??? :?:

Image

You'll be glad to know I didn't do that to those machines. I have a long standing history of trying to save old machines like these from the trash... It pains me to think of all the stuff that makes it's way to the recycler. Free e-waste recycling programs are my nemesis! :evilgeek: They were saved dead machines. I acquired them off of Craigslist, a bit over half a decade ago. ALMOST got a PET from the guy, but he couldn't find it... I never did hear about that PET. :shock: :cry:

I have working VIC-20, C64, and C128s. My 128 is about 8-10 feet to my right! :mrgreen:
Never owned an Amiga though... :cry:

I do own a pair of Apple //e machines, and a plethora of early Macs. I also have a Hewlett Packard HP 9825. NICE old machine. Released in 1976 with a 16-bit custom CPU running at 10 MHz, with 16k, 24k, or 32k of RAM (the first revision in '76 had only 8k and pocket calculator like chicklet keys). :o

Pardon my text... I, uh... I was trolling some conspiracy nuts the day I took that photo... :roll: :lol:
Image

Spherical double shots. Non-profiled, all keys are on a flat plane, slightly angled. These thing were sold as calculators, because back in those days, computers were still supposed to be hulking beasts... It was easier for an engineer to requisition an expensive "specialty calculator" to aid his job, than it was to requisition a computer. Thus, HP's genius, was to market these as calculators. It LITERALLY cut miles of red tape between getting these past corporate procurement bureaucracy! These cost about $5900 - 10k in the 1970s, depending on configuration! :shock:
Yep, I recognized the 64c's colors, but have seen variants of the c64 browns on the various c64s I have. I think I have about 3-4 c64s (they're all over the place right now and I'm working on consolidating them) including our original one with the modified jiffydos rom. Last time we tried to boot that one though, it didn't. :( More restoration to do. Luckily, I think I have the 'diagnostic cheat sheet' that Tenex made available back in the day when they were around, so maybe getting it back up and running won't be so hard. It's nice to remember all those games my brother and I played although he can't play anymore due to his carpel tunnel. :(

That's an awesome collection of commodore stuff! The c64 was the first real computer I spent any serious time on besides our ti99/4a, so it holds a special place for me. I actually still have the books for it and the ti somewhere, so those will be nice to play with again once I consolidate everything. The ti was still working when it was put back in the original box and I was even given a ti99/4 so I've got that somewhere too.

I love keeping the older stuff alive. It's like having a living 'missing link' in evolution where you can see exactly where modern computing sprung from just a few decades ago.

User avatar
richfiles

04 Nov 2015, 01:23

75_KeyboardPlateMftg.jpg
75_KeyboardPlateMftg.jpg (320.79 KiB) Viewed 13702 times
Just got photos from the manufacturer! I'm getting excited! :mrgreen:
Can't wait for it to arrive! I have my temporary Commodore keys ready.
The Shapeways order for the stem adapters shipped today.
I have a teensy OR a donor keyboard. I can use either one as my controller.
I have the nice strips of wood I will use as my middle sandwich layer.
I have over 9000 diodes on a reel (impossibru!). I think I'm good! :roll:

My only snags are the Cherry MX stabilizers from Ortholinear Keyboards. and the bottom plate. OLKB are WAY backed up cause of Massdrop fulfillment. I need to make the bottom plate. I was NOT gonna pay as much as custom plates cost when I know I can do it myself. I'll honestly just trace the plate, when it arrives, onto a sheet of metal, mark it, drill it, and then saw/dremel / file /sand it to my desired shape. Still considering a pice of brass plate. Found a local source.
Last edited by richfiles on 23 Dec 2015, 02:56, edited 1 time in total.

Samir

04 Nov 2015, 05:52

Nice! Its's getting there. 8-)

User avatar
richfiles

04 Nov 2015, 08:34

I greatly regret not getting my number pad plates at the same time... Figured something like that could piggy back off of any old other group buy, and probably possibly even be cheaper... But then I realized, after this GB was already finalized, that I might not get a perfect color match... ever... and regardless of the plates I get, I need to use MY hole patterns and edge sizing and radius to make it fit visually with this plate correctly... Oh well... :|

It REALLY sucks spending as much for a number pad plate as for a whole keyboard plate though... :?

I eventually want to do a keyboard with typewriter keys (like the Datamancer keycap sets), because I will probably have a second computer in my workshop someday, and the Danger Zone may migrate there. Or the Datamancer... I dunno. I actually have the leftover wood pieces of the case I made (I cut nearly a foot out of it), and that's enough to contain a MicroATX mobo, or even a standard ATX, if I top the case off properly. Basically, that computer will also be retro themed. I'll admit that typewriter keys are more for looks than ergonomics, but most workshop use would be mouse movements + viewing datasheets. I'm fine with that. I'll probably do occasional coding, but honestly... I'd almost just as soon do that in the comfort of my living room, and send the files to the workshop!
Last edited by richfiles on 06 Nov 2015, 00:37, edited 1 time in total.

User avatar
richfiles

06 Nov 2015, 00:33

Keyboard_C64_MX.jpg
Keyboard_C64_MX.jpg (387.56 KiB) Viewed 13701 times
Got my Commodore Key to Cherry MX stem adapters from Shapeways today! So, the way these seem to work, is, aside from the obvious straight adapters, the angled adapters are to put stabilizers at the correct distance for the RETURN key, and the narrow posts are to support the overhanging offset stem mount on the weird double stemmed 1.5u keys (Like CTRL, RESTORE, and SHIFT).If I had designed these stem adapters, I think I'd have created a wider adapter for the 1.5u keys that connects to one or both of the stem sockets, and places the MX stem centered. Regardless, It seems like it'll work. I just have to wait for the plate now.
Last edited by richfiles on 23 Dec 2015, 02:57, edited 1 time in total.

Samir

06 Nov 2015, 01:40

Oh that's so cool!

User avatar
richfiles

26 Nov 2015, 08:57

Keyboard75_Stabilizers.jpg
Keyboard75_Stabilizers.jpg (500.26 KiB) Viewed 13709 times
I got my plates today! The blue one is obviously the one I'm using for the Danger Zone key cap set. I got the Cherry MX stabilizers installed... Wow! Those were a real pain! Took quite a while to get the wires bent juuuuust right, so nothing would bind. Space bar took me over an hour to tweak just right! Required the perfect tongue angle! :P
Keyboard75_DyedSample.jpg
Keyboard75_DyedSample.jpg (462.34 KiB) Viewed 13709 times
I've taken the theme a bit further though... I tested one of my Gateron switches, and it turns out that the plastic takes dye VERY nicely! I've now got all the top housings soaking in the dye, so now my MX compatible Gateron Blues, will actually BE blue! :D

I did play around with some sharpies, but I didn't like the look. the left, is obviously the original uncolored switch, the second left is the dyed one (the method I'll be sticking with), and the two on the right are the sharpied ones, using two variations of color.
Keyboard75_DyedMXTops.jpg
Keyboard75_DyedMXTops.jpg (358.32 KiB) Viewed 13709 times
Having experimented with the dye, and finding it stuck nicely, and gave a good color, I strung all the Gateron MX Blue top covers onto a wire, and let them soak. THis is how they all came out! Looking nice! Now to lube everything, and pop them all into place! I was looking at a guide... here, i think, and it mentioned some brands of lube that were suitable. Ended up finding a reel oil for fishing gear. Supposedly, it's safe on plastics, and the first switch hasn't melted yet (though I borked it by assembling the top backwards! Derp! Now I know... :roll:
Keyboard75_FullCompare.jpg
Keyboard75_FullCompare.jpg (739.63 KiB) Viewed 13709 times
Also, a size comparison to a fullsize mechanical Apple Extended Keyboard II. (I am sorry to say, that the yellow is not a white balance issue... It's really that bad! :shock: )
Last edited by richfiles on 23 Dec 2015, 02:47, edited 1 time in total.

User avatar
richfiles

26 Nov 2015, 13:35

Keyboard75_AllSwitches.jpg
Keyboard75_AllSwitches.jpg (833.96 KiB) Viewed 13694 times
And it's dyed, lubed, and assembled!
It's 6:30 AM here. I'm finally about to go to bed, and probably be too tired tomorrow to even think about wiring the matrix! :roll: :lol:
Last edited by richfiles on 23 Dec 2015, 02:48, edited 1 time in total.

User avatar
Plasmodium

26 Nov 2015, 13:53

Nice! Yours is going so much faster than mine - still haven't got my plates back from my local FabLab, so I'm thinking of taking it to my university's engineering workshop instead...

Suffice to say it's looking really good! I was sceptical about the blue at first, but I think it might work! Is the plan still to go with the Danger Zone caps, or have you switched to the Commodore ones now?

User avatar
richfiles

26 Nov 2015, 14:31

Danger Zone for sure... 8-) they just won't ship till February. :cry:

The only reason for the Commodore keys, is so I don't spend the next 3 months sobbing pathetically into my rubber dome keyboard, as I stare at my capless mechanical! :P

It also goes so much faster when you forget about the little things, like eating and sleeping, till you reach a milestone. :roll: :D

User avatar
richfiles

23 Dec 2015, 02:42

Keyboard75MatrixDiodeRows.jpg
Keyboard75MatrixDiodeRows.jpg (385.72 KiB) Viewed 13697 times
Wired the rows and diodes last night. Only had to use a couple inches of wire, to bridge the gap between the space bar. Formed each diode to make the actual horizontal row connections. The current layout would be a simple 6x17 matrix. There are enough unused interconnections that I could honestly optimize the matrix, if I wanted to.
Keyboard75MatrixShaved.jpg
Keyboard75MatrixShaved.jpg (131.59 KiB) Viewed 13697 times
I shaved the plunger caps, and trimmed the switch pins and stabilizing pegs on the front row. The keyboard will be set at an angle, and by trimming the front row of switches as low as possible, the idea is to allow the bottom plate to sit as physically close to the front edge of the top plate as is physically possible
Keyboard75MatrixEdge.jpg
Keyboard75MatrixEdge.jpg (145.35 KiB) Viewed 13697 times
The angle is visible on the side profile. The shaved bottoms of the switches in the front row should help to reduce the overall height of the front edge of the keyboard. I could wire the columns tonight, if I wanted, but quite frankly, I'm a bit tired... Stayed up till 4 AM wiring those diodes into rows.

User avatar
richfiles

23 Dec 2015, 08:29

Another thing... I guess I ultimately decided I liked the flexibility of the Teensy over repurposing the old Mac keyboard controller I had on hand. What I'm curious about, is software for the Teensy 3.1, and the use of port expanders, such as the MCP23018.

My biggest issue right now, is my inexperience with C. Is there even software right now that will run on the Teensy 3.1 and can support port expanders (for my number pad). I'd strongly prefer to not have to wire my matrix out to the external number pad, thus the desire to use the port expander.

This comes back to the question of whether Teensy 3.1 software exists that can also use a port expander. I don't really even know where to start even. I'm most DEFINITELY a hardware guy... Not so much a software guy.

I also noticed that when I search for Teensy 3.1 in the search box, it tells me 3 and 1 were ignored... It actually makes searching for this type of thing a bit... not so straight forward. :|

User avatar
Dan

23 Dec 2015, 13:51

Just dropped by to say that i love this layout and project, for exactly the reasons you laid out in the first post. My first custom will be exactly like this!

/subscribed :)

User avatar
richfiles

24 Dec 2015, 09:29

Keyboard75_Matrix.jpg
Keyboard75_Matrix.jpg (604.49 KiB) Viewed 13613 times
Just finished all the column wiring. I ended up altering the row configuration a bit, to try to optimize the matrix a little. I understand why the standard 75% keyboard conveniently works with 84 keys... It's one of the optimized full matrix layouts. My 75% + 1 requires me to add at least another line to push my matrix passed 84 keys. I ended up using a 14 x 7 matrix, which has 98 key positions, of which I use 88. This uses 21 I/O positions to achieve. To get 7 rows, I bound the top right 7 keys, and bottom right seven keys into a pair of row clusters. The bottom is tied to the actual bottom row, with space and the modifiers. The top 7 key cluster is it's own unique "row" and shares columns 8 through 14. This leaves I/O leftover, which I can use for things like a Caps Lock LED, etc.
Keyboard75_Lacing.jpg
Keyboard75_Lacing.jpg (803.05 KiB) Viewed 13613 times
I'll do another post later on detailing this technique, but it's 2 AM here, and I'm going to bed. In order to secure the longer runs of wiring, I used an old wire binding technique known as "lacing". You take a nylon cord, usually waxed, and tie it off to an origin point. Then you use a simple knot to bind the wire along the run. This is still commonly seen in military, aviation, and space applications, as well as electric motor windings (this is where I learned it). It was far more popular for use in even general equipment, back in the 1970s and earlier, before zip ties were readily available.

What do I use for my lacing cord? Dental floss. That's it. YOu can buy proper waxed nylon, but I find for small jobs like this, dental floss is perfect. Try to avoid minty flavors, if you can find plain waxed. I don't THIMK the minty flavor will cause you problems... It's likely just an aromatic oil that will evaporate over time.

Zip ties (or whatever you call them where you're from, I've heard other names for them, but can't remember any) more or less killed lacing in general consumer goods. Back in the 30s-70s, everything from radios to TVs to calculators often had nicely laced wire looms. Individual wire breakouts were well organized, and quite frankly, there is a special kind of beauty to it... Today we have zip ties. Too bad for zip ties though, I wanted compact cable management in my keyboard that wouldn't interfere with the thickness. That's why I laced my keyboard... And it's kinda cool! :geek:

And, I wouldn't be me if I didn't show off some of the old calculators in my collection that make use of lacing! :mrgreen:
CogitoOpenLow.jpg
CogitoOpenLow.jpg (756.7 KiB) Viewed 13613 times
CogitoInternalLow.jpg
CogitoInternalLow.jpg (639.26 KiB) Viewed 13613 times
Here is my Smith-Corona Marchant (SCM) Cogito 240SR (made in 1965). Bottom pic will give you a few closer details of the wire lacing. Notice the way they break out individual wires from the loom to the power supply to the right. This was a benefit to wire lacing... VERY precise cable management.
Elektronika4_71b.jpg
Elektronika4_71b.jpg (246.34 KiB) Viewed 13613 times
This is my Электроника(Elektronika) 4-71Б, and if you haven't figured out from the name, it was made in the USSR back in 1976. While this angle does a poor job at showing off the lacing, this calculator has some of the nicest and most intricately fine lacing I've seen in my life. You can JUST see the edge of a wire bundle in the front, right where the case is cracked. There are more laced bundles behind the screen. This unit has a badly damaged case, but is perfectly functional! Russians couldn't build a keyboard, PERIOD, but man could they lace up a bundle of wires like pros! :mrgreen:

Anyway, back on topic... I took a lot of pics of the build process. I promise to do a follow up later with some details on the lacing itself. As I said, it's 2 AM... 2:30 AM now.

My keys to making it super simple were:
A: A wire wrap tool, with a tiny slot insulation stripper and the appropriate spool of wire.
B: A good clean soldering iron and good quality solder.
C: Floss. :lol:

There might have been a smidge of patience too. :roll:

User avatar
richfiles

28 Dec 2015, 02:25

So... I'm at a small impasse.

Teensy 3.1 (which I have already) or Teensy 2.0 or 2.0++ (which I would have to order).

There seems to be well established software for the Teensy 2.x devices, and there appear to be good tutorials on using them. On the other hand, it seems that software for the Teensy 3.x devices is somewhat new, and I'm uncertain how easy or difficult it'll be for a software noob like me to get up an running. Here's the thing... I fully intend to have an expansion port on the side of the keyboard to allow me to add a numeric keypad. I already have a nice set of pogo pins for the task, and have figured out, mechanically, how I want it to work. This means that I may potentially have up to a 6x6 matrix in addition to the existing matrix. I've read about port extenders, such as the MCP23017. I could use just a couple of pogos to provide the interface. Again, I'm only just beginning to learn C. I've only ever dealt in BASIC, and that was back in the days of Commodore 64s and TI graphing calculators (and their TI-BASIC variant).

So the question is, do I:

A: Just buy a Teensy 2.x so I can rely on the well established software with good tutorials, and save the Teensy 3.1 for a project with higher processing demands, when I'm far better practiced at coding (such as my FDAI "navball" controller for Kerbal Space Program, which I've constantly hit limitations with, even using an Arduino Mega2560)?

or

B: Just go ahead and solder in the Teensy 3.1 and hope I get it figured out before February, when the Danger Zone key caps are due to arrive... I may really not have needed to mess with the intermediate Commodore keys at the rate this is going... I really only have one more month left, plus a week or so.

User avatar
matt3o
-[°_°]-

28 Dec 2015, 07:56

go for teensy 2, at least you'll have the keyboard up and running in no time :)

User avatar
flabbergast

28 Dec 2015, 10:01

I agree with matt3o, the ARM Teensies (LC and 3.x) code in TMK is very young, and I wouldn't recommend going that way if you're a beginner in C (I have a bit to do with that ARM code, so I know).

Plus for 2.0 there are alternatives to TMK, which don't offer that much functionality, but are usually way simpler to set up (soarer's controller, easyavr). This is useful for debugging (hw vs sw) if nothing else.

Post Reply

Return to “Keyboards”