Codename Hornet

User avatar
philpirj

01 Dec 2012, 17:33

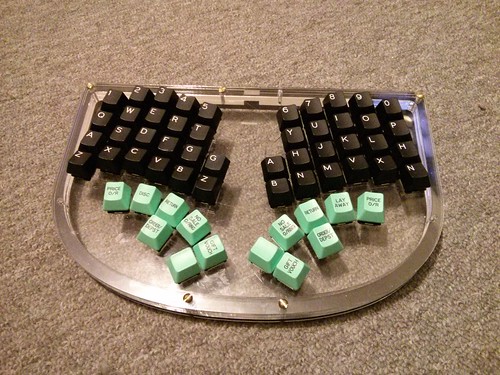
Heavily inspired by BlueCube/ErgoDox.

Goal: Compact ergonomic keyboard for heavy typists, customizable and programmable.
Rationale: None of the keyboards is perfect for me.

Image

Layer modifiers: Shift and Fn.
F1-F12 are on top row.

Any feedback will be appreciated.

Pros: Three rows only, no need to move wrists at all. Tilt. Split. Wristrest. Adjustable pinkypad position. All modifier keys under thumb. WASD (DXCV), HJKL navigation. No layout restrictions (qwerty, dvorak, colemak, workman, neo, bepo etc).

Cons: Alt-Ctrl-Shift-Fx is hard to type. Pinky and thumb usage is heavier than ever. - _ are not on the same key. No insert/delete (can be put on N/M, not sure).

All spare parts are ordered, can't wait to put my hands on it (literally).
Last edited by philpirj on 01 Dec 2012, 18:11, edited 1 time in total.

User avatar
fossala
Elite +1

01 Dec 2012, 17:35

The pinky sections look like they would be aweful.

User avatar
kbdfr
The Tiproman

01 Dec 2012, 17:42

philpirj wrote:[…]Any feedback will be appreciated.

Cons: Three rows only, no need to move wrists at all. Tilt. Split. Wristrest. Adjustable pinkypad position. All modifier keys under thumb. WASD (DXCV), HJKL navigation. No layout restrictions (qwerty, dvorak, colemak, workman, neo, bepo etc).

Pros: Alt-Ctrl-Shift-Fx is hard to type. Pinky and thumb usage is heavier than ever. - _ are not on the same key. No insert/delete (can be put on N/M, not sure). […]
Funny pros and cons :mrgreen:

User avatar
philpirj

01 Dec 2012, 18:11

kbdfr wrote:Funny pros and cons :mrgreen:
Fixed 8)

User avatar
philpirj

01 Dec 2012, 18:18

fossala wrote:The pinky sections look like they would be aweful.
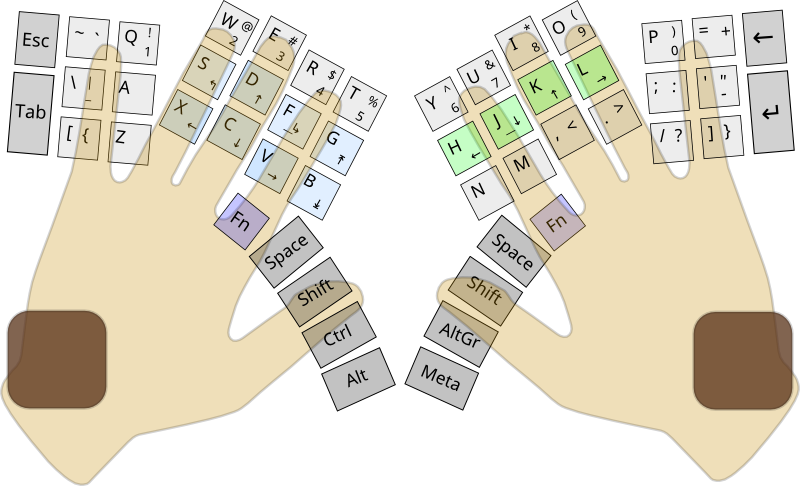
In fact it isn't. What I did is i put my hands on a sheet of paper and put ovals over areas i can reach with my fingers. Not sure if my pinky is dramatically different from other people's, but it can reach a lot.

Print this layout or just put your hand on your screen (don't forget to clean it afterwards) and let me know which keys are hard to reach for your pinky.

User avatar
7bit

01 Dec 2012, 21:14

I get RSI from looking at the layout ...

But nice hand-graphics!!!
:-)

User avatar
philpirj

02 Dec 2012, 06:33

7bit wrote:I get RSI from looking at the layout ...
Why exactly? Is wrist poistion wrong, or any key is too hard to reach? Or just looking at the image too repetitive? ;)

User avatar
Vierax

02 Dec 2012, 11:38

If it can helps you, this is the SVG of the splitted keyboard I actually make http://bepo.fr/wiki/Fichier:Protofauvix1.svg

Sorry for the bépo layout, i did a qwerty one but it's out-of-dated.

User avatar
fossala
Elite +1

02 Dec 2012, 11:57

Now I'm on a PC not a tablet I can go into more detail.
Pinkies look way too far out, I have printed it out and I would have to strech an already week finger to press every pinkie key.
The extra thumb buttons are good because the thumb is strong, it isn't good at movement though, they keys are way to spread out. This could be fixed by having 2 rows of thumb keys using different hight keycaps to reduce the movement.

Findecanor

02 Dec 2012, 14:34

Reminds me a lot of a TRON keyboard, with that pinkie layout and thumb keys in a semicircle.

User avatar
webwit
Wild Duck

02 Dec 2012, 14:37

Interesting project! Keep us posted.

User avatar
7bit

02 Dec 2012, 14:50

philpirj wrote:
7bit wrote:I get RSI from looking at the layout ...
Why exactly? Is wrist poistion wrong, or any key is too hard to reach? Or just looking at the image too repetitive? ;)
The little pinkies must be stretched too far to the sides and must type things they never had to type before ...

User avatar
philpirj

02 Dec 2012, 18:51

@Vierax: Merci for sharing this. Looks a bit different from original bepo, but seems to be convenient to use.

@fossala: I've made some photos of my hand on a printed layout, all pictured with same wrist position.
Two rows for thumbs keys of different keycap height idea definitelty worth considering. Will try that once I get the switches/caps. To odd they are of the same height on Maltron/ErgoDox.

@7bit: In fact, it's easier to reach any of the side keys with my pinkies. And it's not the case with my HHKB and both my 11" laptop's kb, specifically Esc, Backspace, \ and right Fn on HHKB i use to switch layouts. I'm lazy and don't like to move/twist my hands a lot.
Spoiler:
Image
Last edited by philpirj on 03 Dec 2012, 16:11, edited 2 times in total.

User avatar
fossala
Elite +1

02 Dec 2012, 18:56

I can see where you are coming from just all that pinky movement doesn't seem the best idea. When you are making custom boards you should only aim for the best. If it's good for you, great.

jesse

16 Feb 2013, 03:38

Cute. I'm not entirely convinced about how far you think the pinkies can go.

Do think about pushing backspace onto a thumb.

It does look like you got some of the same TRON ideas as me :)

jesse

16 Feb 2013, 05:21

fossala wrote: The extra thumb buttons are good because the thumb is strong, it isn't good at movement though, they keys are way to spread out. This could be fixed by having 2 rows of thumb keys using different hight keycaps to reduce the movement.
I've tried it - It turns out that two rows of thumb keys are _really_ hard for most of my test users to hit.

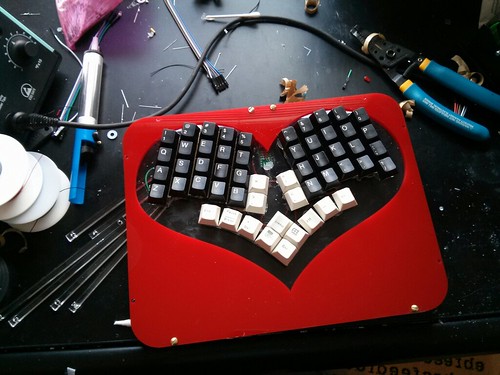
Image
mark 4 keyboard prototype

User avatar
philpirj

19 Feb 2013, 21:06

jesse wrote:Cute. I'm not entirely convinced about how far you think the pinkies can go.

Do think about pushing backspace onto a thumb.

It does look like you got some of the same TRON ideas as me :)
Thanks, Jesse!
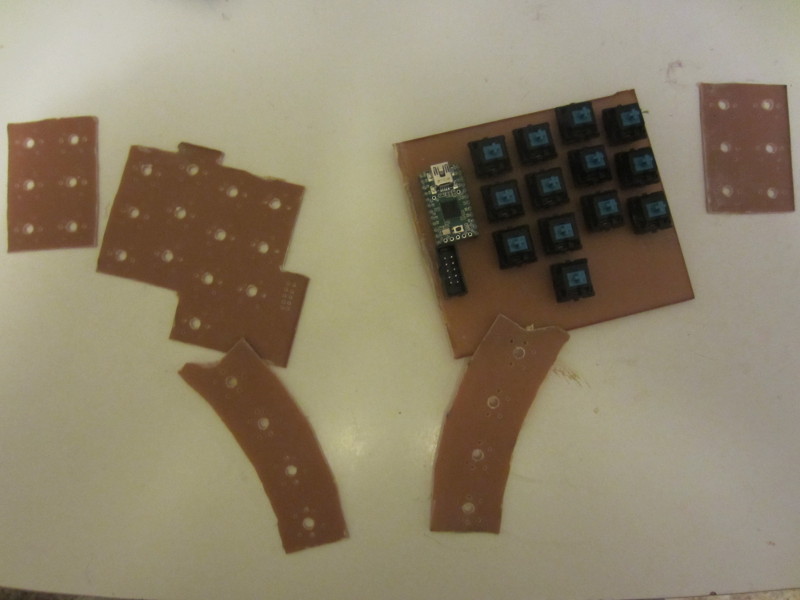
I was thinking a lot and decided to drop the 4 keys on edges.

I have borrowed some good ideas from BlueCube http://deskthority.net/workshop-f7/my-d ... 34-60.html, and combine modifier keys and special action keys (alt+esc, ctrl+tab, shift+space, meta+backspace etc), since it can be distinguished by press type, it's either tap (esc, space etc) or a prolongued press (alt, ctrl etc).

This is my current stage:
Image
Need to solder the rest of the plates, add a hardened backplate under wires and job done.

jesse

20 Feb 2013, 18:02

philpirj wrote:
I have borrowed some good ideas from BlueCube http://deskthority.net/workshop-f7/my-d ... 34-60.html, and combine modifier keys and special action keys (alt+esc, ctrl+tab, shift+space, meta+backspace etc), since it can be distinguished by press type, it's either tap (esc, space etc) or a prolongued press (alt, ctrl etc).
I'm excited to hear how that works for you. I seem to end up pressing modifier keys as I think there's an action I'm going to take...which makes me worried about giving them double-meanings.

I've also been contemplating making modifier keys single-press sticky, to see if that makes using some of the further-spaced-out key combinations easier to hit.
Need to solder the rest of the plates, add a hardened backplate under wires and job done.
Right now, the fastest non-3d-printing prototyping technique I've found is lasercutting keyboard plates out of acrylic. It's pretty easy to get done and not to expensive and quite robust. It may be worth looking at.

User avatar
Icarium

27 Feb 2013, 22:26

jesse: Your board looks pretty great. Have you tried to make the thumb keys in the back higher like on the Kinesis? Should make them easier to hit. :)

jesse

01 Mar 2013, 02:51

Icarium wrote:jesse: Your board looks pretty great. Have you tried to make the thumb keys in the back higher like on the Kinesis? Should make them easier to hit. :)
Yeah. I need to take pictures of the final state of the next version - before the tweaking, it looked like this:

Image

User avatar
philpirj

04 Mar 2013, 21:46

Jesse, thanks for great idea.
Not cutted yet, just a proof of concept.
An acrylic plate i recently bent. Relatively simple to do.
Image
Feels solid.

jesse

13 Mar 2013, 01:33

So. How are the pinky keys working out? I'm kinda tempted to try that next.

User avatar
philpirj

14 Mar 2013, 16:36

jesse: Go my acrylic plate being cut. Switches with caps fit nicely, material is really nice (besides being too electrostatic and collecting all the dust and hairs in the room). Need to desolder my textolite version and solder switches to this plate and bend it. Hopefully will be done by this weekend.
By the way. I disregarded all the advises on putting a 5mm+ spaces between holes and did a 4mm (-0.2mm additional space reduction when laser cutting) space between switches. Caps sit nicely and don't even try to touch each other.
Any advice on soldering the switches inserted in acrylic plate? Should i put a paper so the solder doesn't drop and melt acryl?

jesse

14 Mar 2013, 17:49

philpirj wrote:jesse: Go my acrylic plate being cut. Switches with caps fit nicely, material is really nice (besides being too electrostatic and collecting all the dust and hairs in the room). Need to desolder my textolite version and solder switches to this plate and bend it. Hopefully will be done by this weekend.
Presumably, you'll bend it before soldering ;)
philpirj wrote: By the way. I disregarded all the advises on putting a 5mm+ spaces between holes and did a 4mm (-0.2mm additional space reduction when laser cutting) space between switches. Caps sit nicely and don't even try to touch each other.
Yeah, I've been using a 4mm spacing and have been quite happy with it. It's at the lower end of the OSHA guidelines, but is still compliant ;)
philpirj wrote: Any advice on soldering the switches inserted in acrylic plate? Should i put a paper so the solder doesn't drop and melt acryl?
That hasn't been a problem for me. I do end up with some drops of solder on the the acrylic, but it's merely ugly. Getting paper into and out of those 4mm channels is going to be a pain, especially after you have a nest of wire on top of em.


What I've been doing lately is clipping the side of the diode that should touch the switch to the length of the lead coming out of the switch and soldering vertically. It eats more vertical space but seems relatively easy to solder, especially with good tweezers.

I switched from soldering the leads on the diodes directly to each other to create the matrix. That turned out to be relatively brittle. Instead, I've been using 30 gauge wire with relatively thin insulation and using a drop of solder to melt away the insulation and solder to the leads. Piers pointed me at using self-fluxing magnet wire as a potentially better option. http://www.bofh.org.uk/2013/03/13/fun-with-solder writes up his experience on that.

Be sure to leave a decent amount of slack in the wire between keys. Otherwise even a little bit of flexing will snap your solder joints.

I've then been soldering one of these: https://www.sparkfun.com/products/9194 to each row and each column and connecting those to the Teensy.

The acrylic plate won't hold switches in place very well by itself. Pulling a keycap, even with the best technique, _will_ rip out a switch occasionally. Initially, I tried using superglue to bond switches in place. That mostly works, but enough sneaks into the switches that they develop an uncomfortable scratchy feel. Lately, I've switched to laying down a hotglue matrix once I get the switches in. So far, it's "good, not double-plus amazing" Once I get the 3D printer, I think I'm going to try to make a second plate that goes _over_ the switches to keep them well anchored.
I really need to write this stuff up.
User avatar
philpirj

14 Mar 2013, 23:02

jesse wrote:Presumably, you'll bend it before soldering ;)
Not quite sure yet, but it seems that it won't be easy to solder when plate is bent, because i don't have a hole on the bottom site i can solder though, so i will have to solder though side holes, and since i'm still not so comfortable with soldering, don't have that magic magnet wire etc.

There's another interesting option to soldering:
Image
https://www.google.com/search?tbm=isch& ... инительная Unfortunately image search on Cable Coupling Sleeve doesn't give so many interesting results. The downside here is that it's much harder to disconnect this than to unsolder.
jesse wrote:Piers pointed me at using self-fluxing magnet wire as a potentially better option. http://www.bofh.org.uk/2013/03/13/fun-with-solder writes up his experience on that.
Interesting thing! BTW i'm using the same approach to diodes, i've spent an hour and put them all inside the switches.
jesse wrote:I've then been soldering one of these: https://www.sparkfun.com/products/9194 to each row and each column and connecting those to the Teensy.
My main concern was that i can destroy some Teensy legs, because they seem to be made of some different metal and doesn't solder very well. Definitely worth buying.
jesse wrote:The acrylic plate won't hold switches in place very well by itself. Pulling a keycap, even with the best technique, _will_ rip out a switch occasionally.
I've just tried to pull one cap - switch sits there tight. Probably i'm just lucky and made a good guess on the hole size.
jesse wrote:Initially, I tried using superglue to bond switches in place.
Dangerous experience. I've once superglued by broken flip-flops and it became incredibly hot in seconds. I had to wait couple of minutes before was able to wear it again.
jesse wrote:Once I get the 3D printer, I think I'm going to try to make a second plate that goes _over_ the switches to keep them well anchored.
When I bottom out, there's not much space left between mounting plate and the keycap (probably a bit over 1mm), so not sure how to perform that without modifying the switch.

I think it's a better idea to use Cherry proposed construction of two plates
Image
and use SP-3 PCB support, sized 3.2mm which is about the size between two plates. Image
Need to solder before acrylic vaporizes or use some solder-less connection.
jesse wrote:I really need to write this stuff up.
Keep posting! I've found loads of interesting stuff in your photo album online.

jesse

15 Mar 2013, 00:16

philpirj wrote:
jesse wrote:Once I get the 3D printer, I think I'm going to try to make a second plate that goes _over_ the switches to keep them well anchored.
When I bottom out, there's not much space left between mounting plate and the keycap (probably a bit over 1mm), so not sure how to perform that without modifying the switch.
I have ideas. I'll report back.

Piers Cawley

29 Mar 2013, 07:49

philpirj wrote:
jesse wrote:I've then been soldering one of these: https://www.sparkfun.com/products/9194 to each row and each column and connecting those to the Teensy.
My main concern was that i can destroy some Teensy legs, because they seem to be made of some different metal and doesn't solder very well. Definitely worth buying.
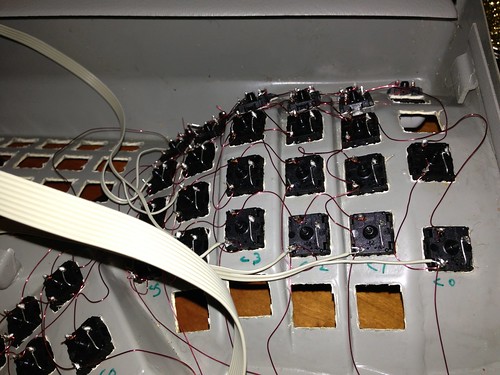
Oof... that looks tediously fiddly. I took a leaf out of the original Maltron wiring and used ribbon cable crimped female terminals going into socket housings like this: http://proto-pic.co.uk/0-1-2-54mm-crimp ... n-10-pack/ which make connecting to and from the Teensy about as easy as it's going to get. Here's a photo of how I connected up the ribbon cable to the columns

Image
Ribbon cable FTW! by pdcawley, on Flickr

I'm feeling slightly foolish for not writing up (and photographing) the Teensy end of the cable.

Piers Cawley

29 Mar 2013, 07:52

Sorry... meant to add... the pins on your teensy are made of copper and will solder perfectly happily if that's what you decide to do, but unless you're mounting it directly on a PCB and solderinging it in place through the holes, you're much, much, much better off with crimp sockets. Point to point wiring directly to the pins is just asking for a nightmare of shorted connections if you ask me.

User avatar
philpirj

06 Apr 2013, 19:14

Quick update: got version two of my acrylic plate, i've shifted thumb keys a bit and made holes a bit smaller (there were gaps and switch was able to move horizontally). Besides that i broke one half of my version one plate while putting the caps on switches (thanks god before i soldered everything!). There's a major wtf i experienced with version two: switches didn't snap tight and it is possible to take them out with no effort. My first thought was that holes were too small and clips don't have enough space, but it turns out that acrylic plate i've bought has a major thickness error, while i was expecting it to be 1.5mm+-2%, it's about +20% and that prevents the switches to be securely mounted. Good i ordered 4 halves at once and two of them are about 1.5mm, while other two are up to 1.8mm. Beginning to solder.

User avatar
philpirj

14 Apr 2013, 21:29

One half of keyboard and 95% of work done.
Image
Image
Image

Hand(s) on
Image

Post Reply

Return to “Workshop”