KBT Pure firmware/controler

coredumb

11 Dec 2012, 18:34

Hello,

I'm actually a HHKB Pro 2 owner and while i love this keyboard i really wanted to try a cherry switch keyboard.
Also HHKB is pretty limited in terms of customization.

So as i can't type on a bigger sized keyboard anymore, and i wanted to give a try to something else, i bought a Pure.
Thing is, i already dislike how some of the keys are placed on the layout - particularly the Fn key as using an European keymap it should be switched with Alt_r.

Anyway, i found that it was a good start to start hacking on a Teensy... And so i wanted to ask the more knowledgeable people about it and the firmware.
Are the Pure's firmware sources available somewhere? Should i go for a Tensy or a Teensy++? Which opensource firmware one would advise me to start with as a base - Yeah usually easier than to start from scratch :lol: ?


Thanks in advance for your answers,
Coredumb

coredumb

20 Dec 2012, 20:11

So i have received it and controler is apparently a http://www.holtek.com.tw/english/docum/ ... 82k94x.htm chip.
Was looking around the vendor site but not sure if there's an easy way with official tools to reprogram it.

Any advice?

laffindude

21 Dec 2012, 02:10

HT82K94E is one time programmable device. You could try to get a replacement IC and program it youself, but you'd be on your own for the firmware.

coredumb

21 Dec 2012, 08:40

Ok thanks for the info.
I think the first "easy" task would be to rewire some keys, though that wouldn't solve the Fn layout.

relcc

03 Jan 2013, 21:36

Same problem here. Going from HHKB (lite) to Pure -> layout problems. Did you find a solution?

coredumb

05 Jan 2013, 15:07

I ordered a teensy - two actually cause i'll eventually break one :D - and plan to set it up in place of the HT82K94E controller.

Have to gather some more informations, see how i'm gonna detect the Pure Matrix, and hope i don't make the board unusable :D (Which may very well happen as seeing how the actual controller is placed i'll have to cut tracks)

I'll give all information when i start - for now i'm moving house and it doesn't let me do anything on that.

User avatar
mashby

05 Jan 2013, 18:30

So glad you're taking this on and eager to hear about your progress after the move.

Thank you!

coredumb

05 Jan 2013, 19:50

Hope to find time this month to start hacking on this :)

User avatar
urbanus

06 Jan 2013, 06:03

Sounds like an interesting project. Would you like some help?

I've recently done something similar with an old Wyse terminal keyboard, i.e. remove the controller and replace it with a Teensy 2. Wyse terminal keyboards are beautiful old machines, but they're not even close to being PC-compatible. However, now with a Teensy and some firmware I have a rather novel USB keyboard!

I went looking for customisable firmware, but what I found out there wasn't easy to modify. Given some random keyboard and the existing firmware, it simply wasn't obvious what to do next. So I wrote my own, with the main theme being customisability for different types of keyboard. My code is on GitHub: a project called clavis. It's a work in progress: still quite new and the documentation isn't complete.

So if you're interested, we could work together. I can deal with the firmware side and give you advice on what to do with the hardware. What do you think?

coredumb

06 Jan 2013, 13:37

Oh very much appreciated!! I can also code a bit for the firmware part, i'm more worried by the matrix and controler replacement actually.
I'll send you my details by PM if you want. I gues you'd like some HD shots of the board?

JBert

06 Jan 2013, 13:55

I've been messing around with the Poker, a slightly smaller keyboard than the Pure.

I couldn't really replace the controller by a Teensy as the controller's solder traces are very fine, it's very hard to solder loose wires to those traces without making contact with the trace next to it. In the end, I started looking at using the original controller in PS/2 mode and then connecting a Teensy with Soarer's converter to remap all stuff. The newest version has support for Fn keys, so I disconnected the Fn key from the Poker controller and hooked it directly into to the Teensy. The setup works, but building it all into the keyboard is proving to be troublesome - the plastic case has little spare room.

coredumb

06 Jan 2013, 14:06

Yeah i saw that the traces are very thin, the first of my worries actually

User avatar
urbanus

06 Jan 2013, 20:06

coredumb wrote:Oh very much appreciated!! I can also code a bit for the firmware part, i'm more worried by the matrix and controler replacement actually.
You're planning on replacing the matrix as well? Not saying that's a problem -- it's just more work. One good argument in favour is if the existing matrix doesn't feature diodes. In that case reimplementing the matrix is a definite plus, especially if you plan to use the board for gaming.

However the least intrusive approach is to work with the existing matrix, and isolate/remove the existing controller.
coredumb wrote:I'll send you my details by PM if you want. I gues you'd like some HD shots of the board?
Sure, that would be great. I'll PM mine.

User avatar
urbanus

06 Jan 2013, 20:14

JBert wrote:I couldn't really replace the controller by a Teensy as the controller's solder traces are very fine, it's very hard to solder loose wires to those traces without making contact with the trace next to it.
Is the controller surface mounted? If so then yeah, soldering onto that by hand would be very hard. Don't want to go there.

I would suggest a different approach: after analysing the matrix, isolate the controller by cutting its traces. Then when wiring in the Teensy, use hookup wire to connect the pins of the Teensy to the appropriate pin of the first Cherry MX switch in the row/column. That will be a very easy point onto which you can solder.

coredumb

06 Jan 2013, 20:17

Oh no i mean matrix discovery, i don't plan on replacing it :)
As for the soldering, yeah my plan was to cut traces sounds like the easier approch... Also try to move away from the controler where there's more space.

relcc

06 Jan 2013, 23:11

Soldering on the Pure is actually quite easy if you attach wires to the keys directly. The controller can be removed. There is another chip whcih may be a driver for the leds, but as you come from the HHKB you probably dont care about the leds. You even may be able to reuse the usb connector on the Pure.

coredumb

07 Jan 2013, 00:08

Yeah the LEDs will wait :)
As for the connector.... Well i don't mind a bit of relocation

User avatar
urbanus

08 Jan 2013, 12:00

I made some progress today on Clavis. To make the KBT Pure project happen, we need to be able to translate the meaning of the keys depending on whether the "fn" key is pressed. ("fn" is not a USB key sent to the host: it is for the controller's use only, to reinterpret the keys being pressed.)

To that end, I added a feature I call "hacks". It's basically a function pointer you can optionally provide, which gets called any time the keys have changed. In your hack function, you can do things such as check which keys are currently pressed and modify the matrix. This makes the implementation of "fn" easy: if "fn" is pressed, change the "1" key to "F1", "2" to "F2" etc. etc., and when not pressed change them back to their normal meanings.

I'll be interested to see your results when you've analysed the matrix. Then we can start cutting the code! (And traces... and warranty :o ).

User avatar
urbanus

08 Jan 2013, 12:09

coredumb wrote:Yeah the LEDs will wait :)
Out of interest, are we talking about the indicator LEDs or backlighting? If backlighting, how does that work? Teensy provides 5V of course, if that helps. Or is it something more sophisticated (brightness control etc.)?

relcc

08 Jan 2013, 12:22

I have analysed the matrix, merged some rows, modded ther PCB for 2 buttons instead of backspace and added a Teensy and modded the (plastic) case yesterday. I will post my findings, the matrix and pictures later today. I might do some programming on the Teensy this evening.

coredumb

08 Jan 2013, 12:41

Wow excellent!! Show us all that :)
@urbanus i think we were referring to backlighting, though i don't care much about the indicator LEDs.

As i haven't had time to look at the board, i'm really interested by what @relcc modded

relcc

08 Jan 2013, 21:53

Here are some of my findings. I used a multimeter to chart the columns and rows of the PURE PCB. I used (colored) letters for the columns (the ones that are connected directly to the keys), and numbers for the rows (the ones that are connected via a diode).
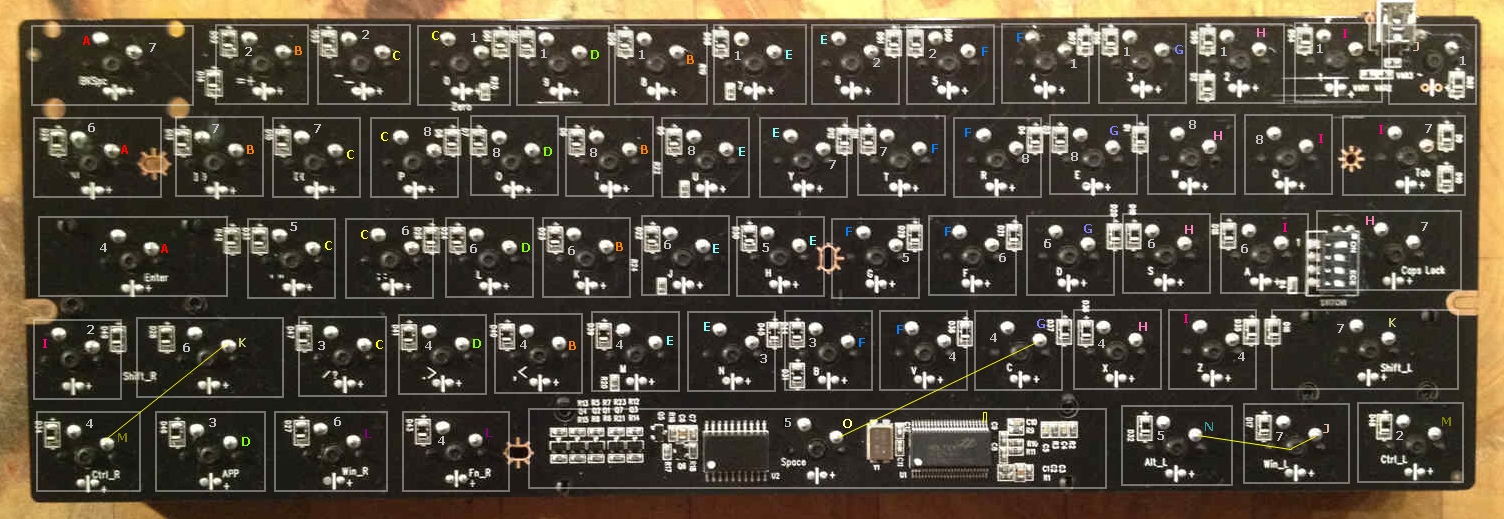
Reverse engineering the matrix of the KBT Pure
pure_re.png (936.11 KiB) Viewed 22406 times
The chip on the right is the controller, the one on the left is probably the led driver. Mosdt likely this is connected using i2c or spi to the driver. For hacking the keyboard using a Teensy I leave the chips in place. Only the Teensy is powered, the existing chips are not. If I cannot scan the keys correctly I would most likely try to remove the controller. If you would like to re-use the led circuit, you would have to remoev the controller and hookup the led driver to the teensy as well.

If I chart the matrix of the above findings, I get the following matrix:
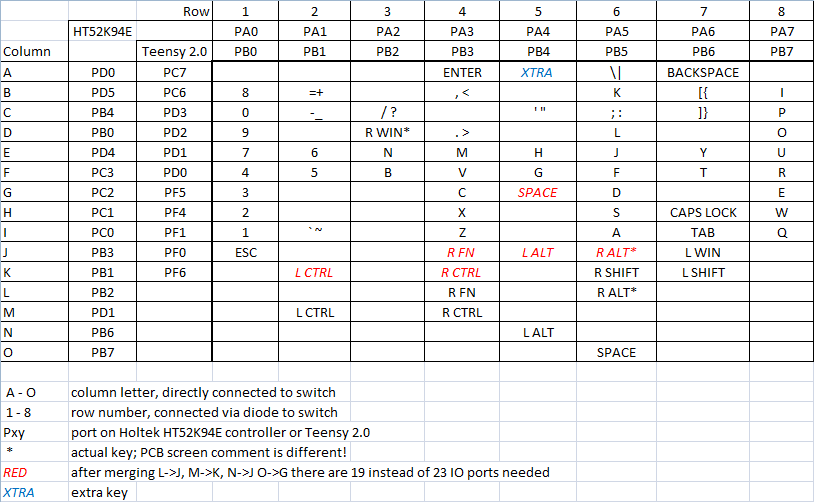
Matrix of the KBT Pure
keymap.png (30.45 KiB) Viewed 22406 times
The connections to the ports of the HT52K94E are also shown, next to the connections to the ports that I used on the Teensy. Of course you are free to connect to other ports.

Some of the rows may be overlapped with others, to decrease the number of rows used. It is not necesarry, as the Teensy has enough ports, but I combined some of the rows to decrease IO used. The hardware mapped keys are shown in red. In the first picture the mapping (combining of rows) is hown with 4 yellow connections. The fourth is between two pins of the controller.

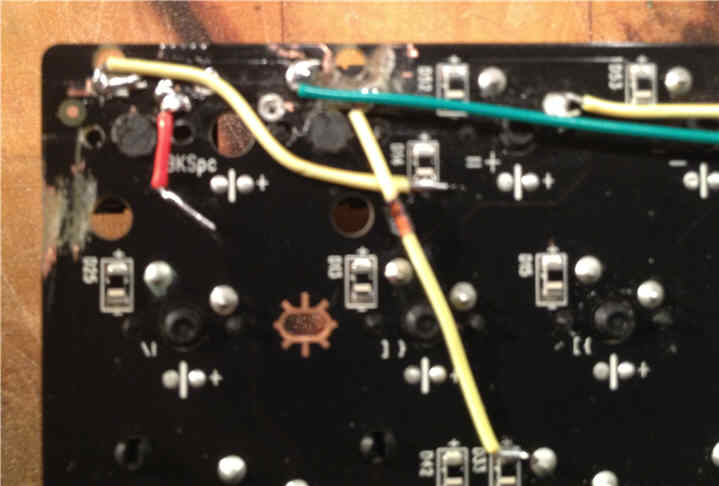
In blue is an extra key I added, as I like to have two keys instead of the backspace, to mimic the layout of the HHKB.
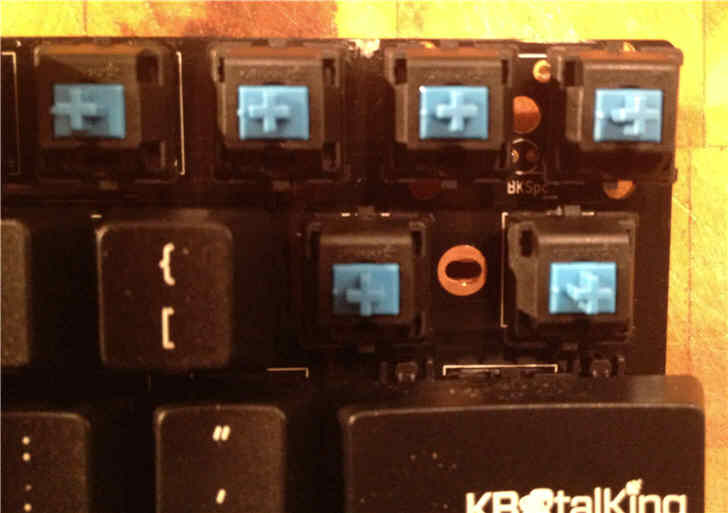
Added key, top view
Added key, top view
IMG_2544.JPG (28.46 KiB) Viewed 22475 times
added key, bottom view
IMG_2545.JPG (28.35 KiB) Viewed 22475 times
After connecting all the rows and columns to the Teensy I get the following result:
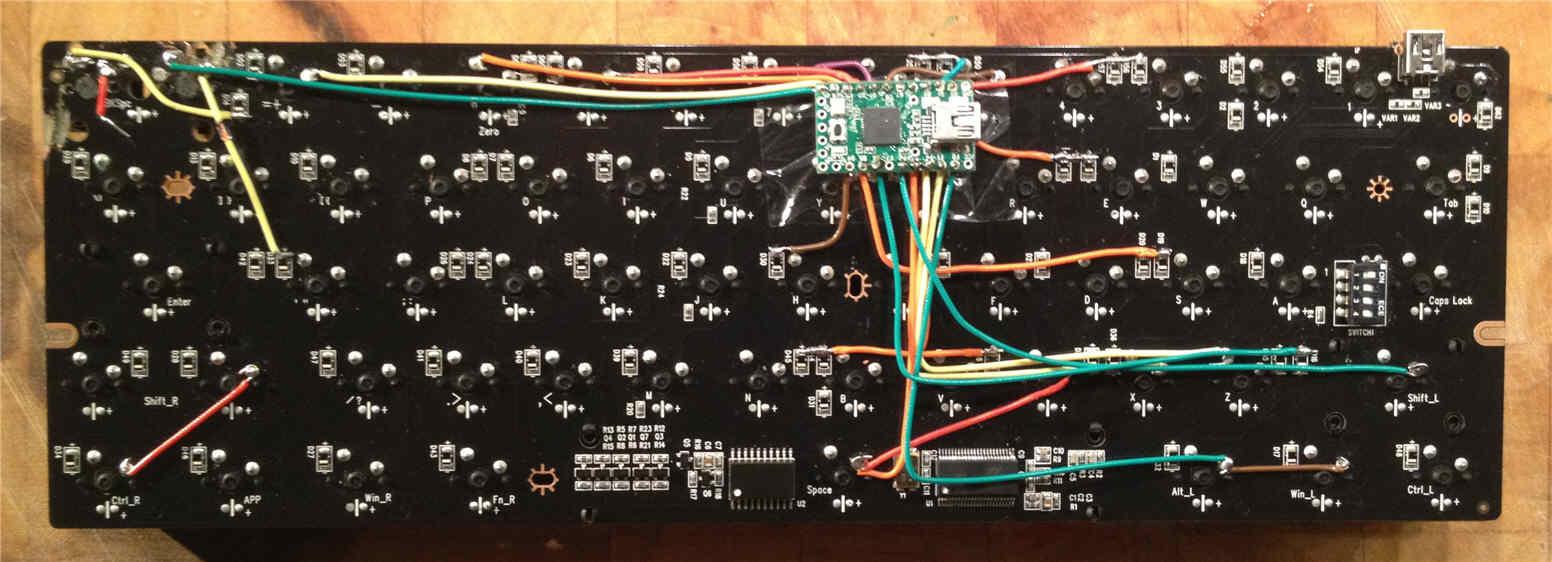
Teensy added
Teensy added
IMG_2543.JPG (92.82 KiB) Viewed 22475 times
Next was some case modding to fit the PCB with Teensy in the (temporay) original case. This is mainly for providing space for the connections, the Teensy itself, a hole to reach the reset button and a hole for another USB cable, since the original USB connector is not used:
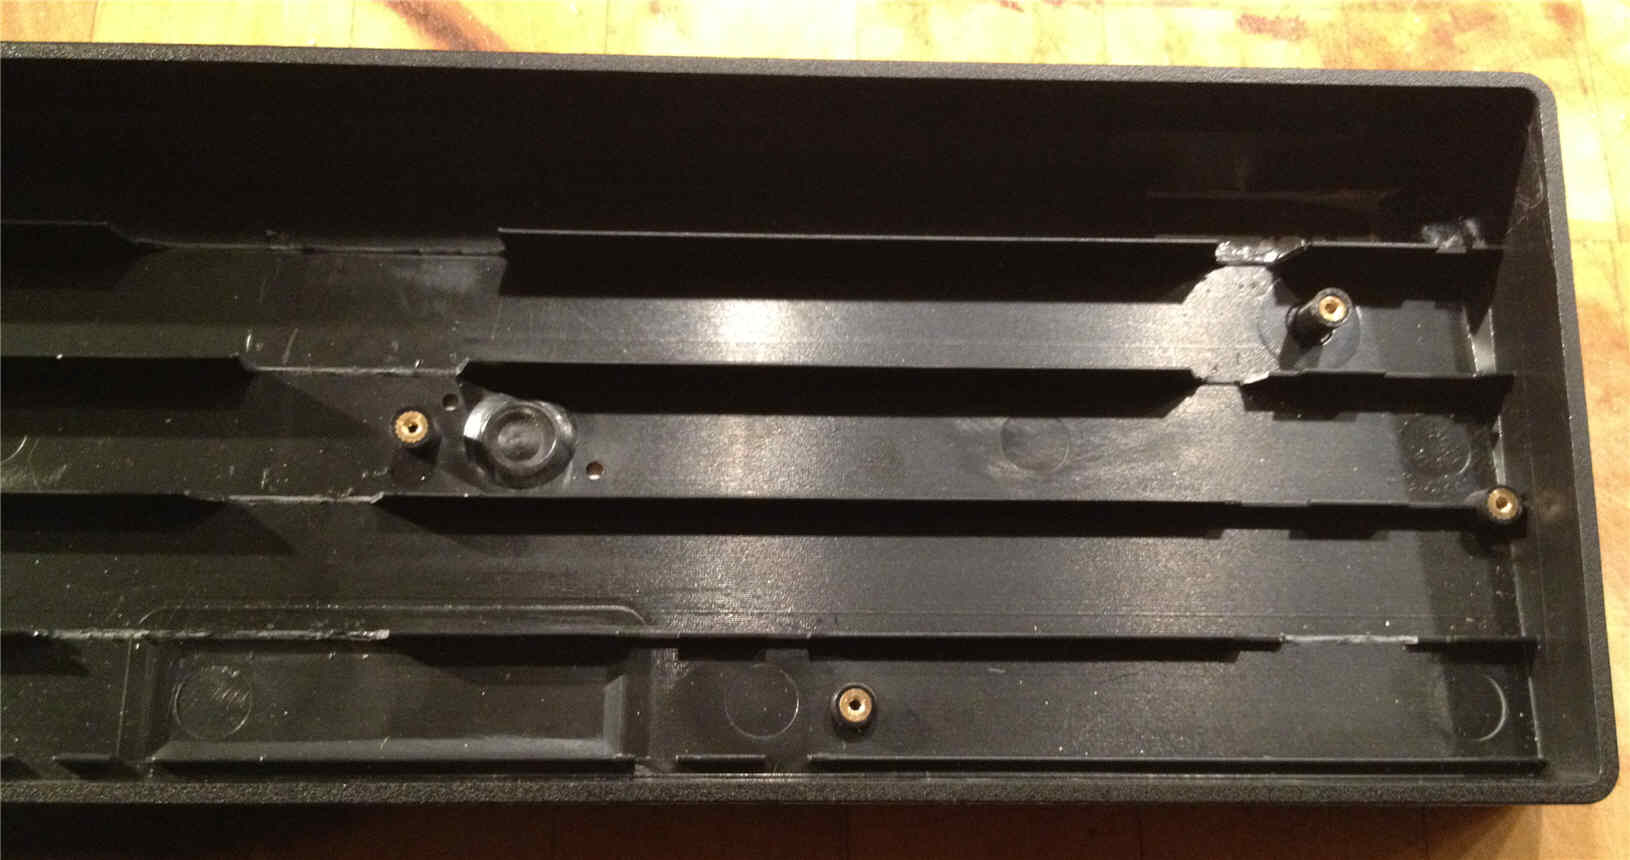
Simple case modding
Simple case modding
IMG_2547.JPG (87.59 KiB) Viewed 22475 times
The finished product looks just like the original KBT Pure, but with two buttons top right. Next is providing software for the Teensy to make the keyboard do what I want, and waiting for my key caps to be delivered.
Last edited by relcc on 10 Jan 2013, 19:25, edited 2 times in total.

coredumb

08 Jan 2013, 22:06

Impressive :O

relcc

10 Jan 2013, 19:28

The keyboard is now fully functional using an adaptation of the tmk_keyboard source files. Still awaiting new keycaps...

relcc

01 Feb 2013, 12:21

The final result with key caps
img_2608.jpg
img_2608.jpg (61.06 KiB) Viewed 22213 times

User avatar
CeeSA

01 Feb 2013, 13:04

ui, looks very nice. What kind of keycaps are they?

relcc

01 Feb 2013, 18:25

Those are wasdkeyboards.com . My own design

User avatar
Gilgam

01 Feb 2013, 21:57

It's a amazing mod and result.
Thanks for sharing the code.

coredumb

02 Feb 2013, 18:33

@relcc Awesome :)
I really need to find some time to start this....

User avatar
mashby

03 Feb 2013, 06:06

relcc wrote:Those are wasdkeyboards.com . My own design
That's funny, I was designing some Dolch Replica/Round 3 style caps on their site just today!

You don't recall what size font you used on the alpha keys do you?

Post Reply

Return to “Keyboards”